3 Day Project : Transforming Our Side Yard
 I’m pretty sure most homeowners have that one weird spot in their yard or outdoor space that isn’t functional or large enough to do much of anything with. Most of the time it houses trash bins, utilities- like an air conditioning unit, sprinkler system, or other necessary eyesores that come with homeownership. For the past two years, we lived with an embarrassing “side yard” I pretended didn’t exist. Although it was in plain sight of our newly renovated outdoor living space, I hoped visitors wouldn’t notice. I’m happy to share our latest project… we teamed up with Lowes and finally addressed the elephant in the room (or rather, backyard) and it made all the difference! Click through to see the transformation, get inspiration for your own odd lawn areas, check out three(!) tutorials, in case you’re planning your own 3-day project this Labor Day.
*This post is sponsored by Lowes. All content, ideas, and words are my own. Thank you for supporting the brands that allow us to create unique content while featuring products we actually use & enjoy!
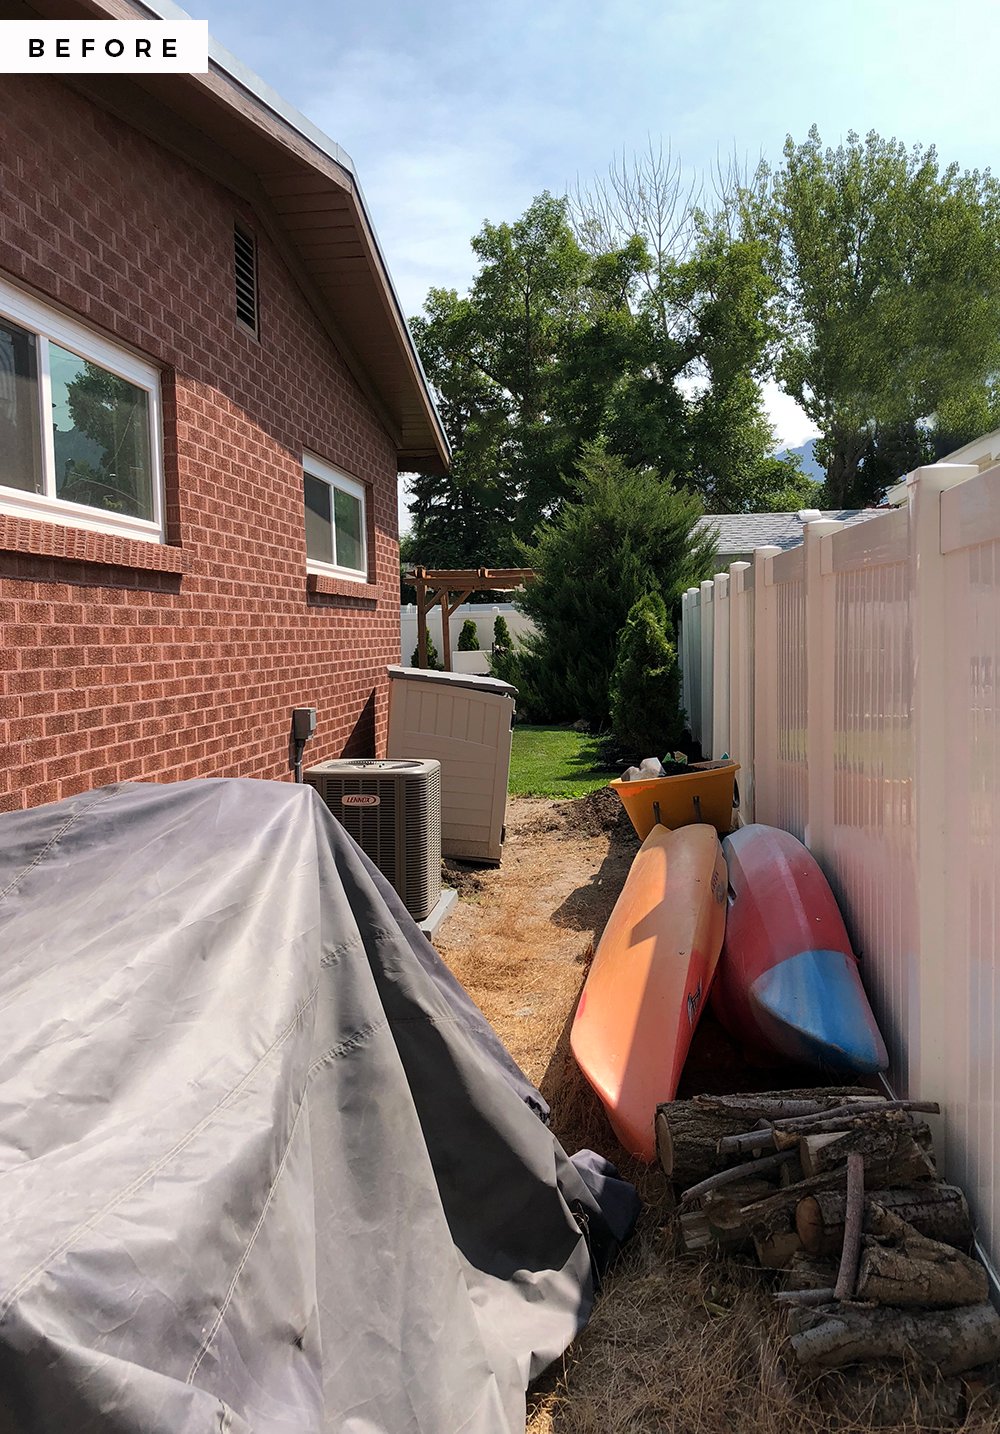
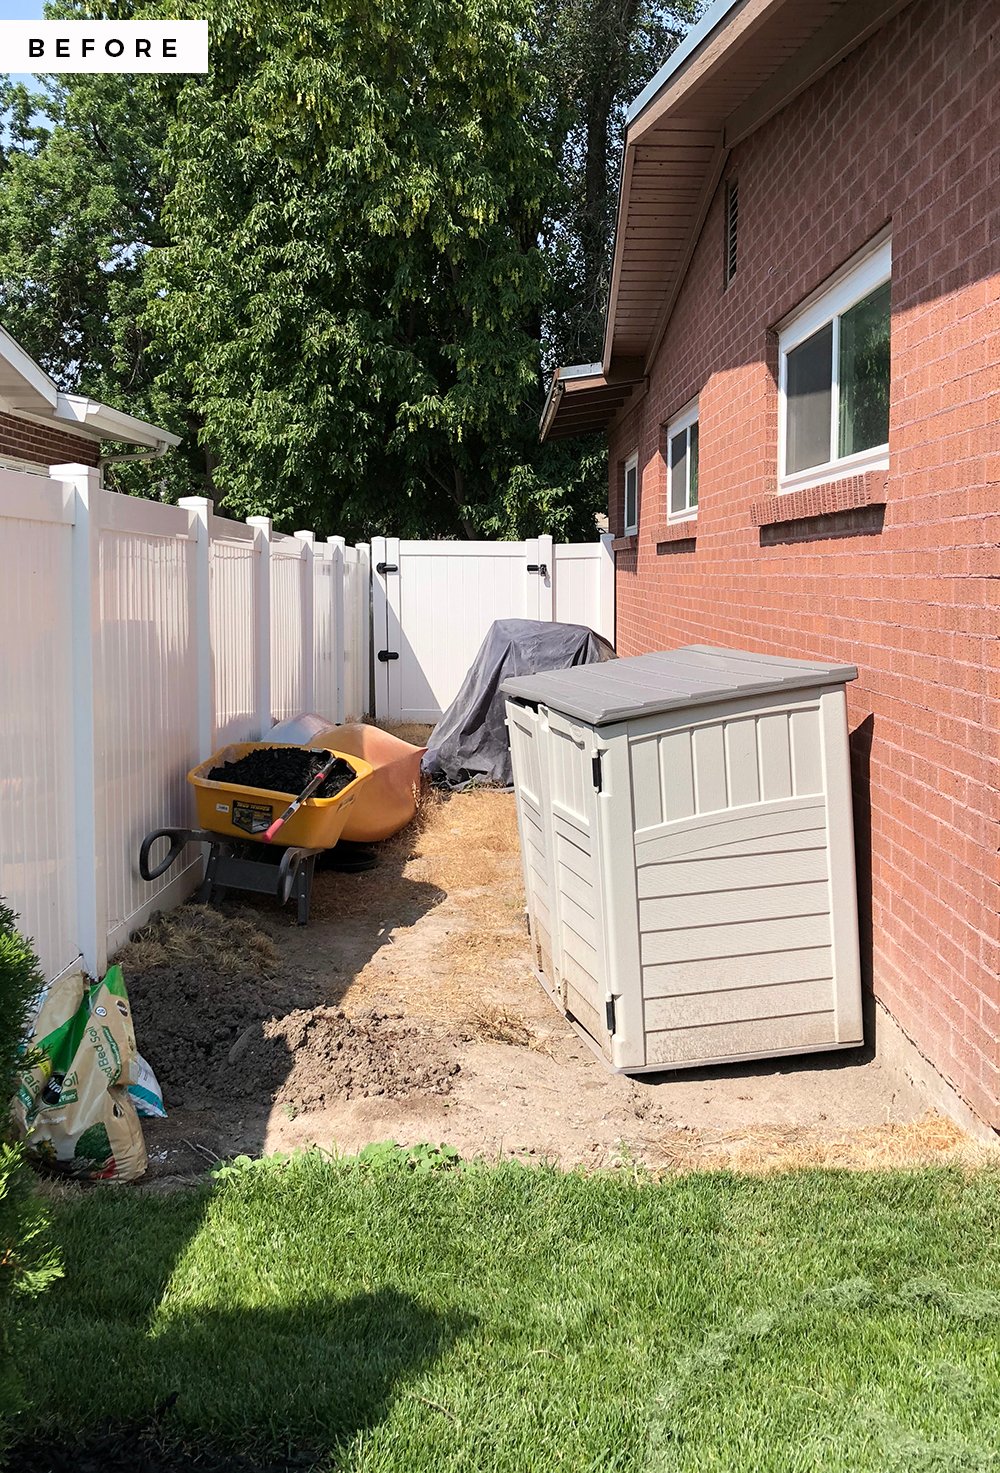 I warned you it was rough. This is a realistic picture of what we were dealing with. As you can see, it’s sort of a straight shot from our beautiful pergola, patio, and outdoor lounge area.
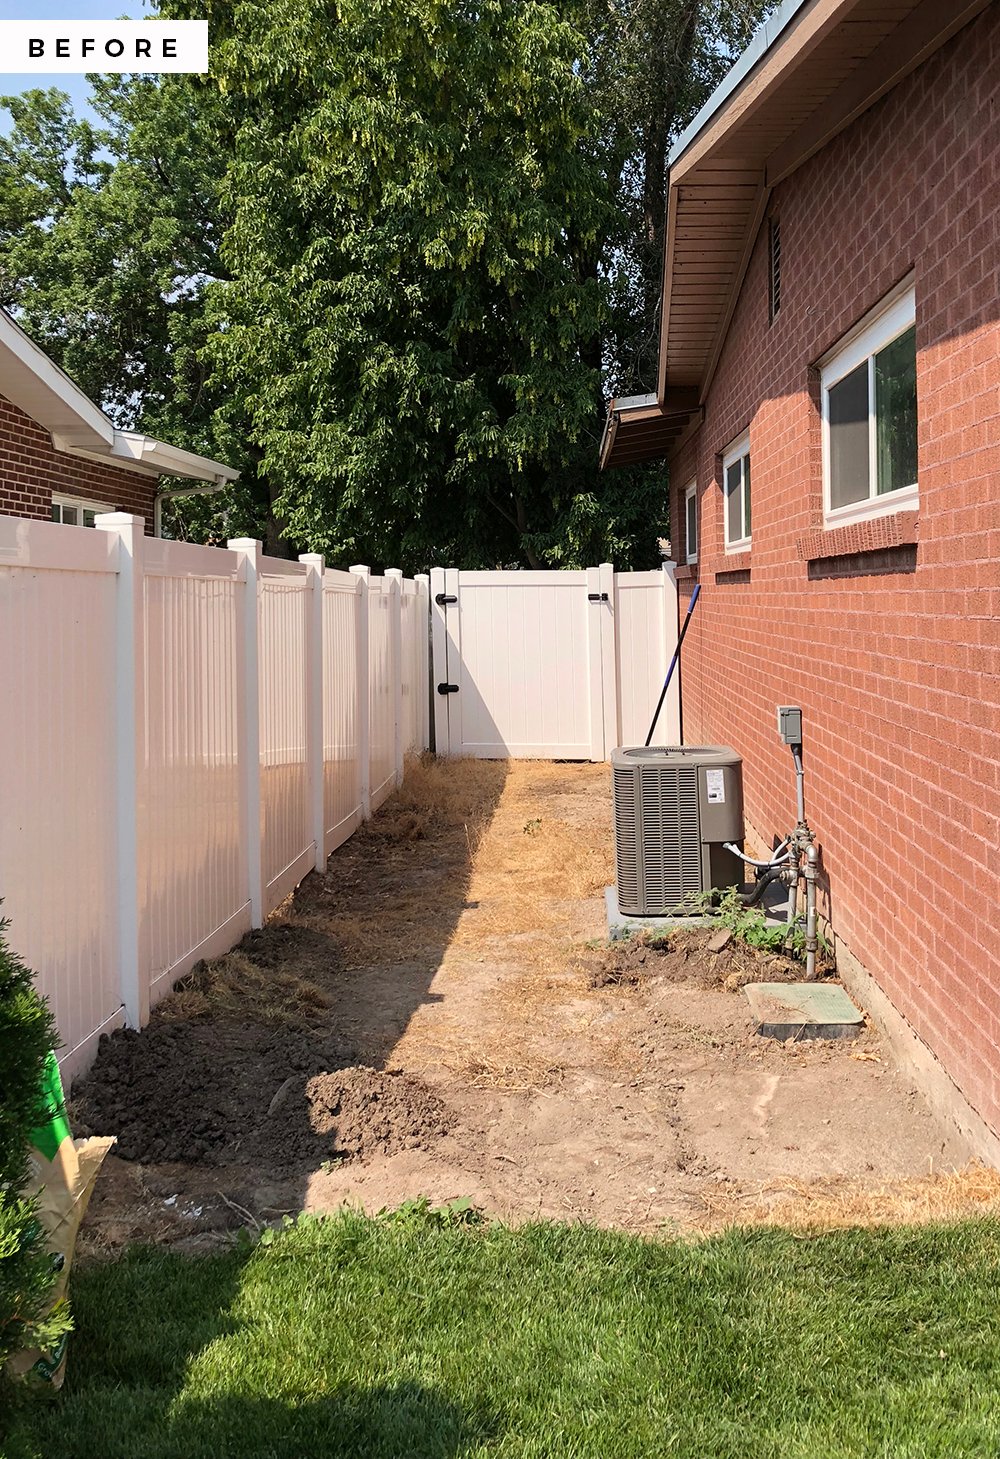
 The first step toward beautifying the area was to empty all of our junk out of the space. After that, it already looked better, but still not great by any stretch of the imagination…
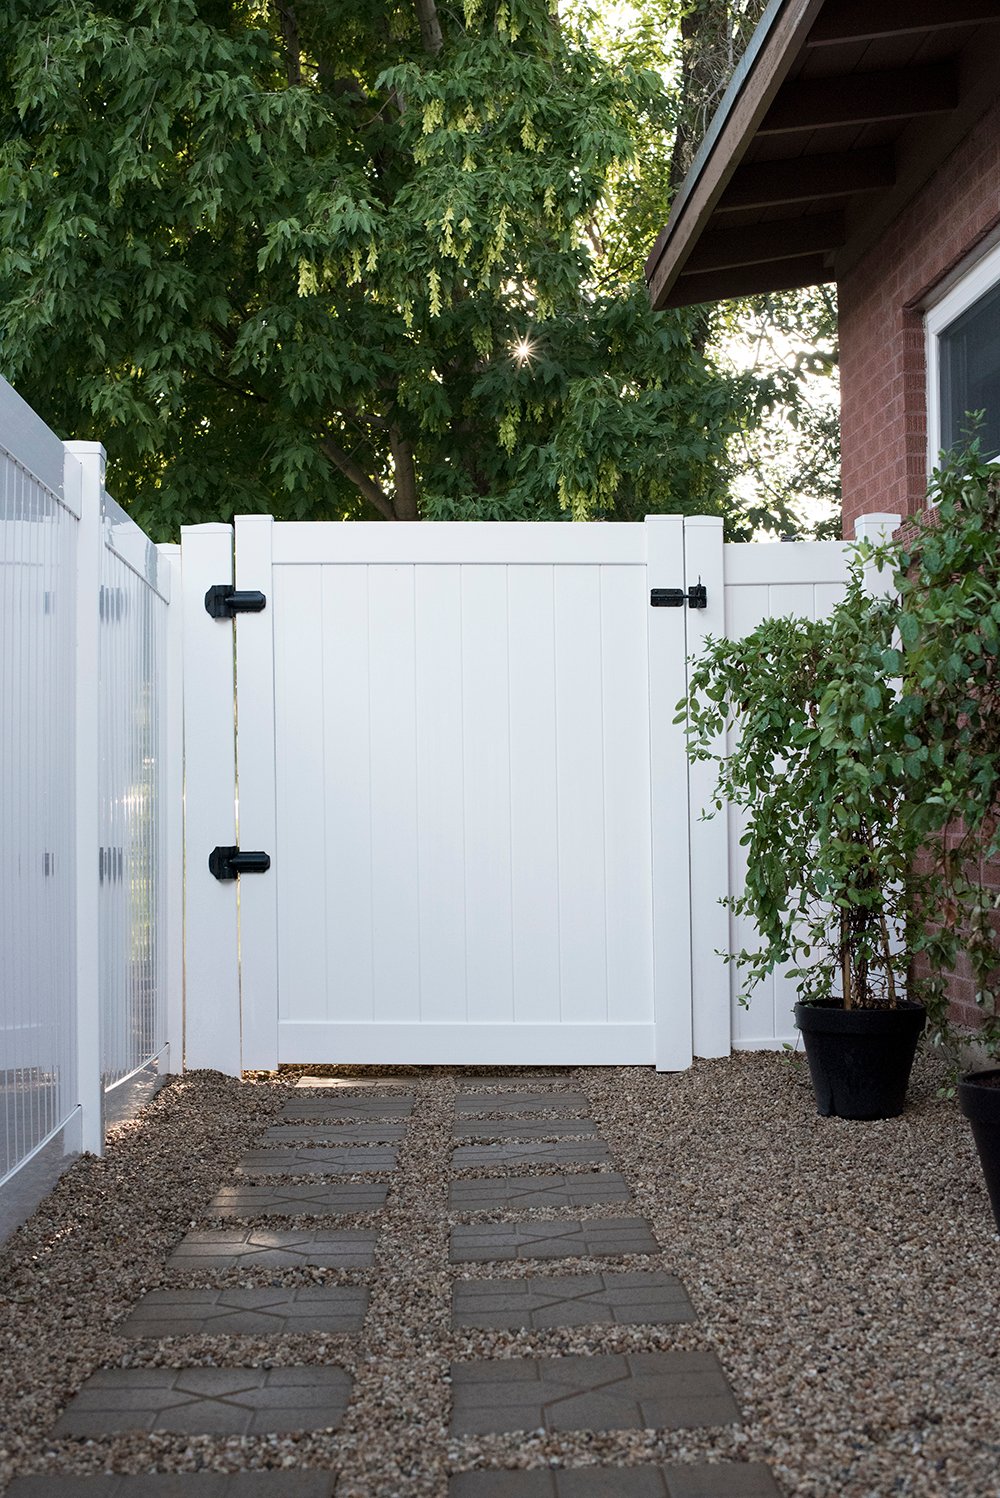
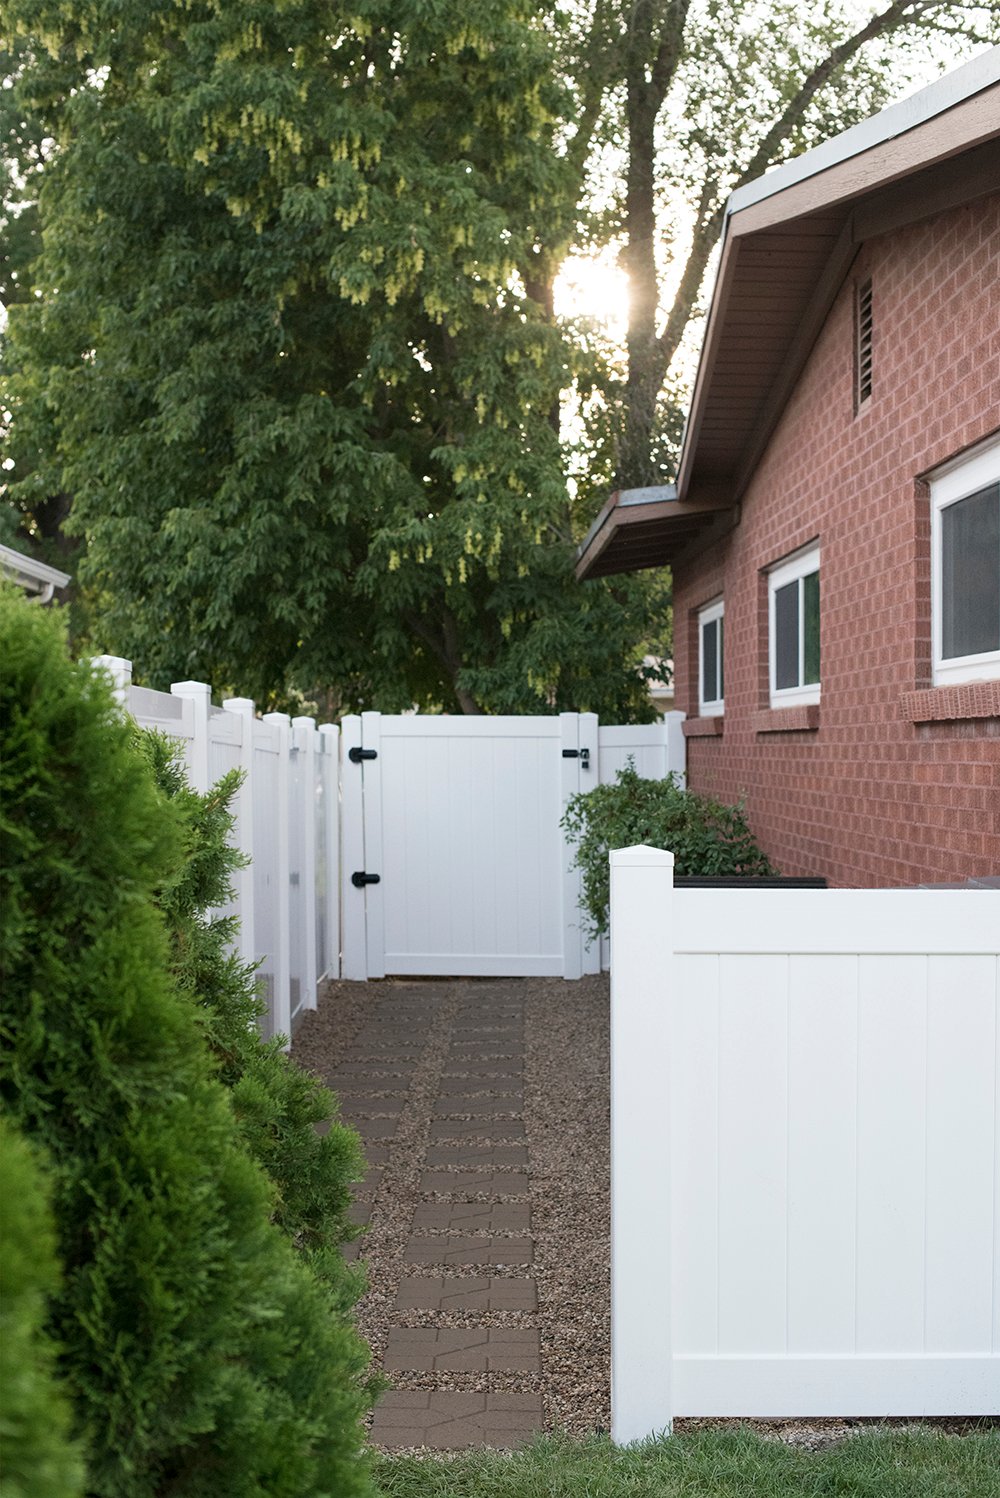
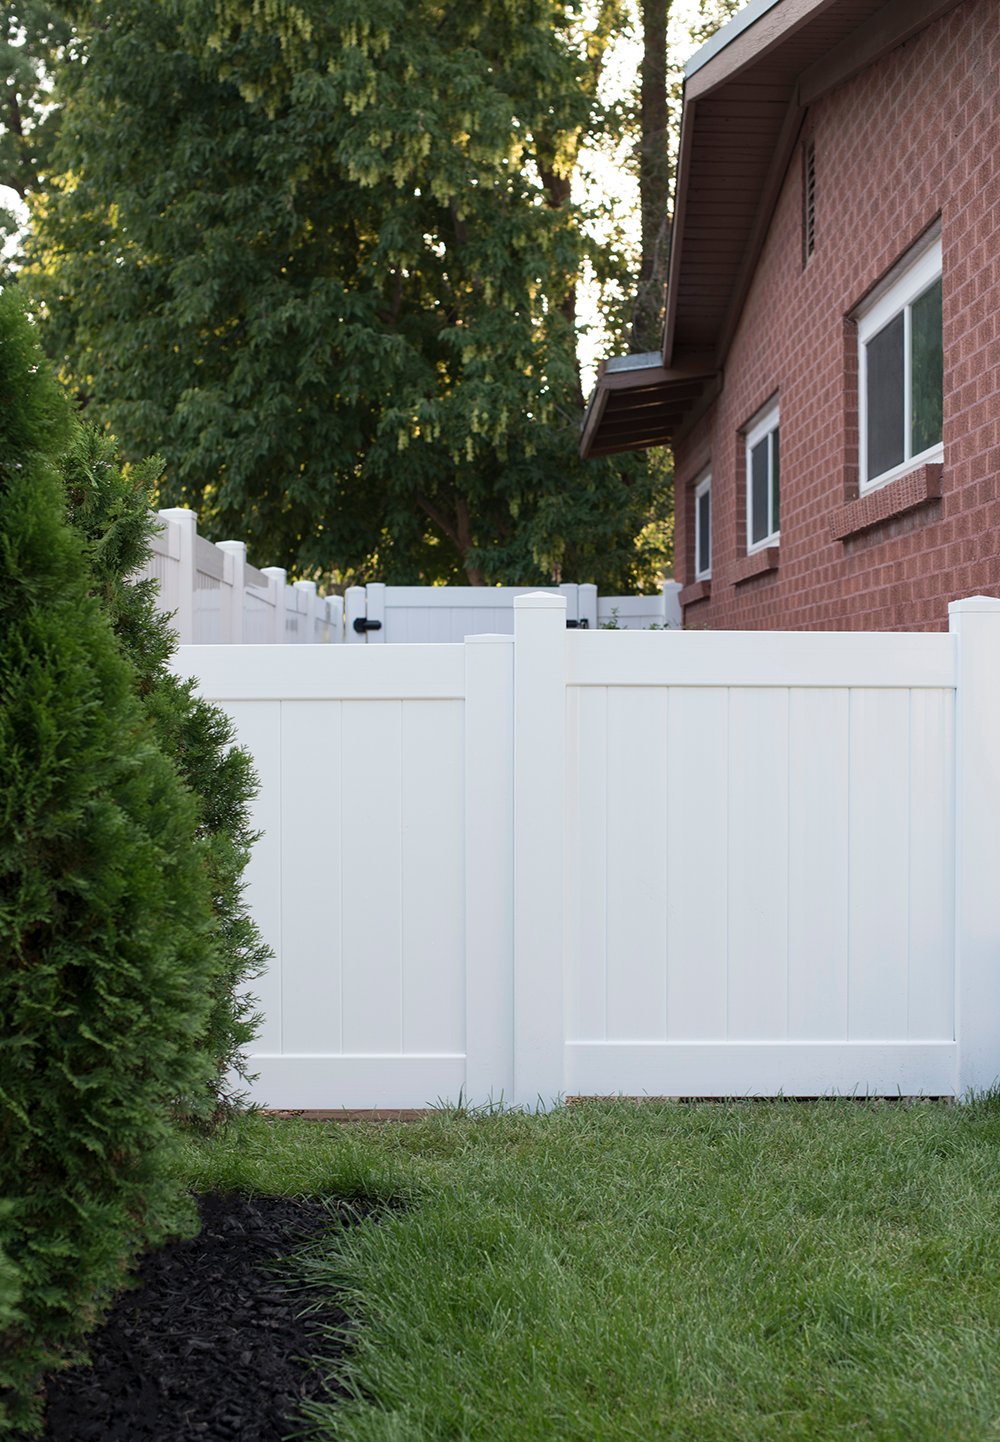
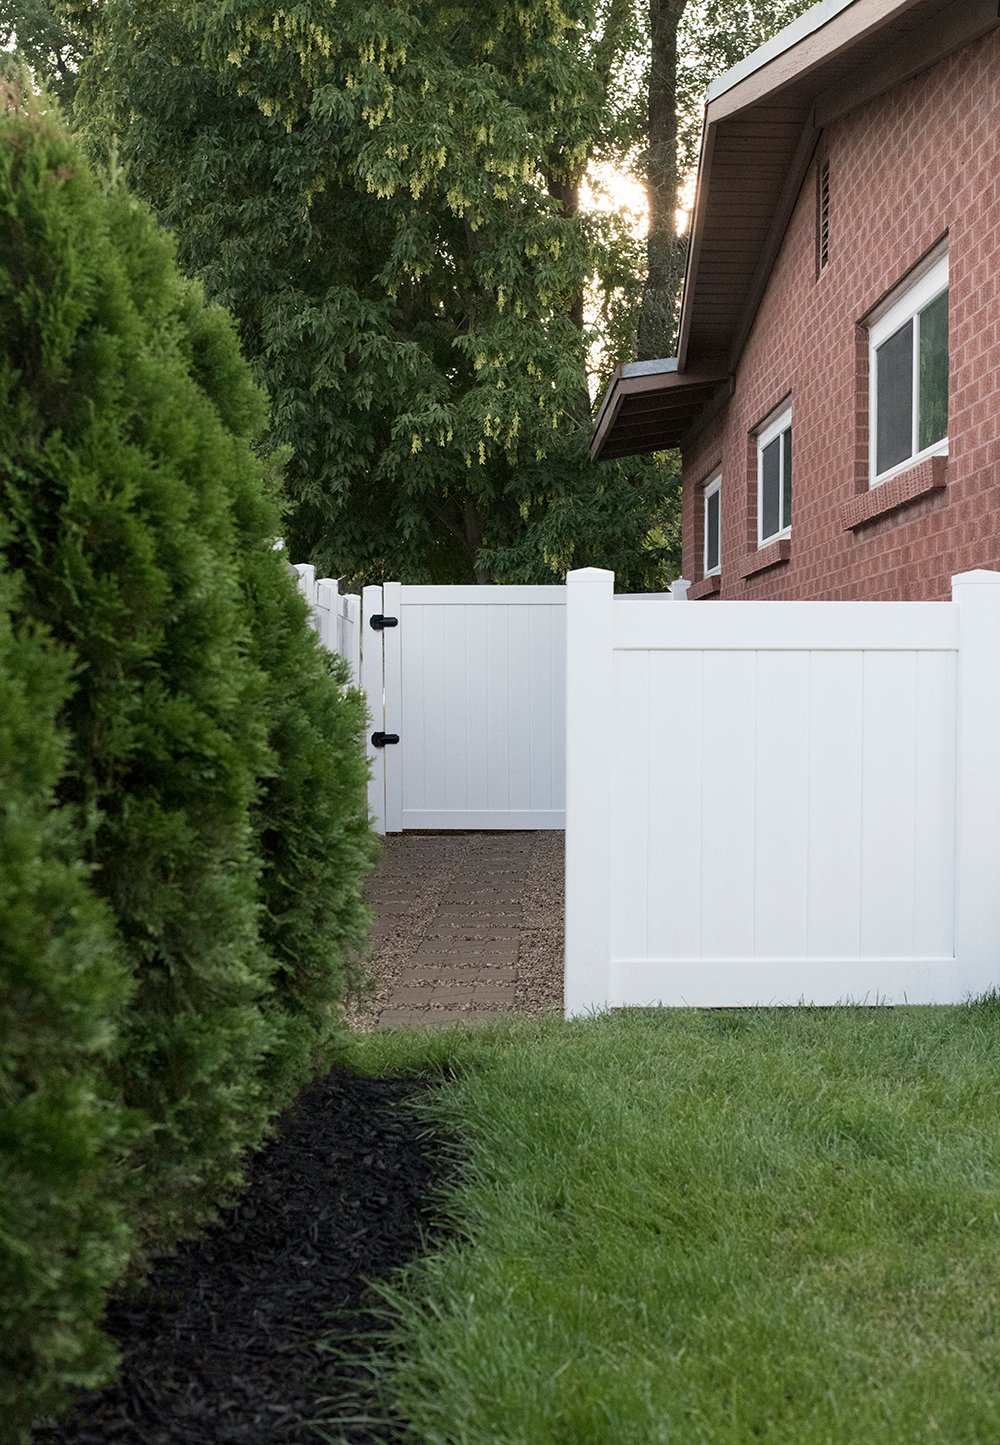
 I’m happy to report this is what it looks like now… SO. MUCH. BETTER! Quite the before and after, right? Despite the icky before images, it really was a quick project! Believe it or not, it kept raining in Utah last week (which is a rarity), so my photos kept getting delayed. We’ll take all the rain we can get, so I can’t complain… but I was so excited to share this project with you guys because I feel like it’s a common issue with a pretty easy solution. Despite the weather and delay in getting this posted, I hope some of you will tackle a similar project over Labor Day! This space took us less than three days once all of our time was added up.
 This was our to-do list for the project…
- Add a fence and gate to keep this area out of sight.
- Remove grass and add pea gravel (for zero maintenance and water conservation).
- Add decorative and functional stepping stones from one gate to the other.
- Build or buy a screen for the air conditioner unit.
- Pour a concrete pad for our storage container (which houses outdoor cushions during the winter).
 I thought it would be easiest to break our to-do list down by the main projects. You’ll find three easy tutorials below: pouring a concrete pad (for a storage container), installing a fence, and adding stepping stones and pea gravel! We tackled one project per day. Let’s get started…
POURING A CONCRETE PAD
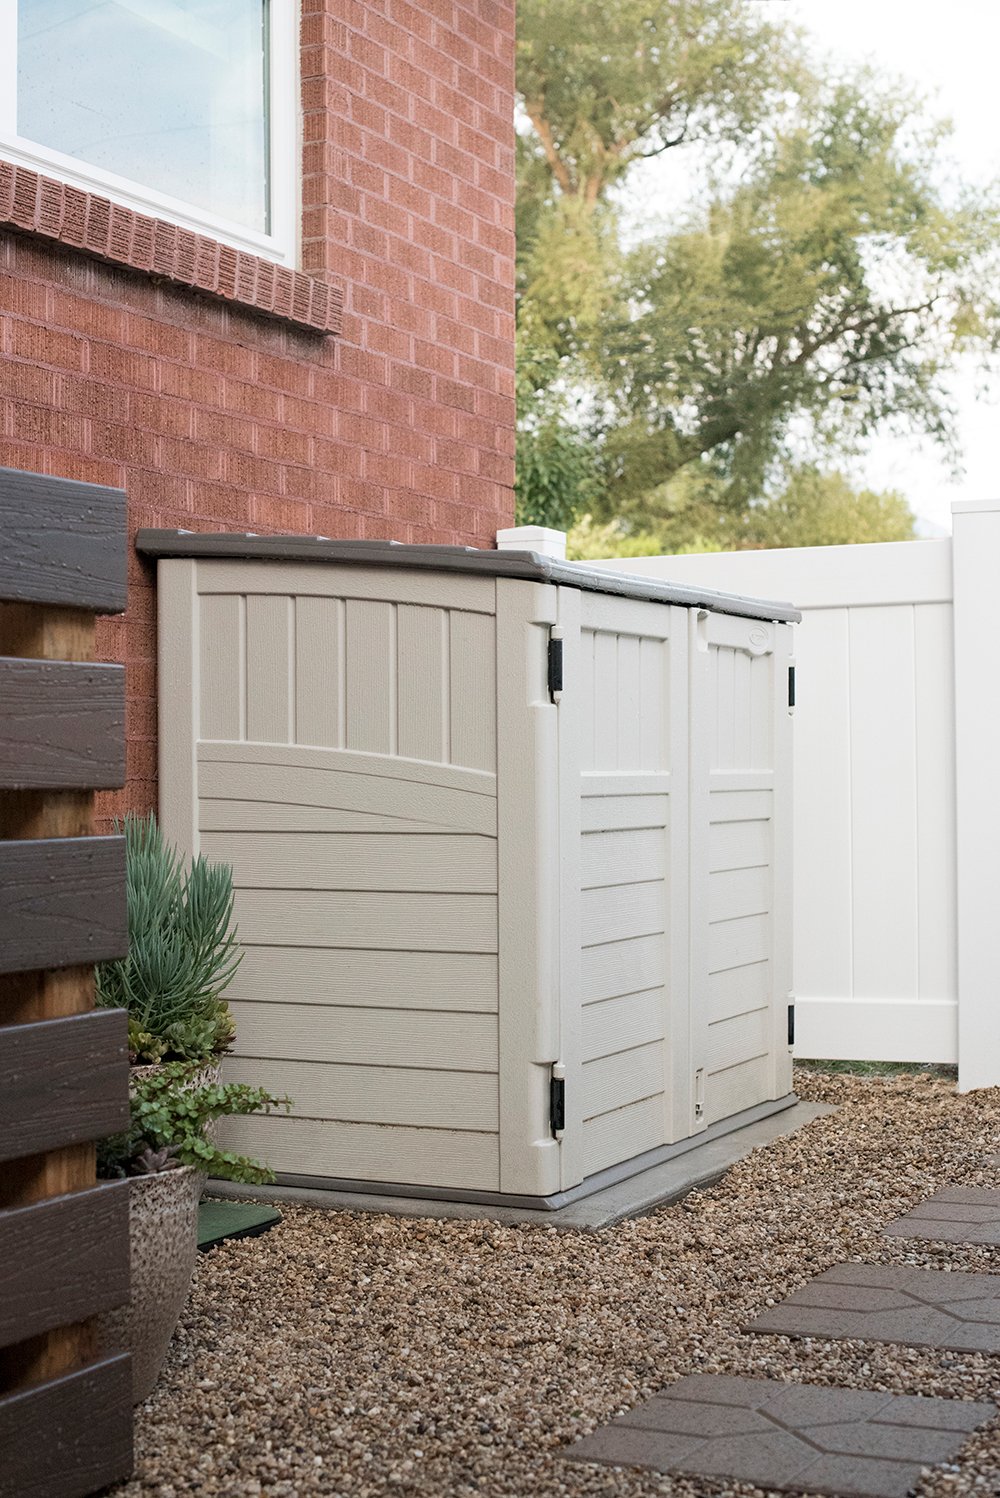 You might remember this post about winterizing the backyard… our Suncast outdoor shed comes in really handy during the snowy Utah winters, but never sat level. This meant it wasn’t as water-tight as it should’ve been. The solution? Pouring a concrete pad to keep it off the dirt. Not only does it look much cleaner, but it will keep our cushions nice and dry since the container is sitting as it should.
 Here’s what you need to get started:
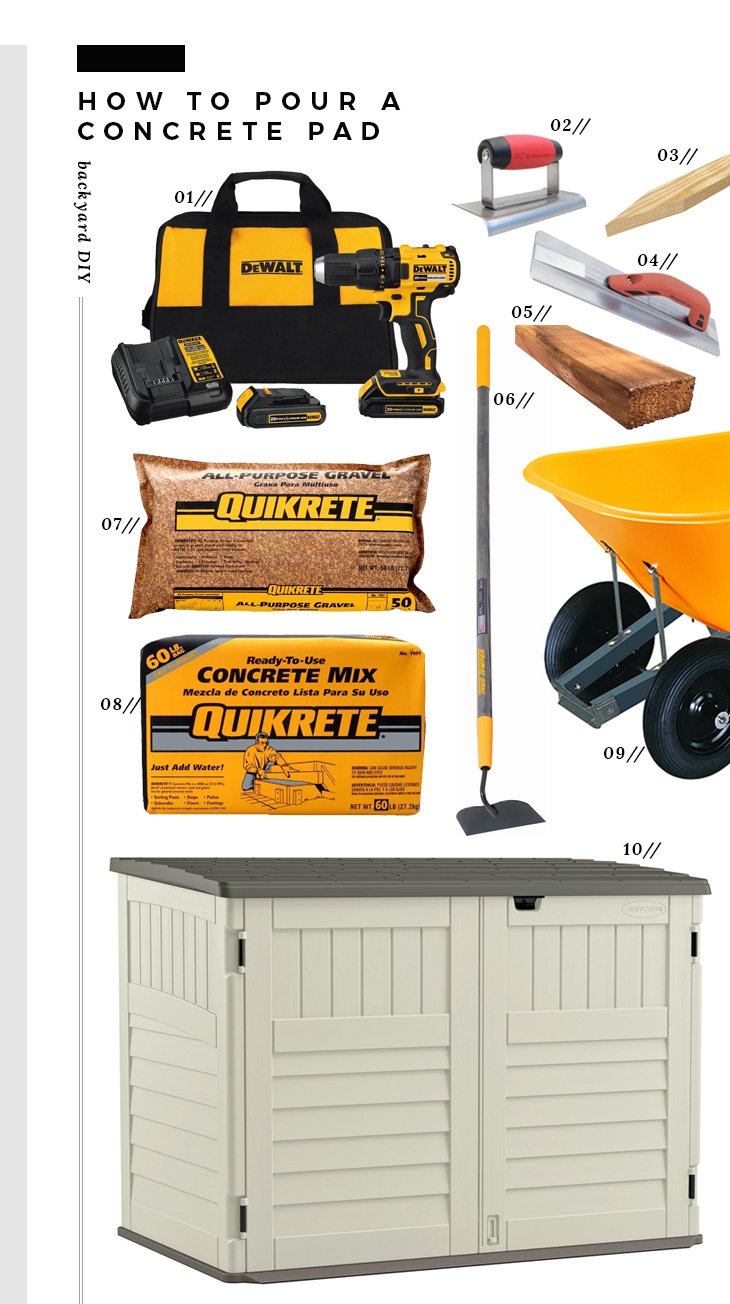
01: dewalt power drill // 02: concrete edger // 03: wood stake // 04: concrete float // 05: lumber 2×4 // 06: garden hoe // 07: all purpose gravel // 08: quikrete concrete // 09: true temper wheelbarrow // 10: suncast storage shed
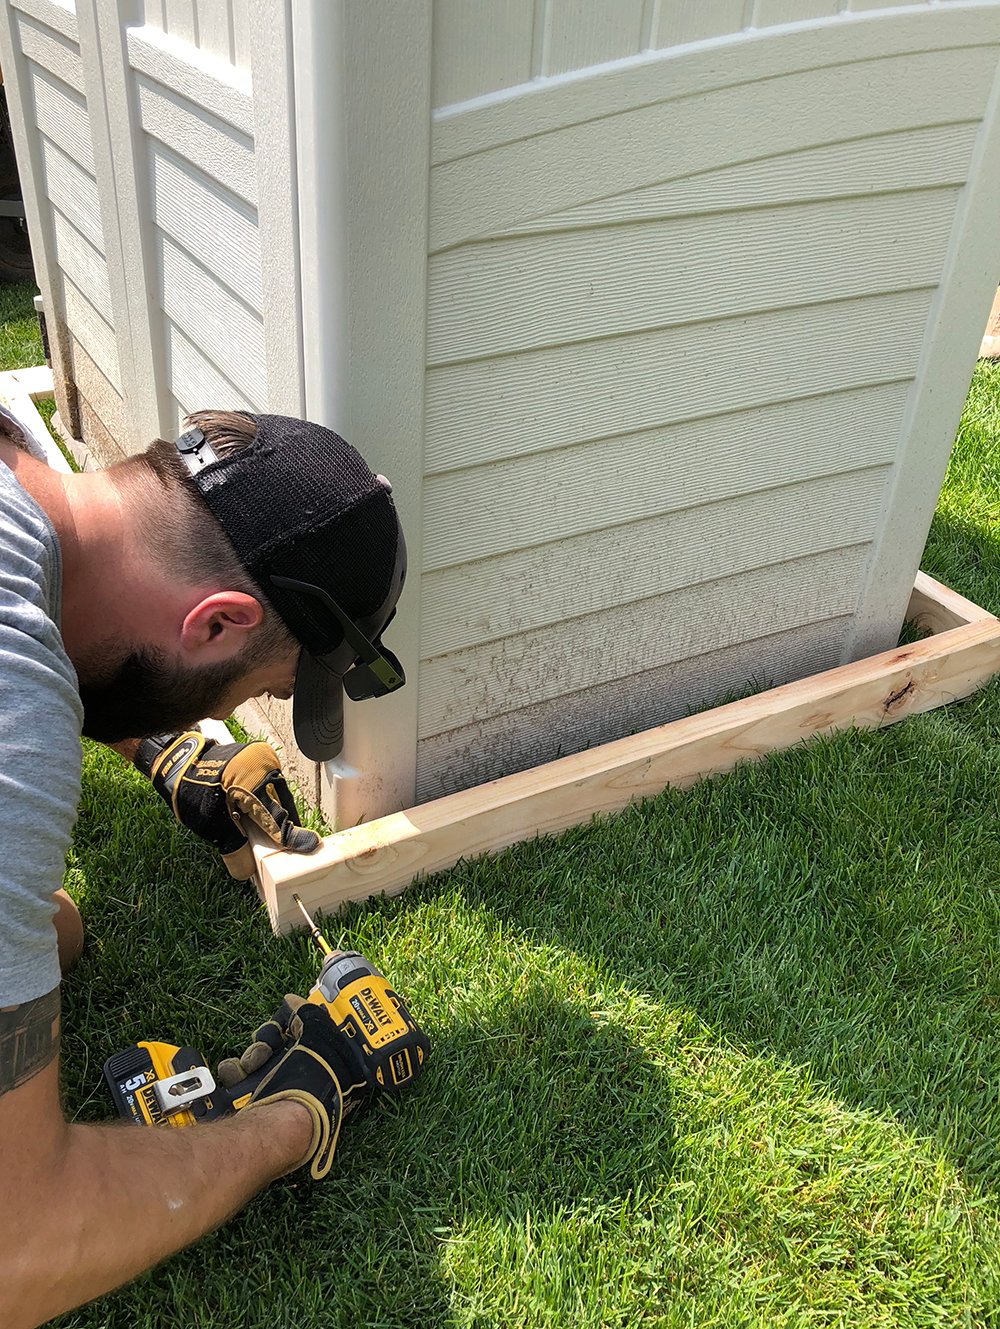 Step 1 // Build the form. Begin by building a quick concrete form. You’ll notice Emmett building the frame around the base of our storage shed, to ensure the size fits perfect. We used 2x lumber and screwed it together with our Dewalt power drill.
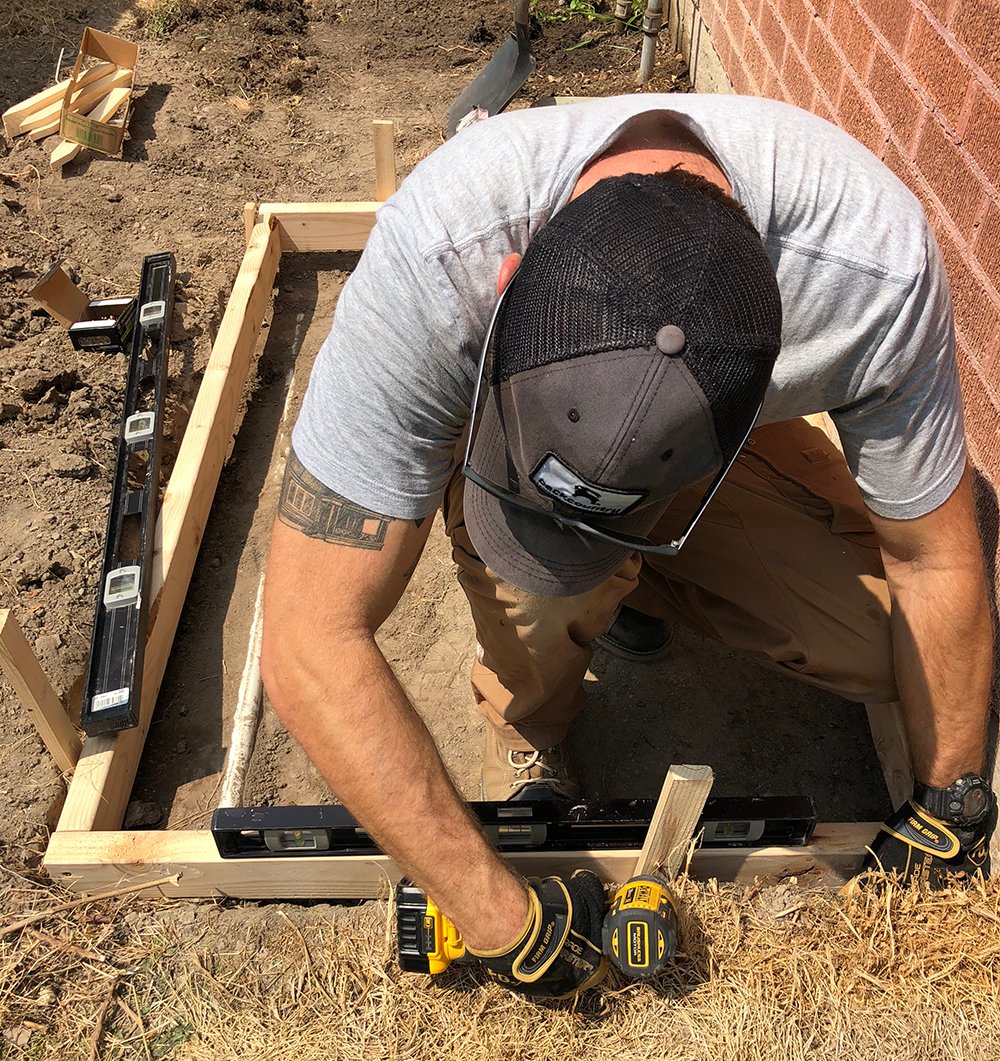 Step 2 // Secure the form. Next, attach the wooden stakes to the sides of the form and push them into the ground to secure the frame.
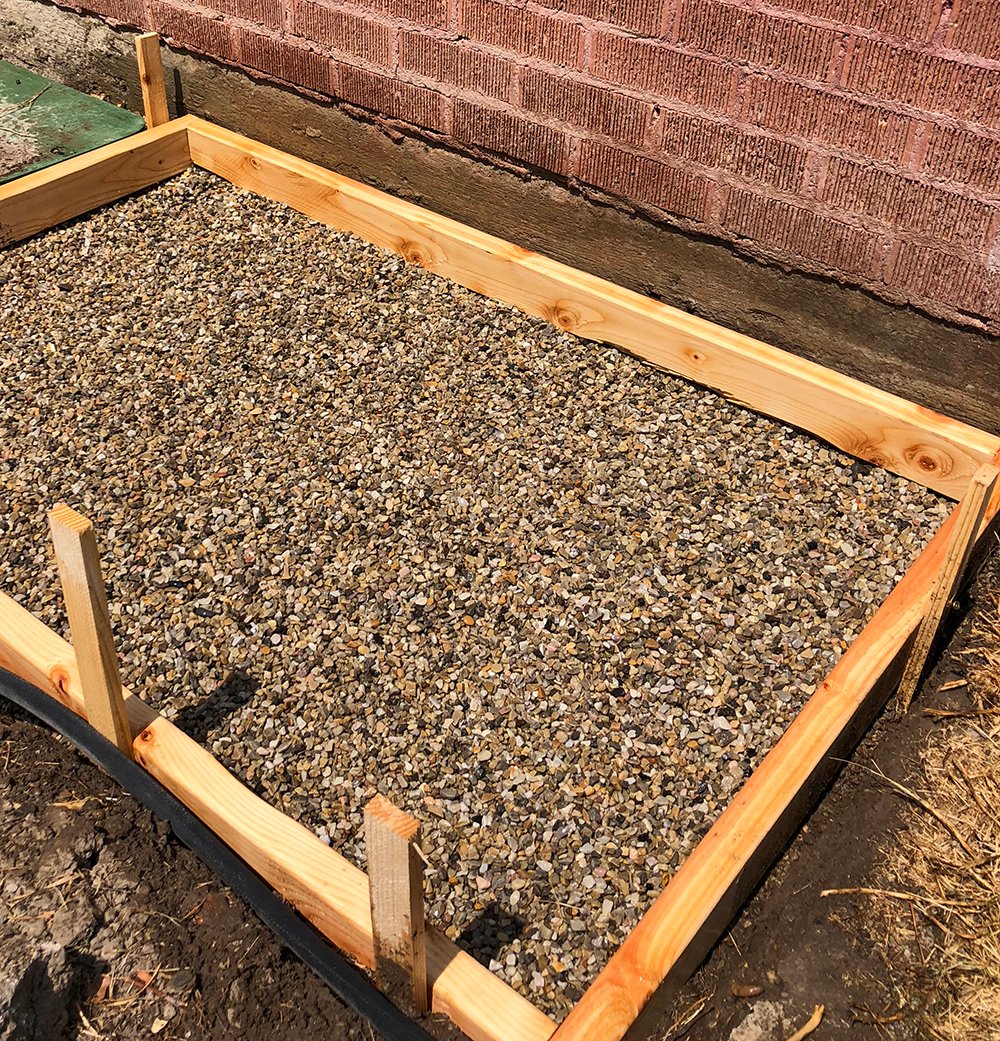 Step 3 // Add a layer of gravel. Using Quikrete all purpose gravel, empty a thin layer of gravel evenly into the bottom of the form.
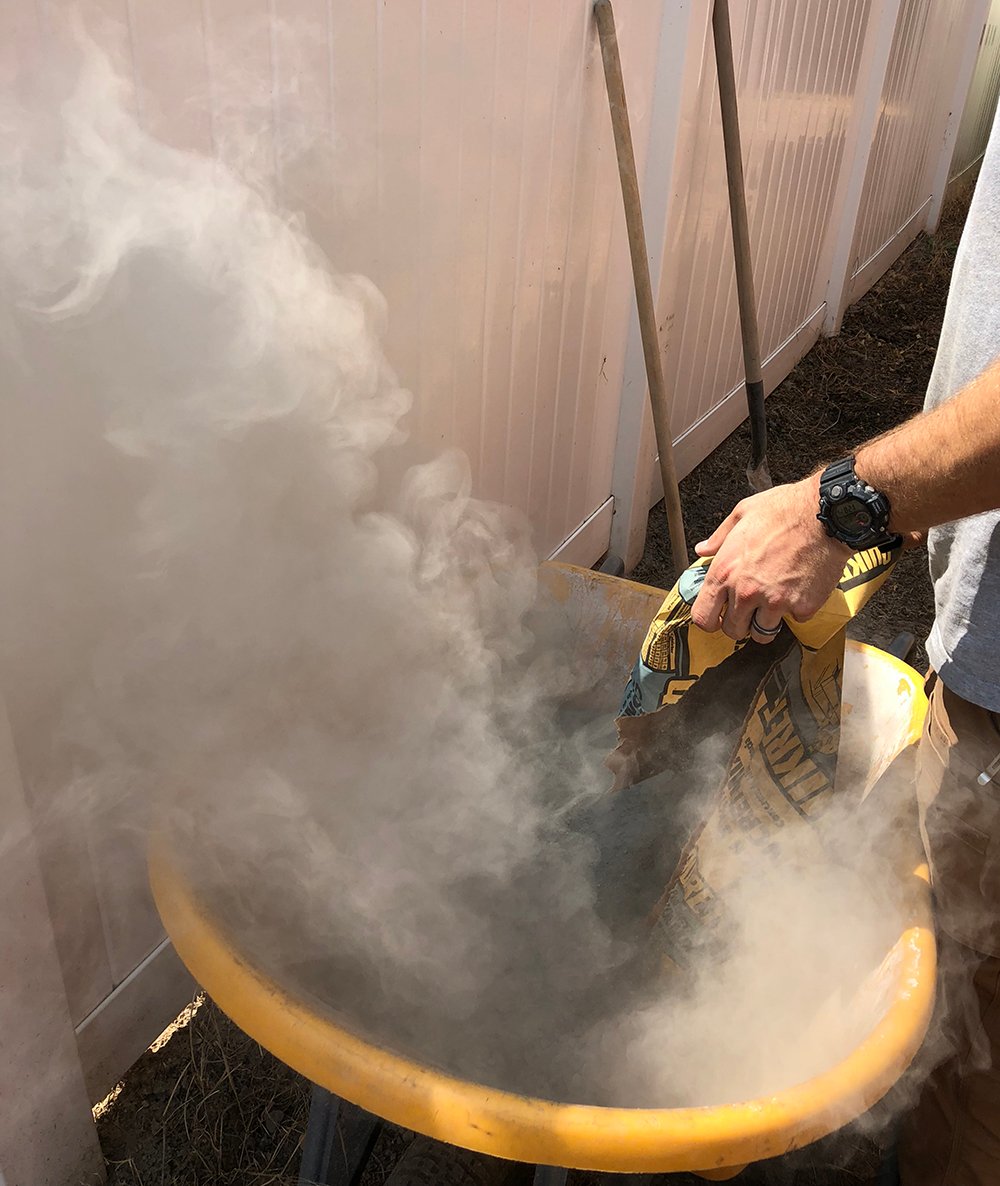 Step 4 // Mix up the concrete. Next, mix your concrete by adding water per the instructions on the package. We do our mixing in our True Temper wheelbarrow… it’s easy to clean, so we just treat it like a giant mixing bowl.
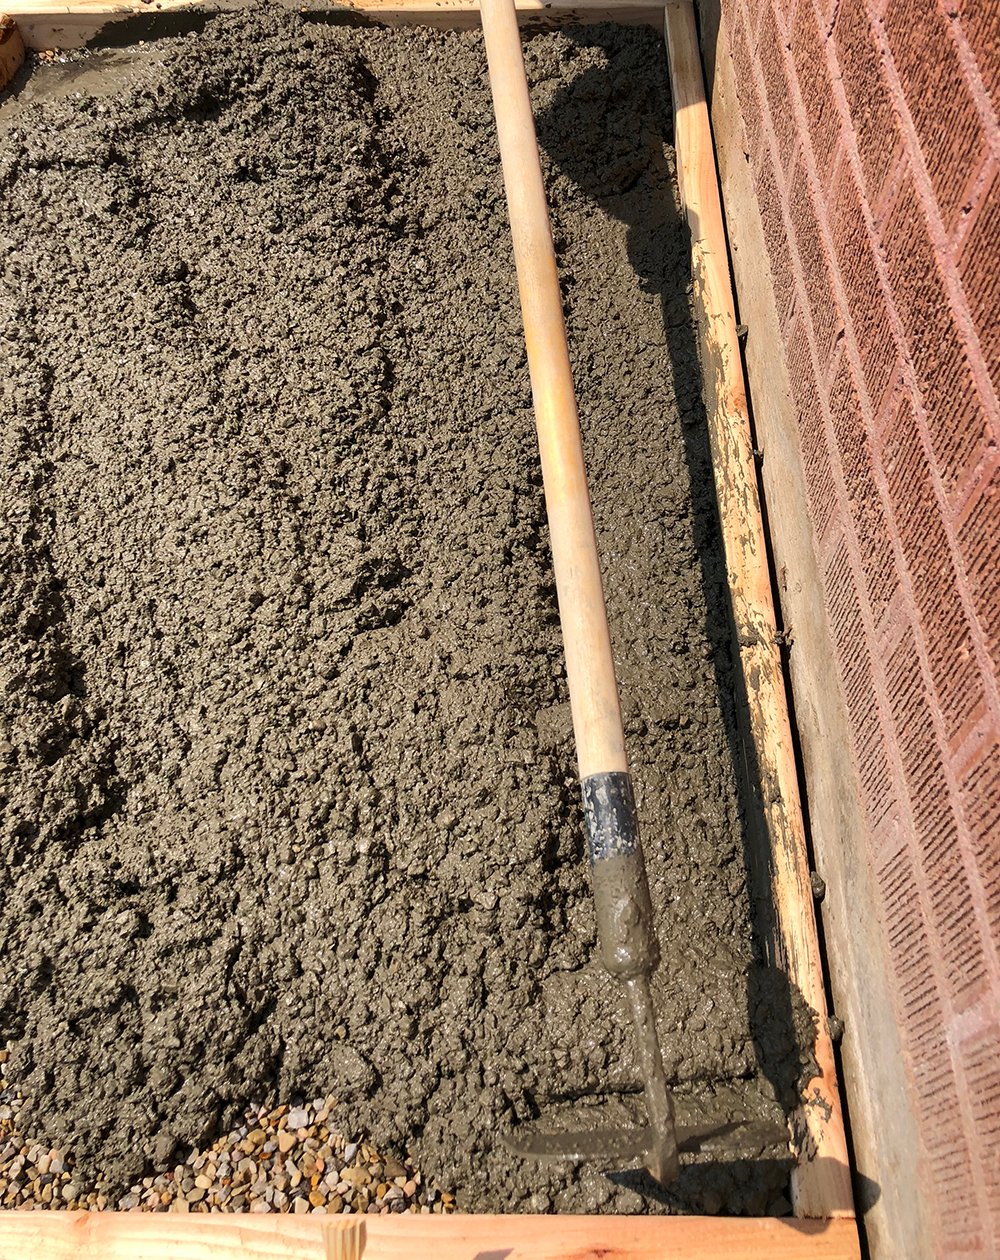 Step 5 // Add the concrete to the form. Once you’ve reached the appropriate consistency, empty the concrete from the wheelbarrow into the form.
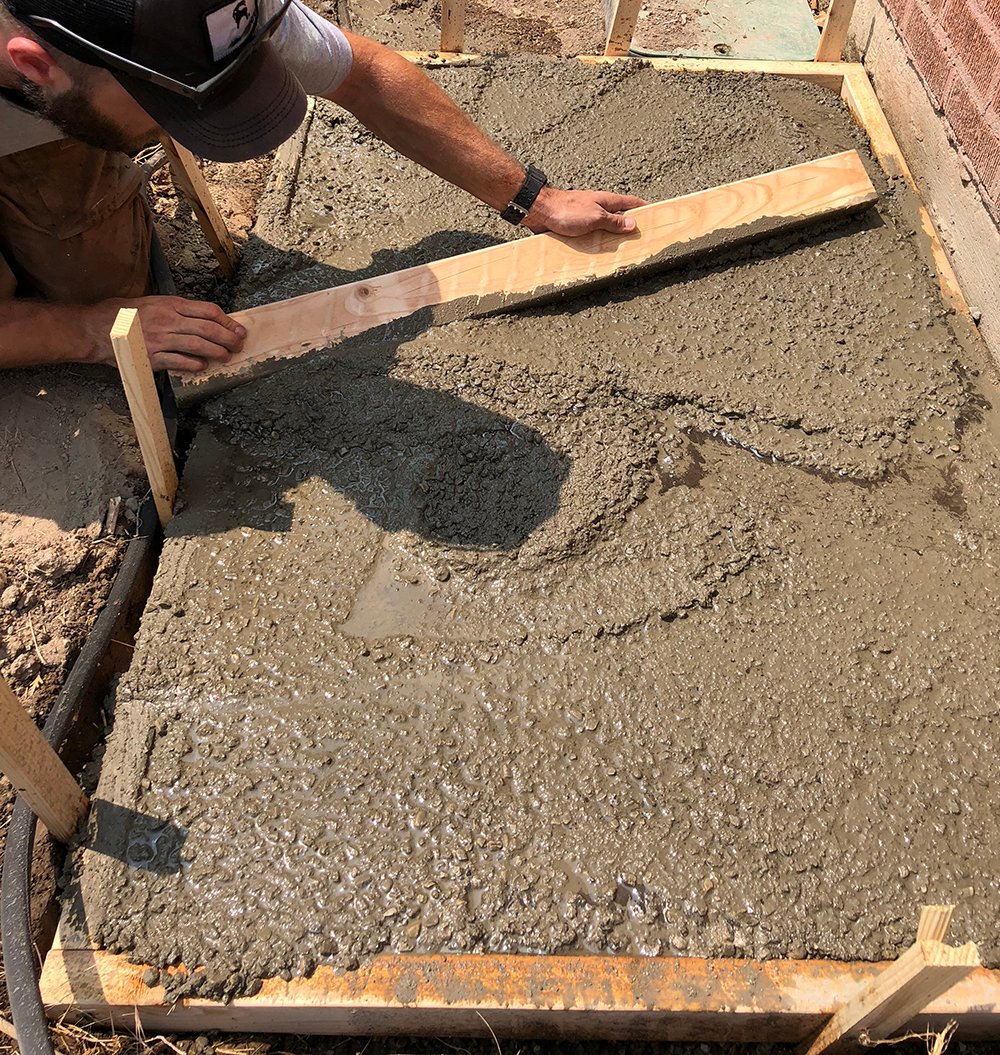 Step 6 // Screed the concrete. Using a 2×4, screed the top of the concrete before it cures. This is the easiest way to achieve a perfectly flat and level surface.
 Step 7 // Smooth the concrete. Next, use a concrete float to smooth the surface. If it’s curing too quickly, mist it with water to help with the smoothing process.
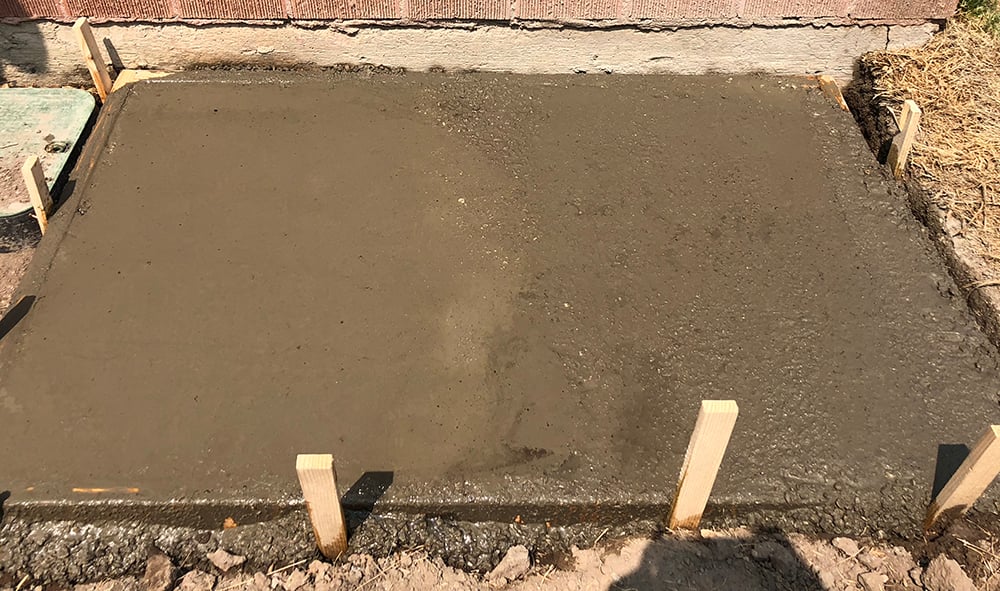 The above image depicts the smoothing process… the left side has been smoothed and the right side has yet to be done. It makes a big difference and gives the pad a finished look!
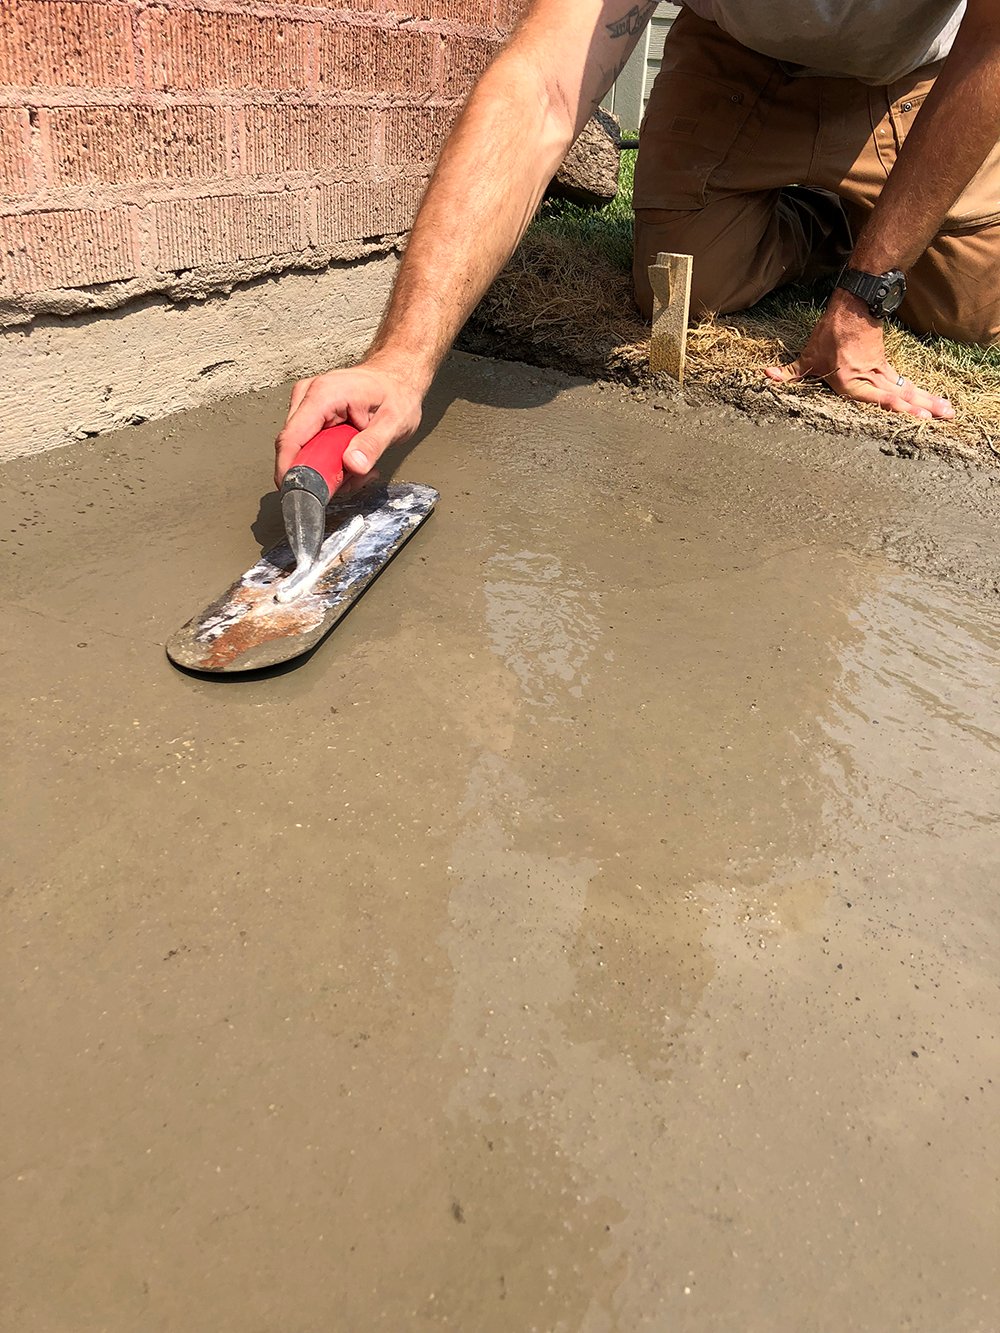
 Step 8 // Finish the edge. Before the concrete is totally set, use a Marshalltown concrete edger, running the tool between the edge of the finished concrete and form. This will provide an eased edge, separate the concrete from the form, and give the entire pad a finished look.
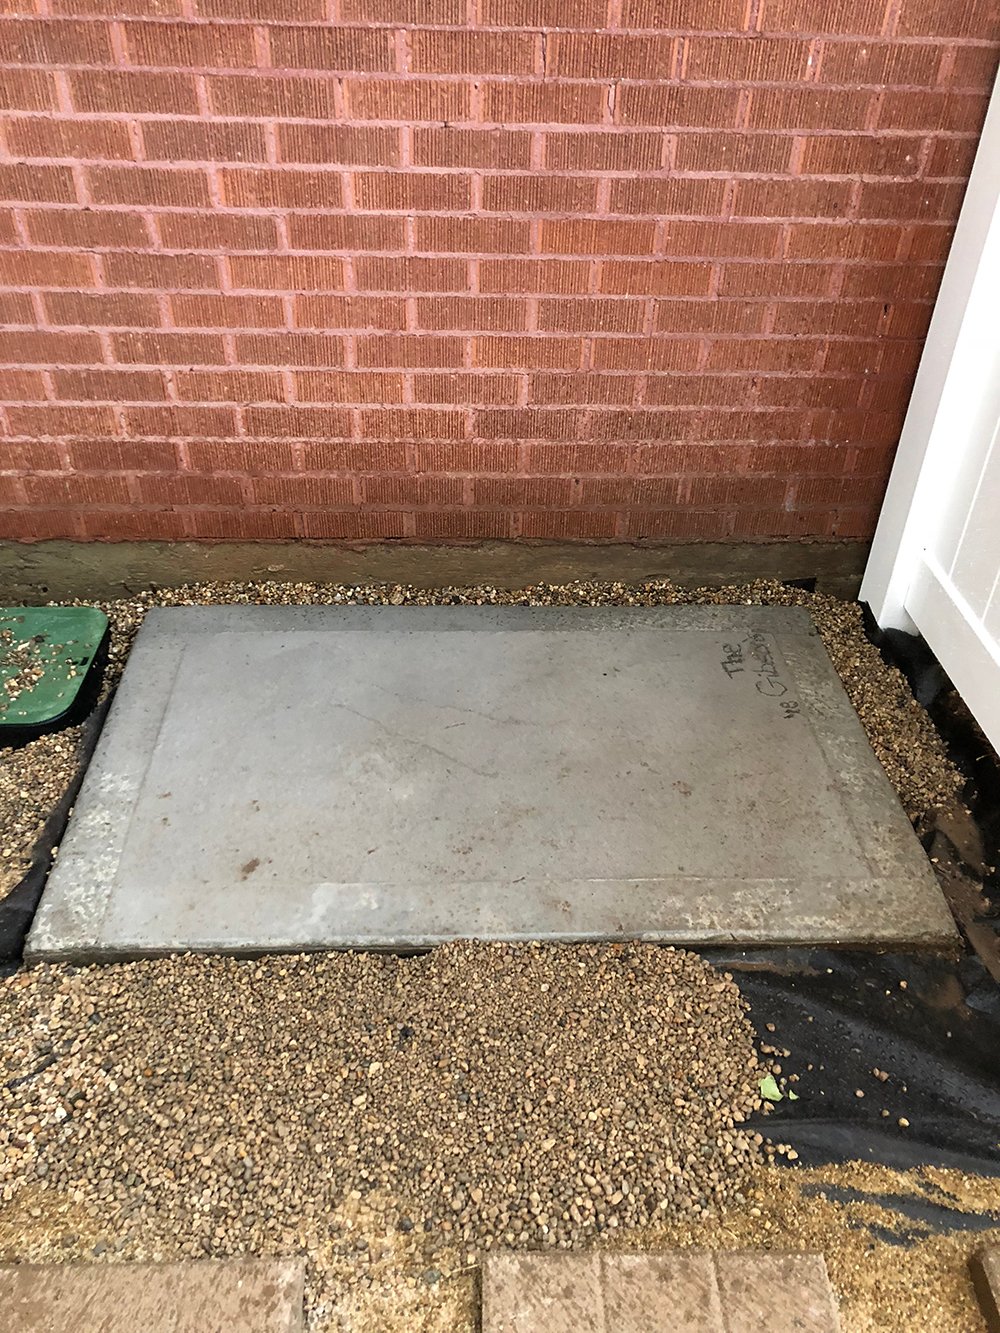 Step 9 // Allow it to cure. Once the stone is totally cured- remove the form. You’ll notice Emmett carved “The Gibsons” into the corner before it was set up. Ha! I sort of love that he did that.
 I think it turned out pretty nice and I love that it will keep the plastic shed and cushions housed inside of it nice and clean this winter! Onto the next project… installing the fence.
INSTALLING A FENCE
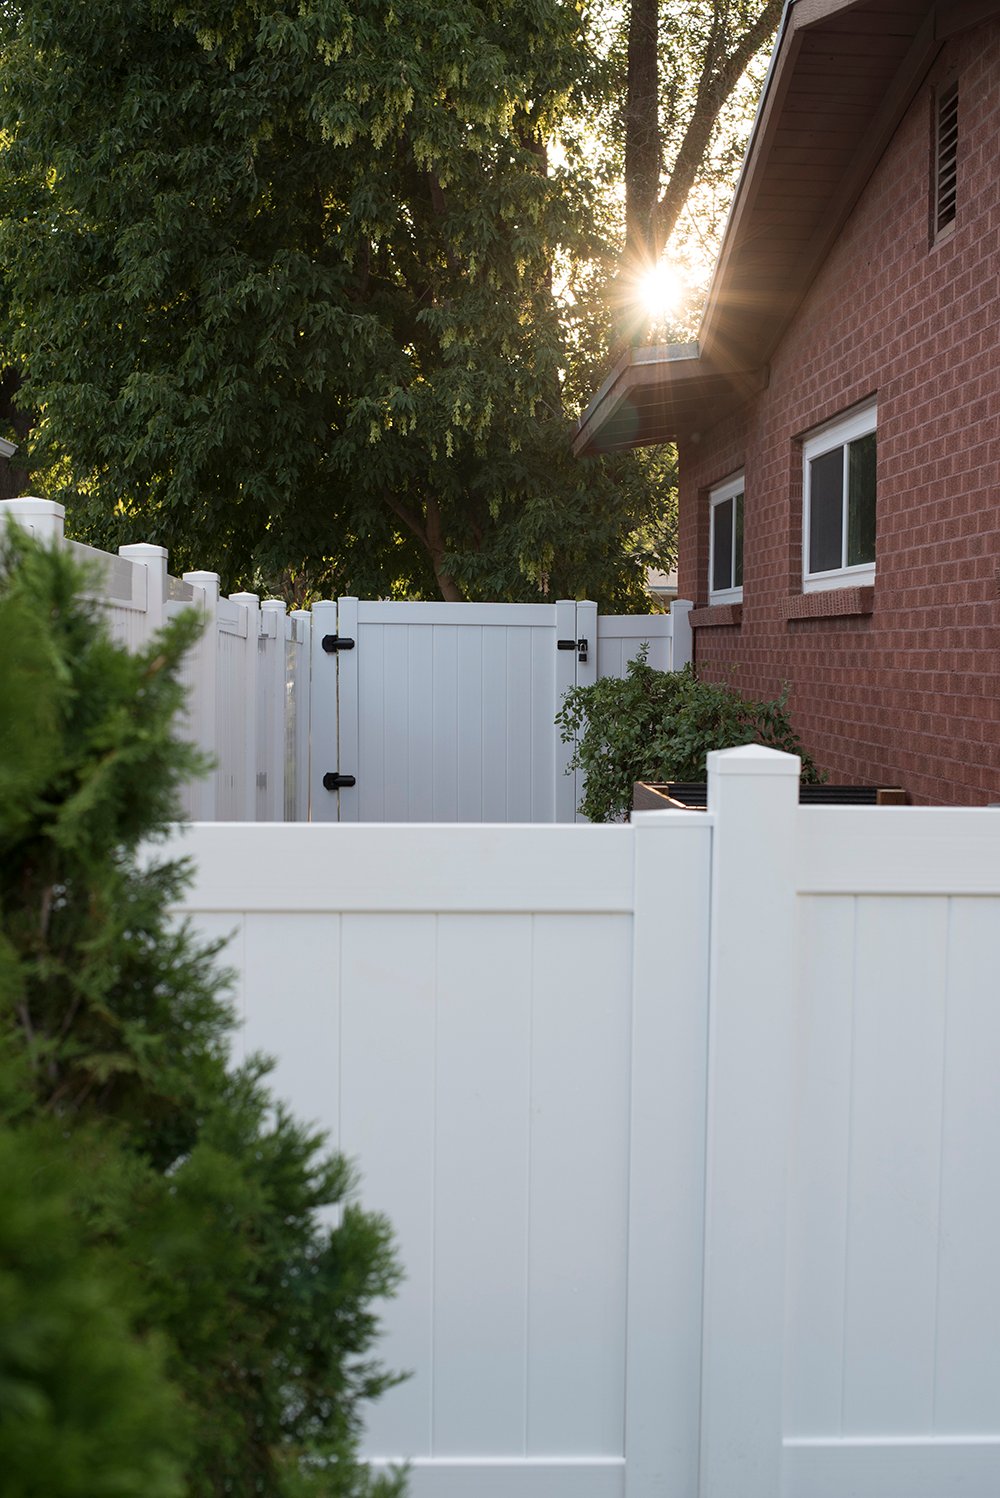
 I’m not going to go into great depth on this one because you can find our entire privacy fence tutorial in this post, but it’s a very easy and straightforward process! We added a short, four foot fence and gate to the end of our side yard to keep things hidden and private. Check out the finished result below.
 Here’s what you’ll need for this portion of the project:
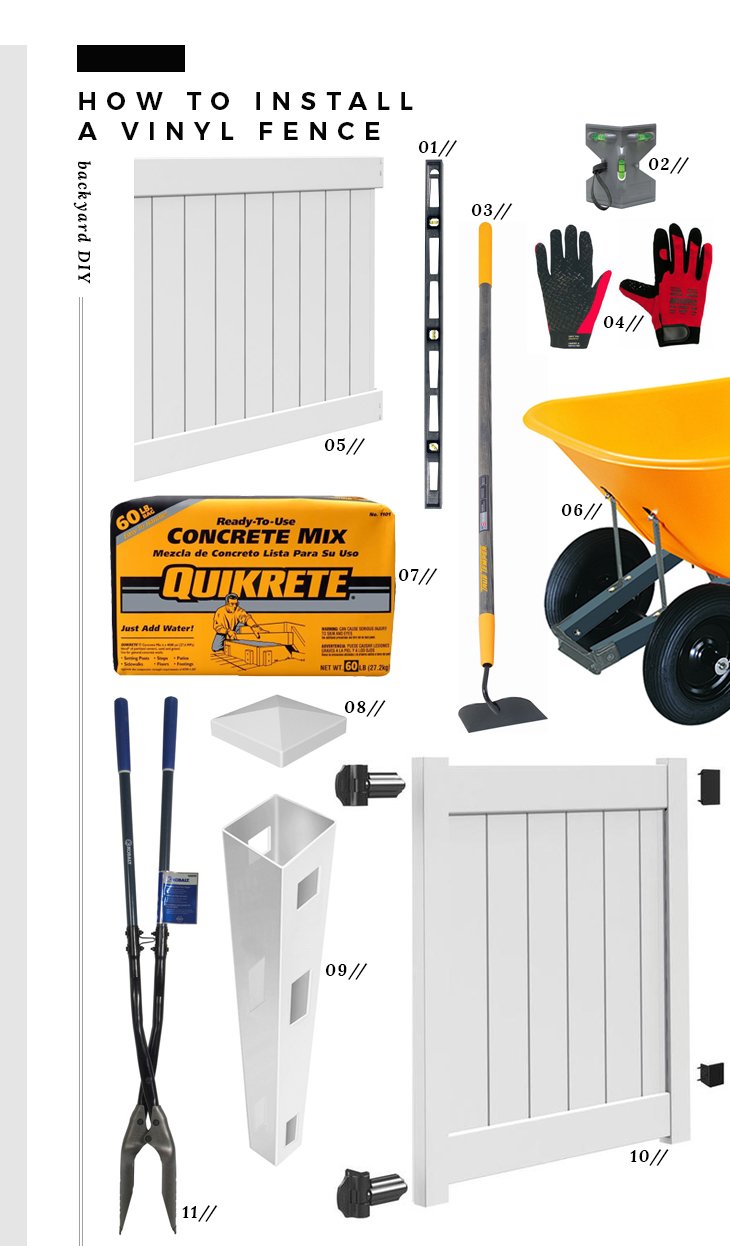
01: level // 02: post level // 03: garden hoe // 04: unisex work gloves // 05: freedom fence panel // 06: true temper wheelbarrow // 07: concrete mix // 08: post cap // 09: fence post // 10: vinyl gate // 11: post hole diggers
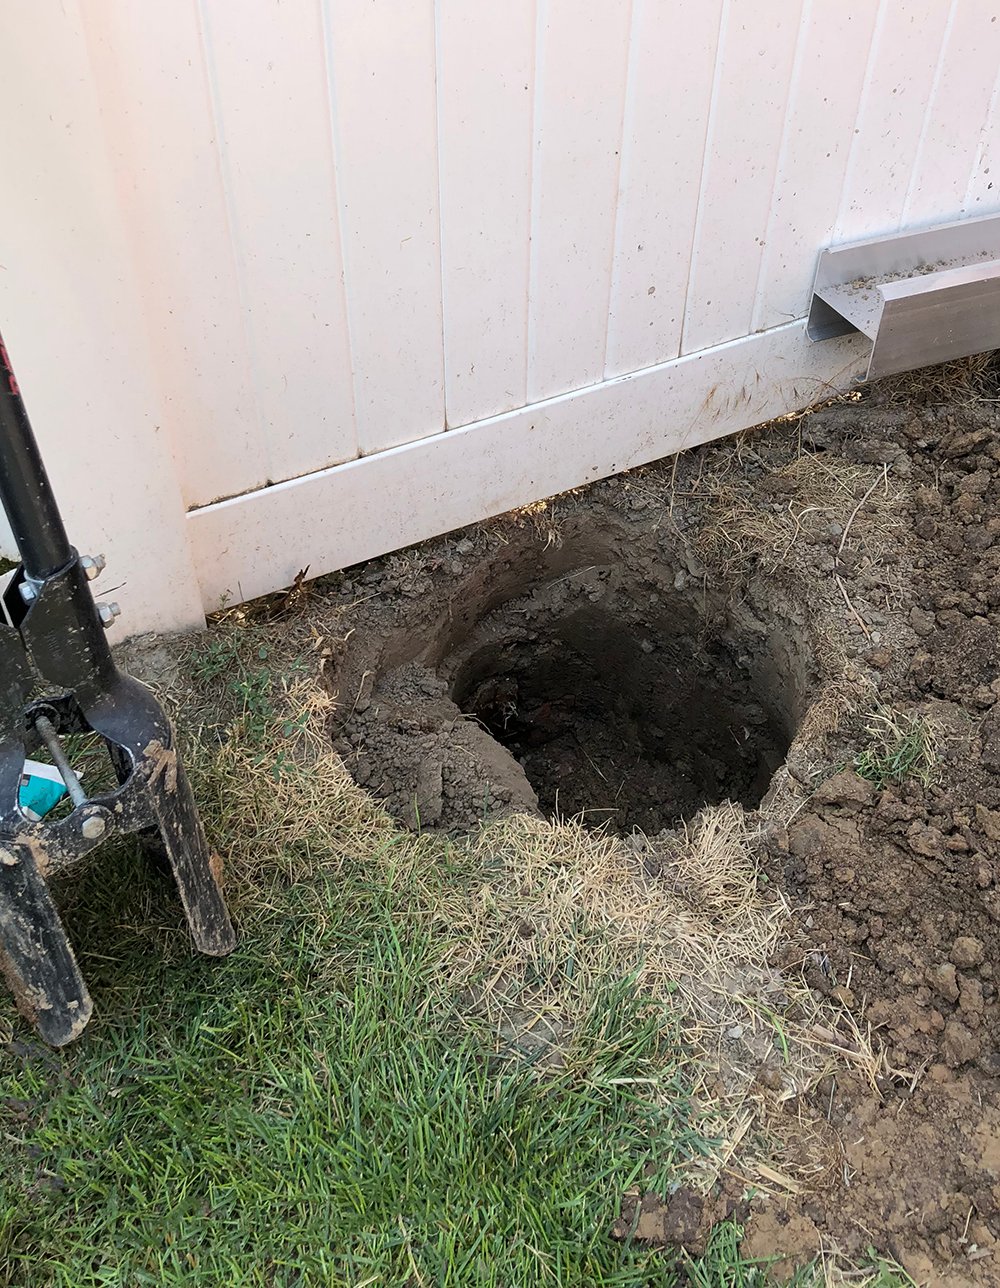 Step 1 // Dig the post holes. I’ve said it before and I’ll say it again- this is the most difficult part of the process… digging the holes. Luckily, we only had to dig four holes for this Freedom fence, but a Kobalt post hole digger and gloves made the job a lot easier!
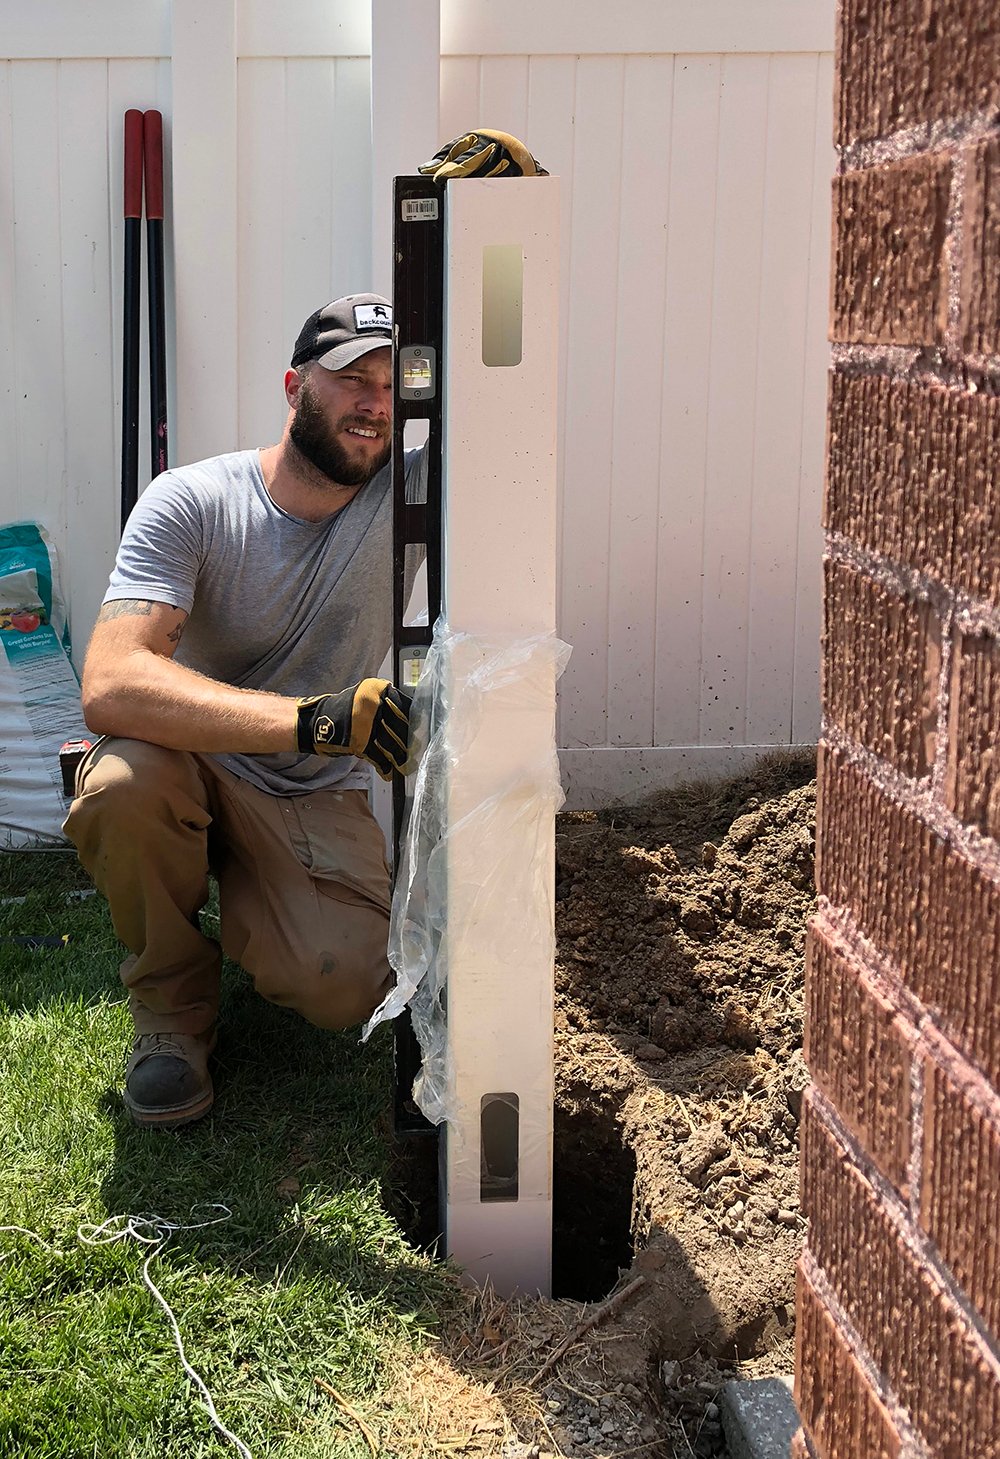 Step 2 // Set the posts. Level the post and fill the hole with concrete. Repeat this process until all posts are set and cured.
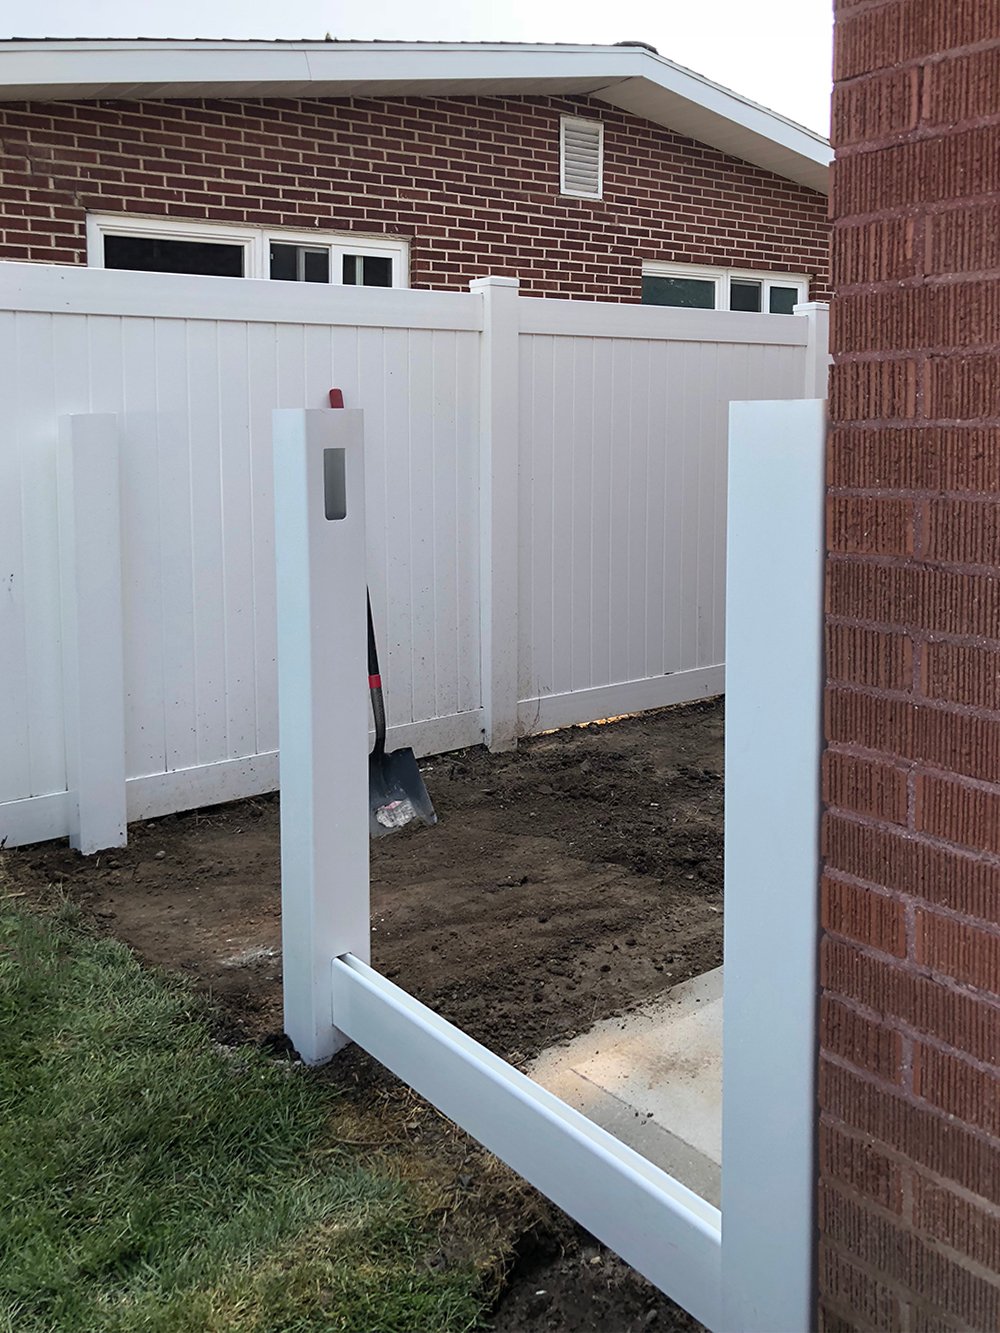 Step 3 // Insert the panels. Once the posts are set and sturdy, you can begin installing the center panels.
 Step 4 // Build and install the gate. Lastly, you’ll want to assemble and install the gate if there is one. Again, I have very detail instructions for installing a fence and a gate in this blog post, but it’s really an easy repetitive process that makes a big impact!
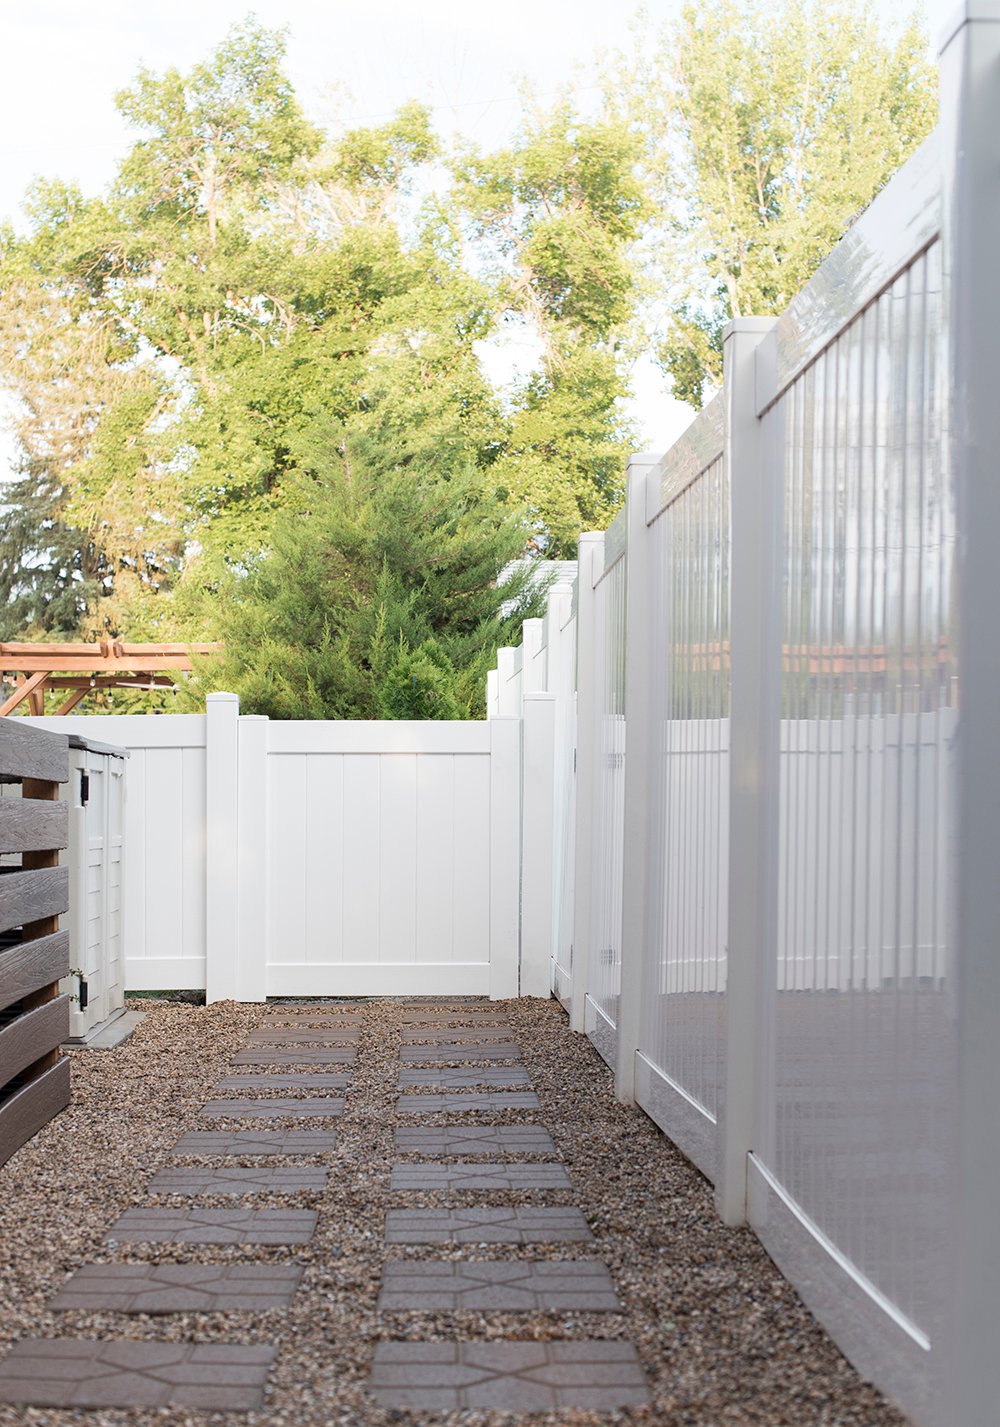
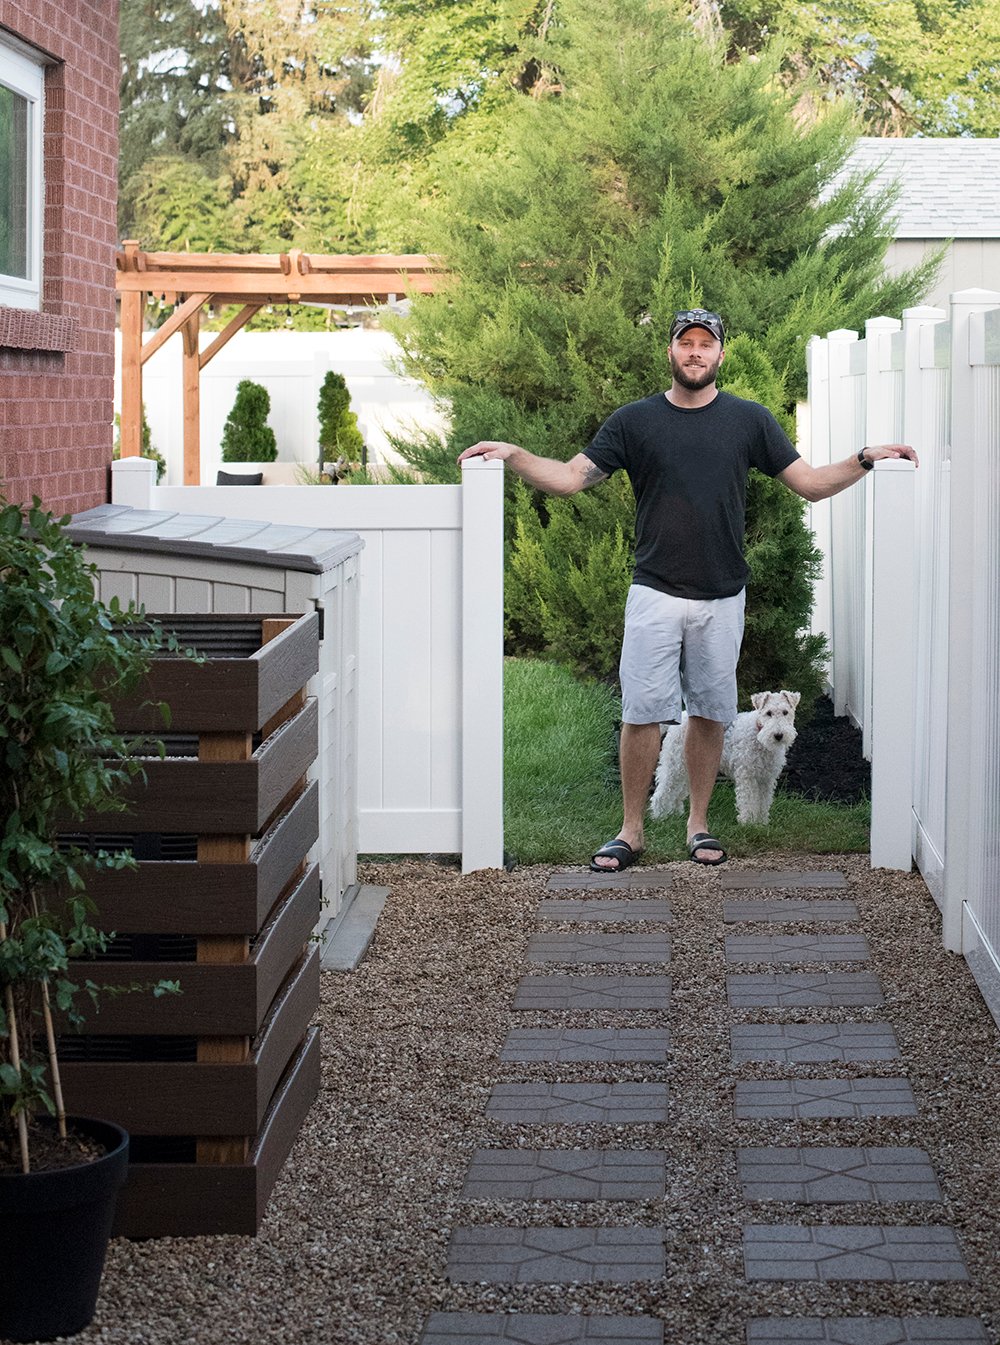
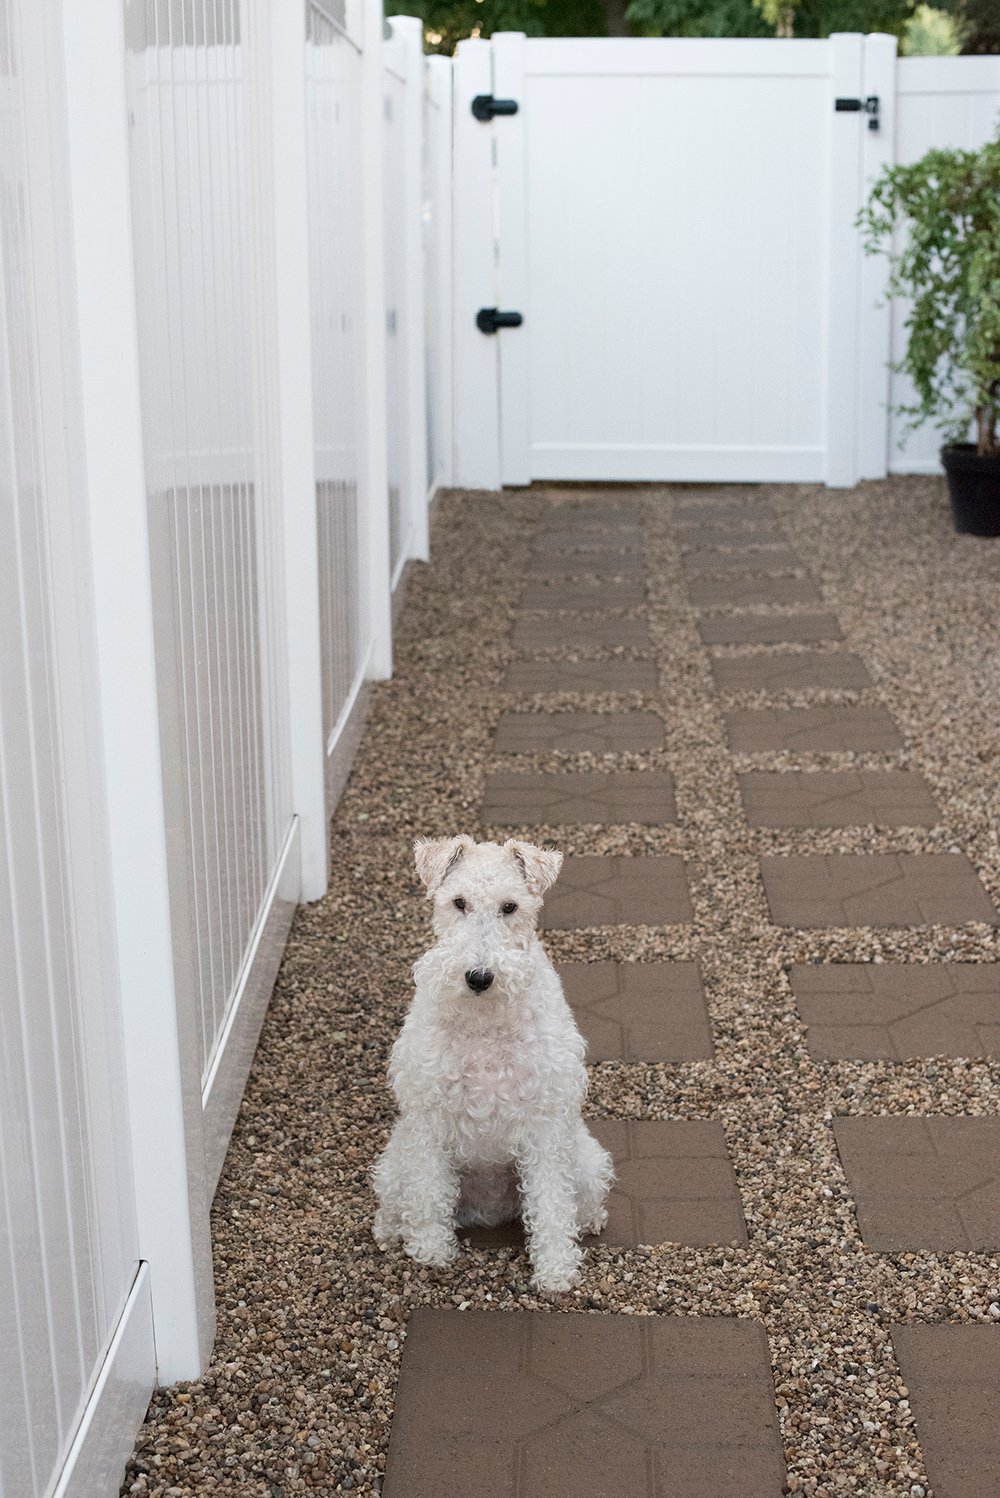 I love that this back section is gated off. It keeps our utilities and storage hidden, while keeping the dogs out. All of our friends know we’re a dog friendly family and an invitation to our backyard typically includes four-legged family members. Now that they can’t run into the side yard, the dogs are always in plain sight and we can keep an eye on them at all times. Ready for the final project? This is definitely my favorite of the three!
ADDING STEPPING STONES & PEA GRAVEL
 Here’s what you’ll need for the paver stones and pea gravel pathway project…

01: pea gravel // 02: paver base // 03: metal shovel // 04: kobalt rake // 05: sta-green weed barrier // 06: pinnacle patio stone
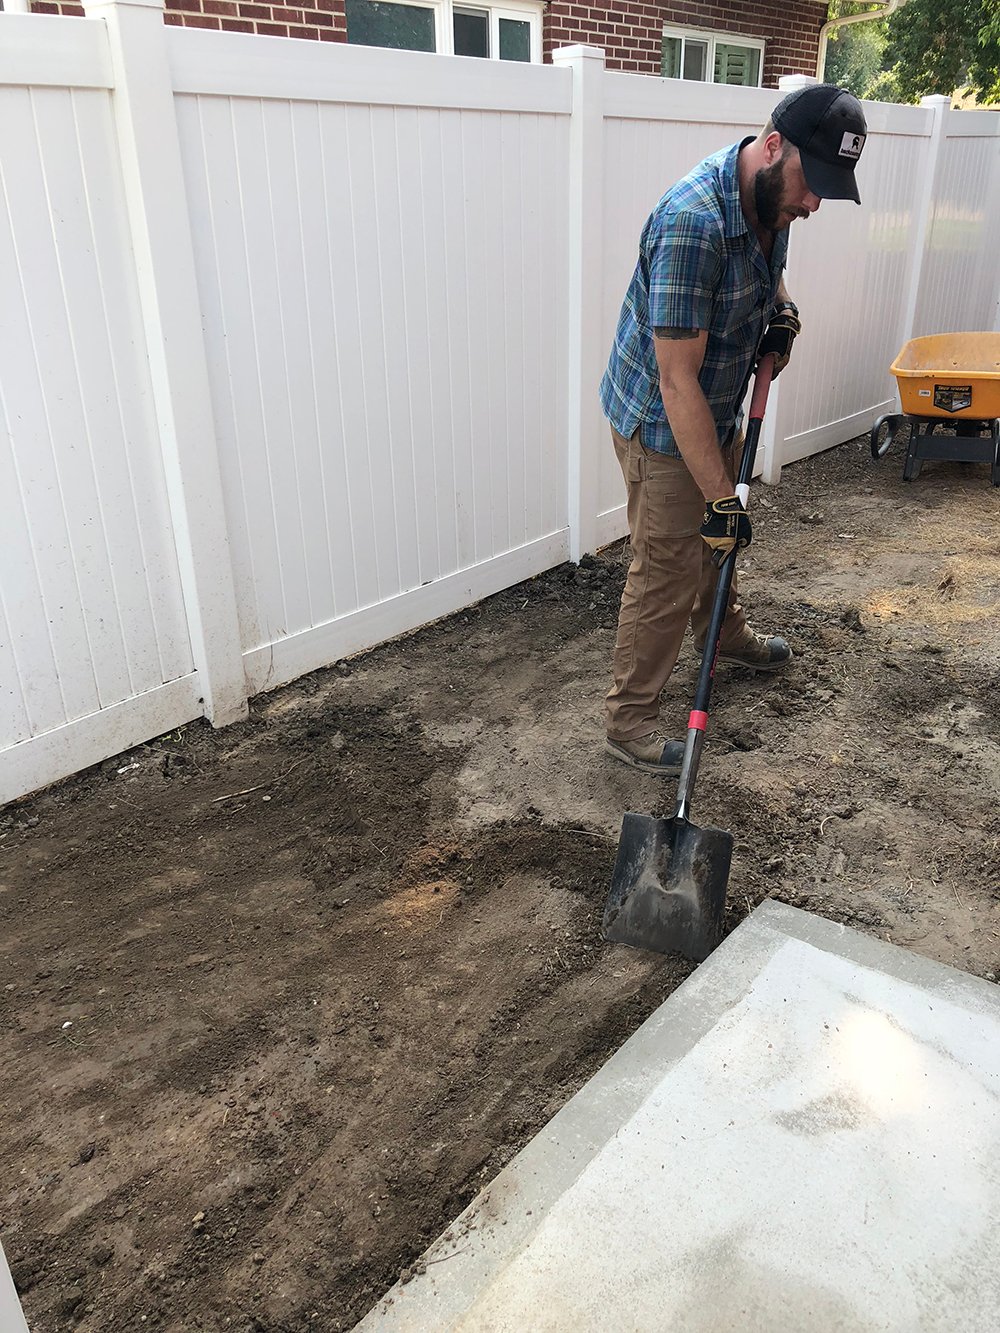 Step 1 // Level out the dirt. Using a flat shovel, scrape and level the ground as best as possible.
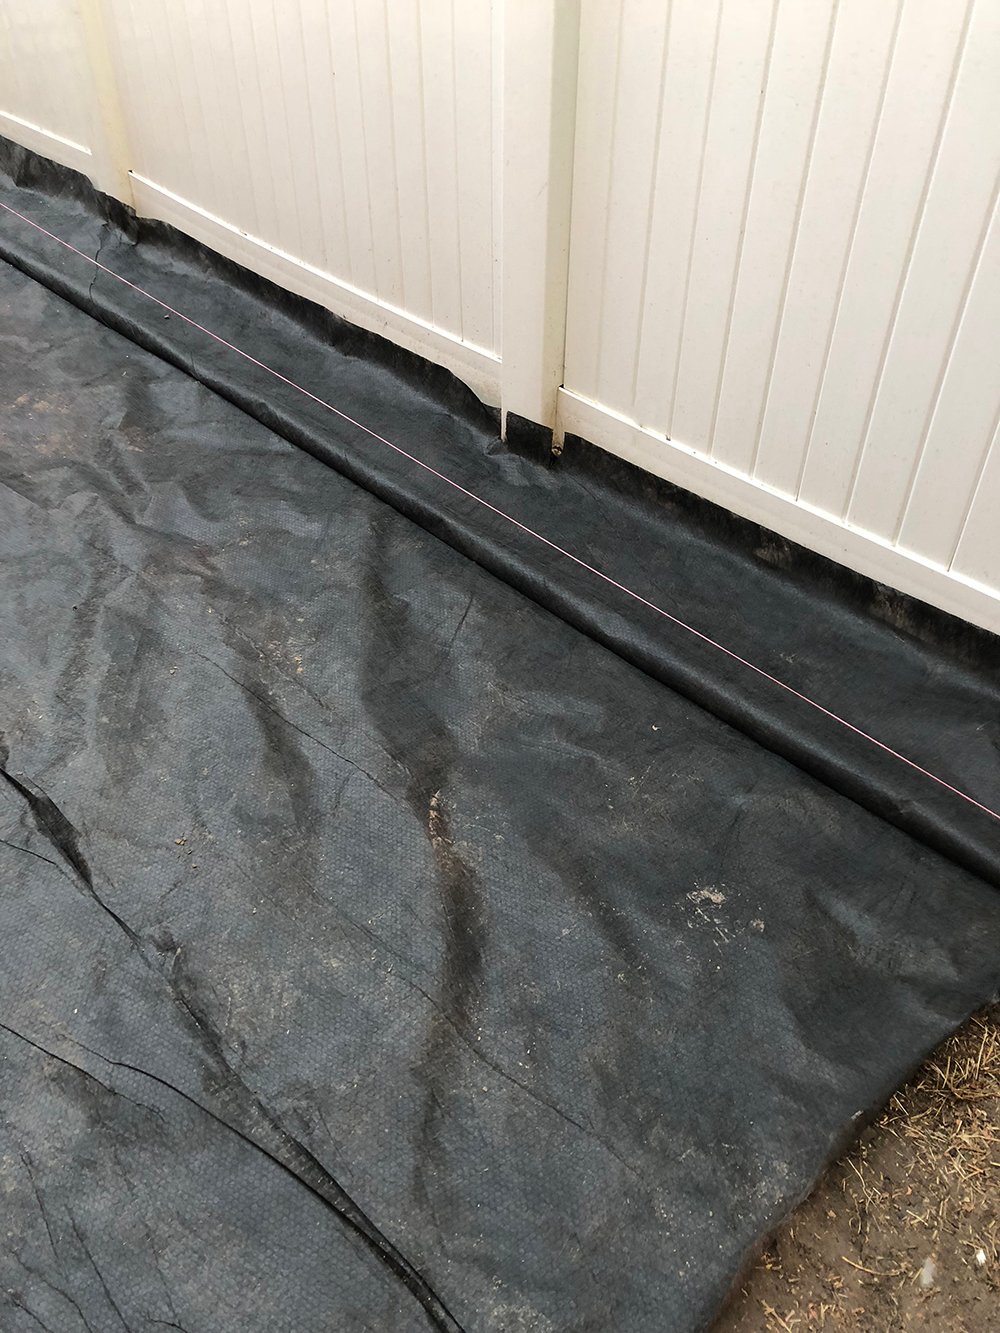 Step 2 // Lay the weed barrier. Once everything is nice and level, lay down the Sta-Green weed barrier and trim the fabric to fit your space.
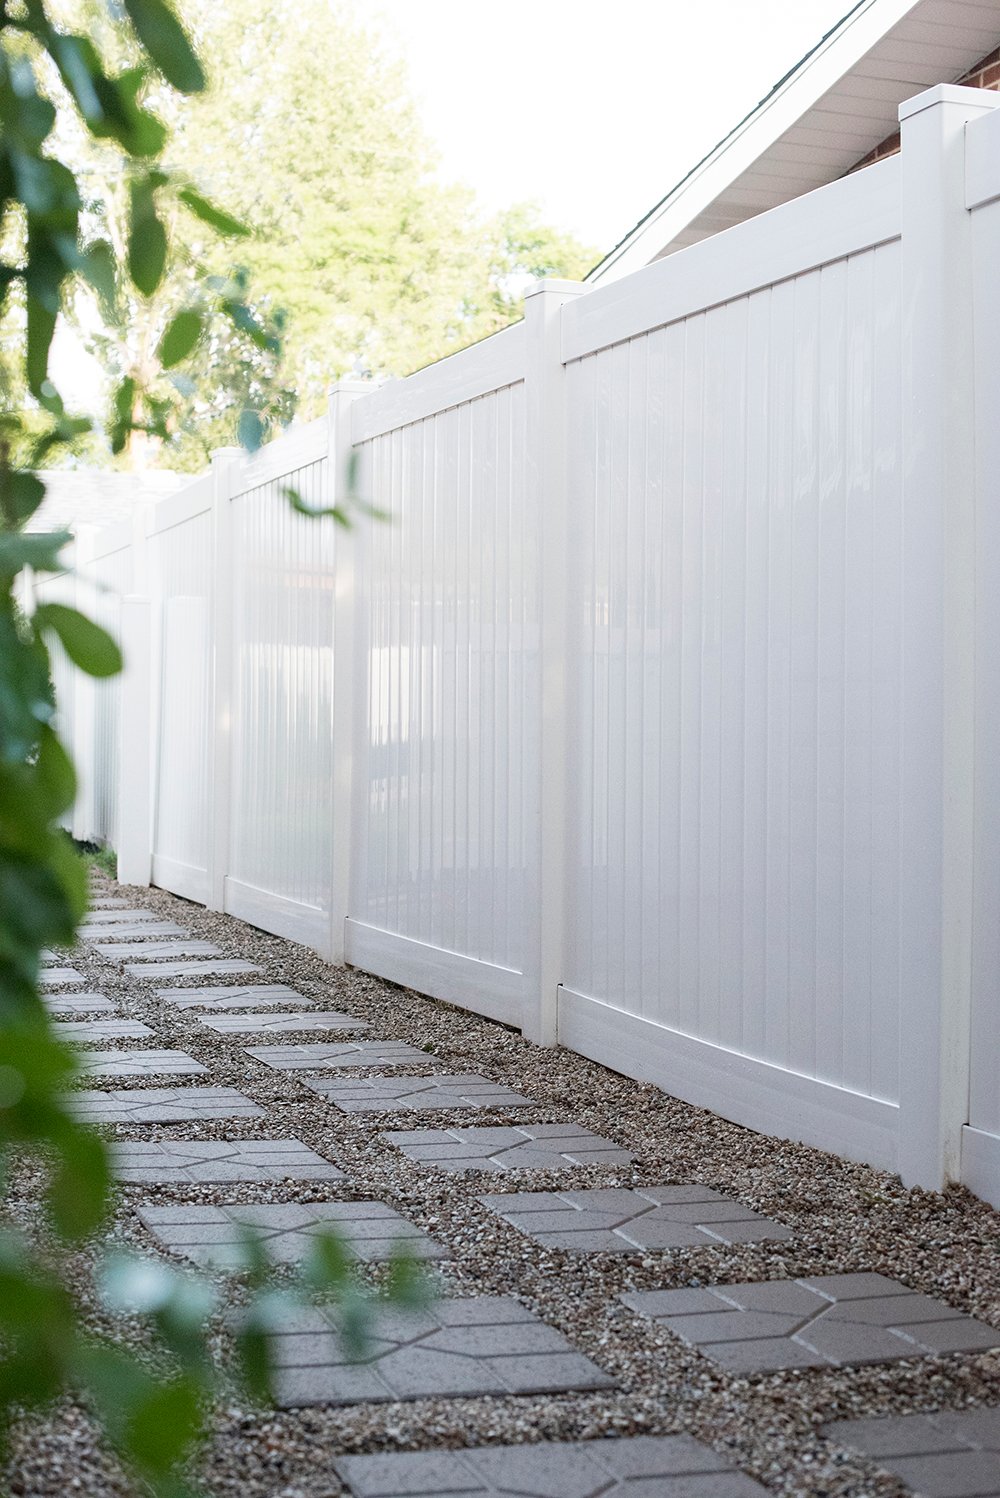
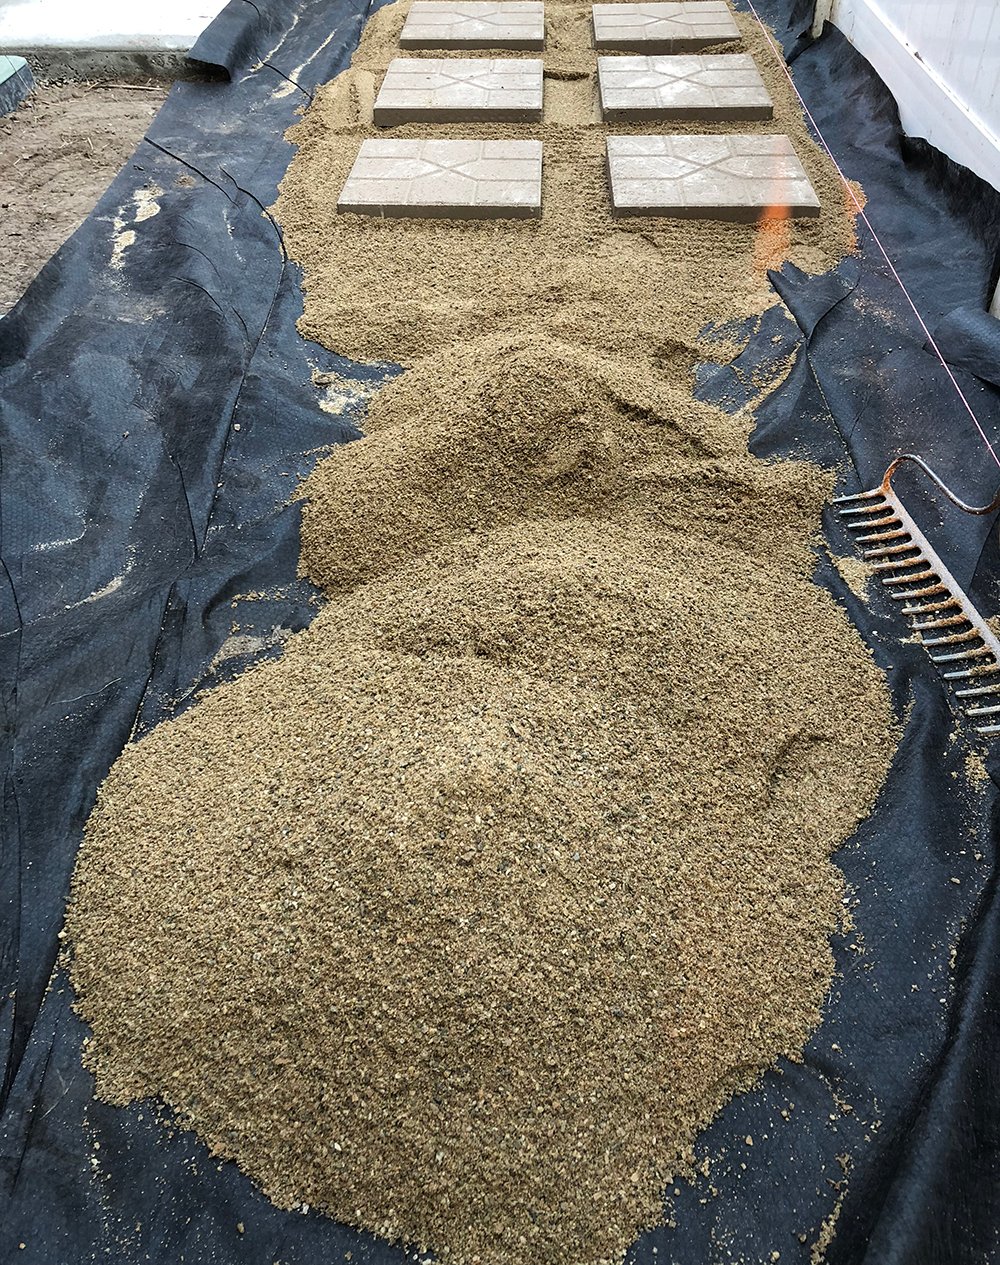 Step 3 // Add paver base and position the pavers. Next, add a layer of paver base and position your pinnacle patio stones in the desired pattern or layout. We weren’t as meticulous about leveling these as we were with our paver patio (see that tutorial here) because we didn’t mind an organic look in the side section of our yard… pea gravel is very forgiving and it helps camouflage imperfection.
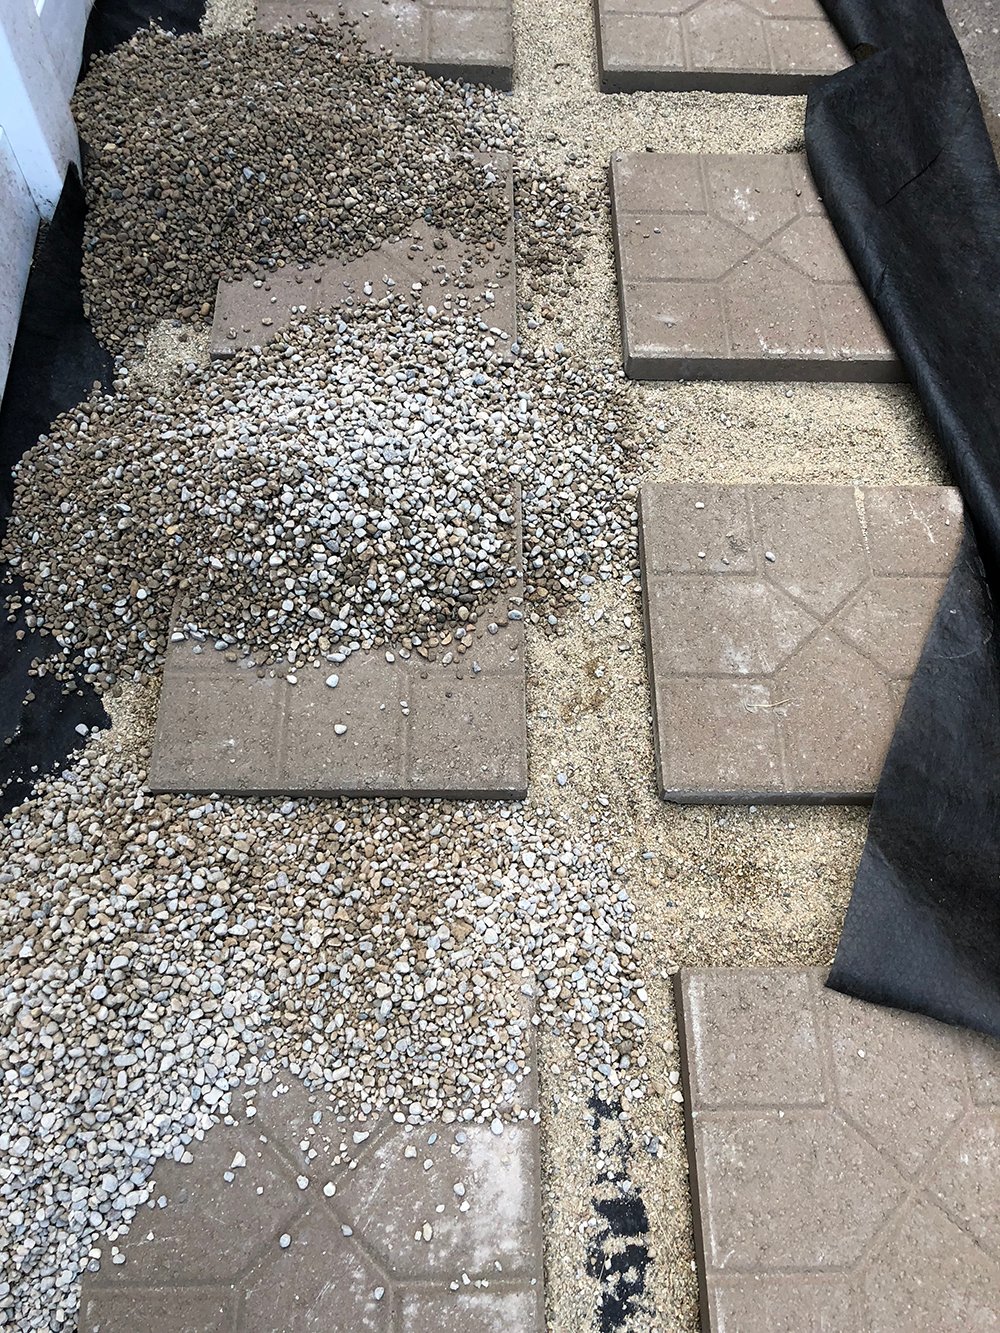
 The above image shows what the patio stones look like once we had them set in the paver base.
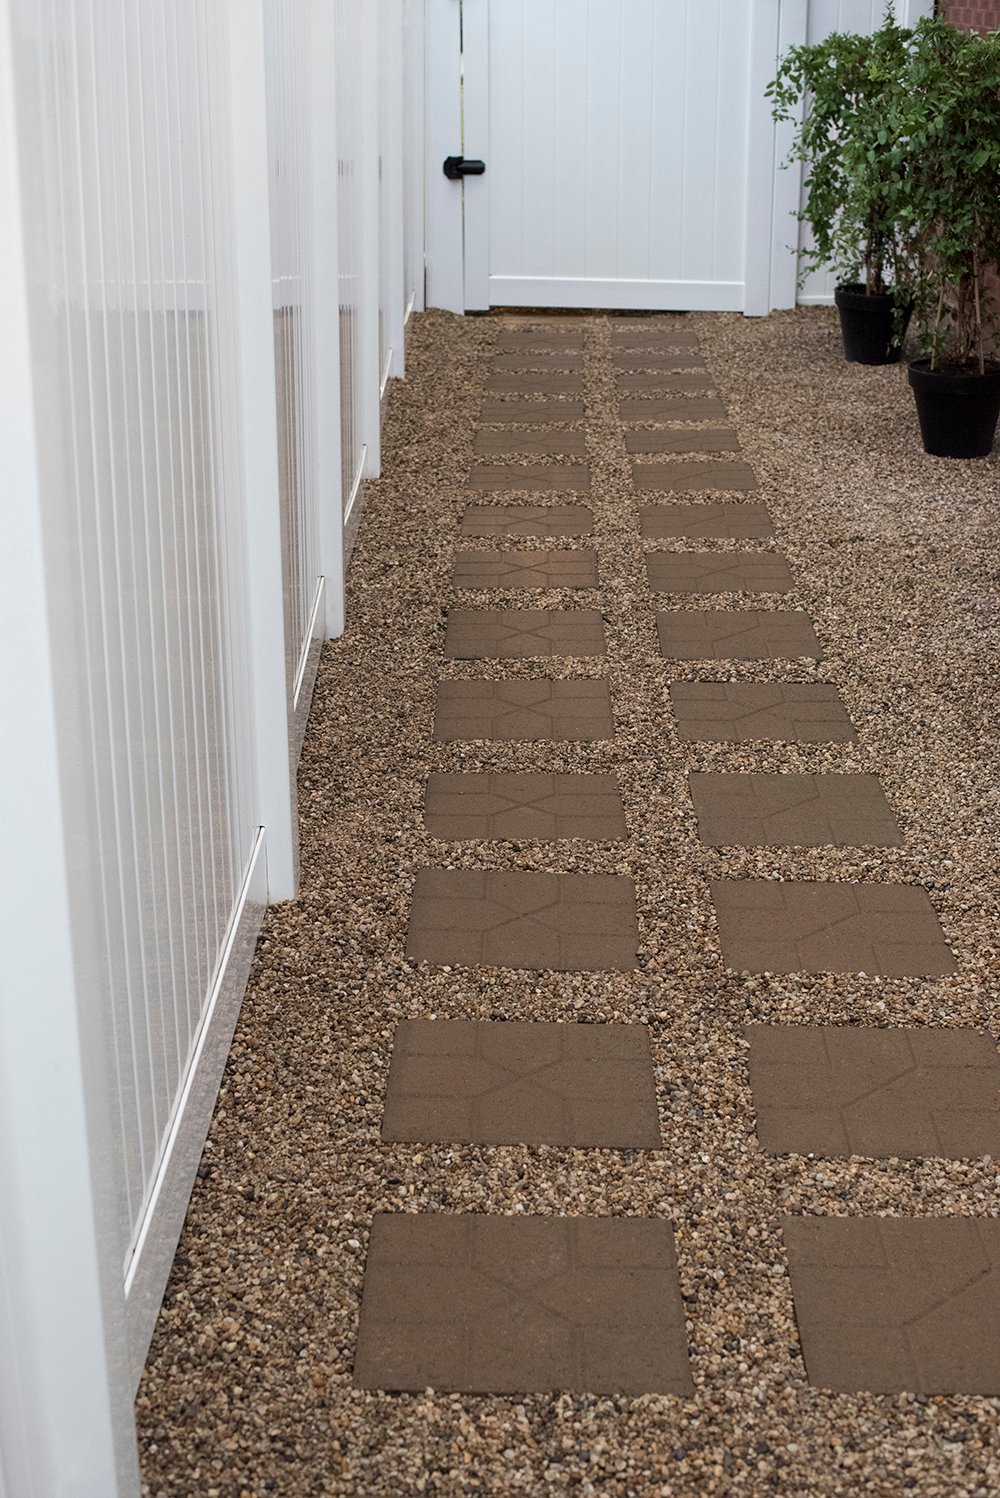
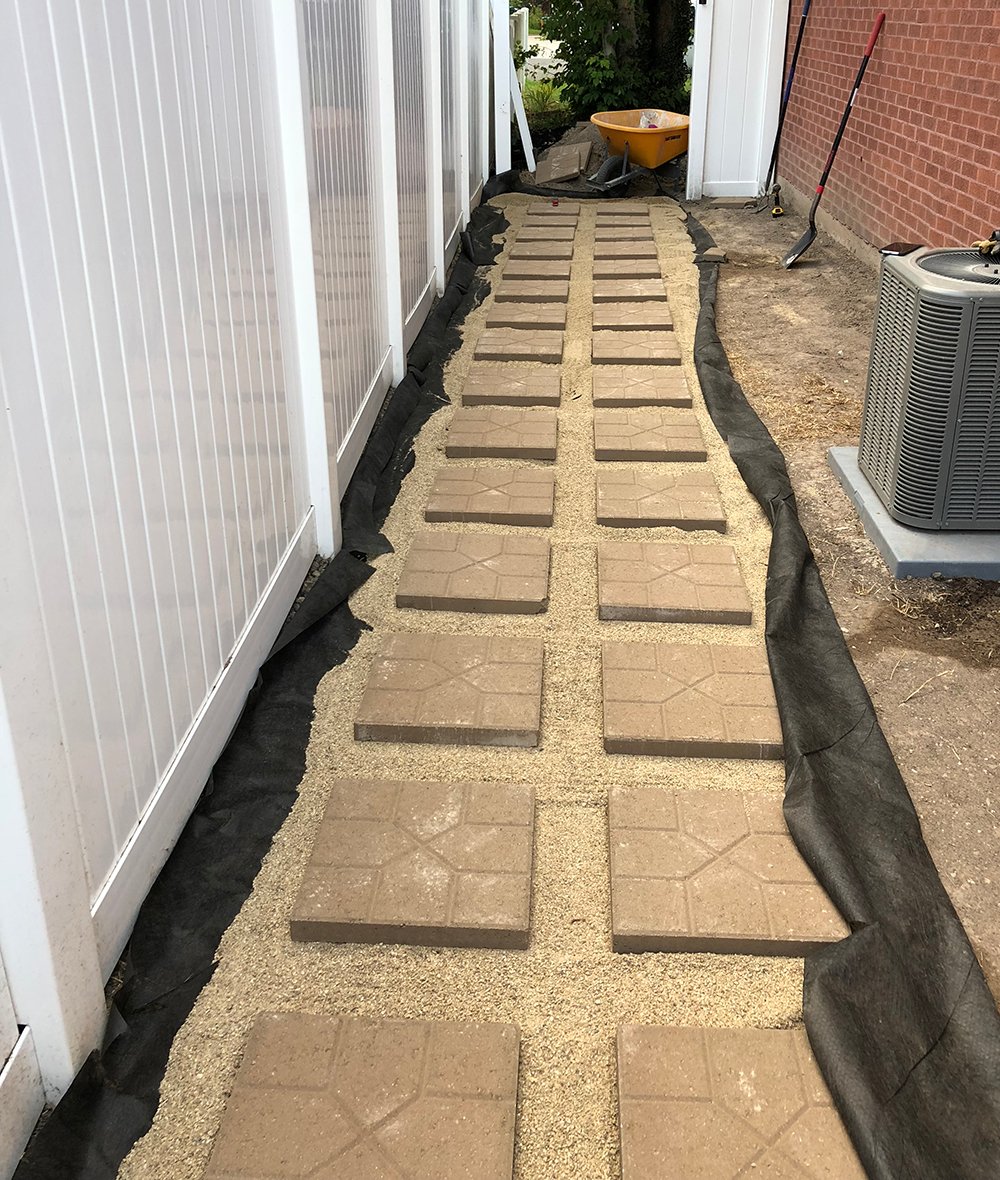
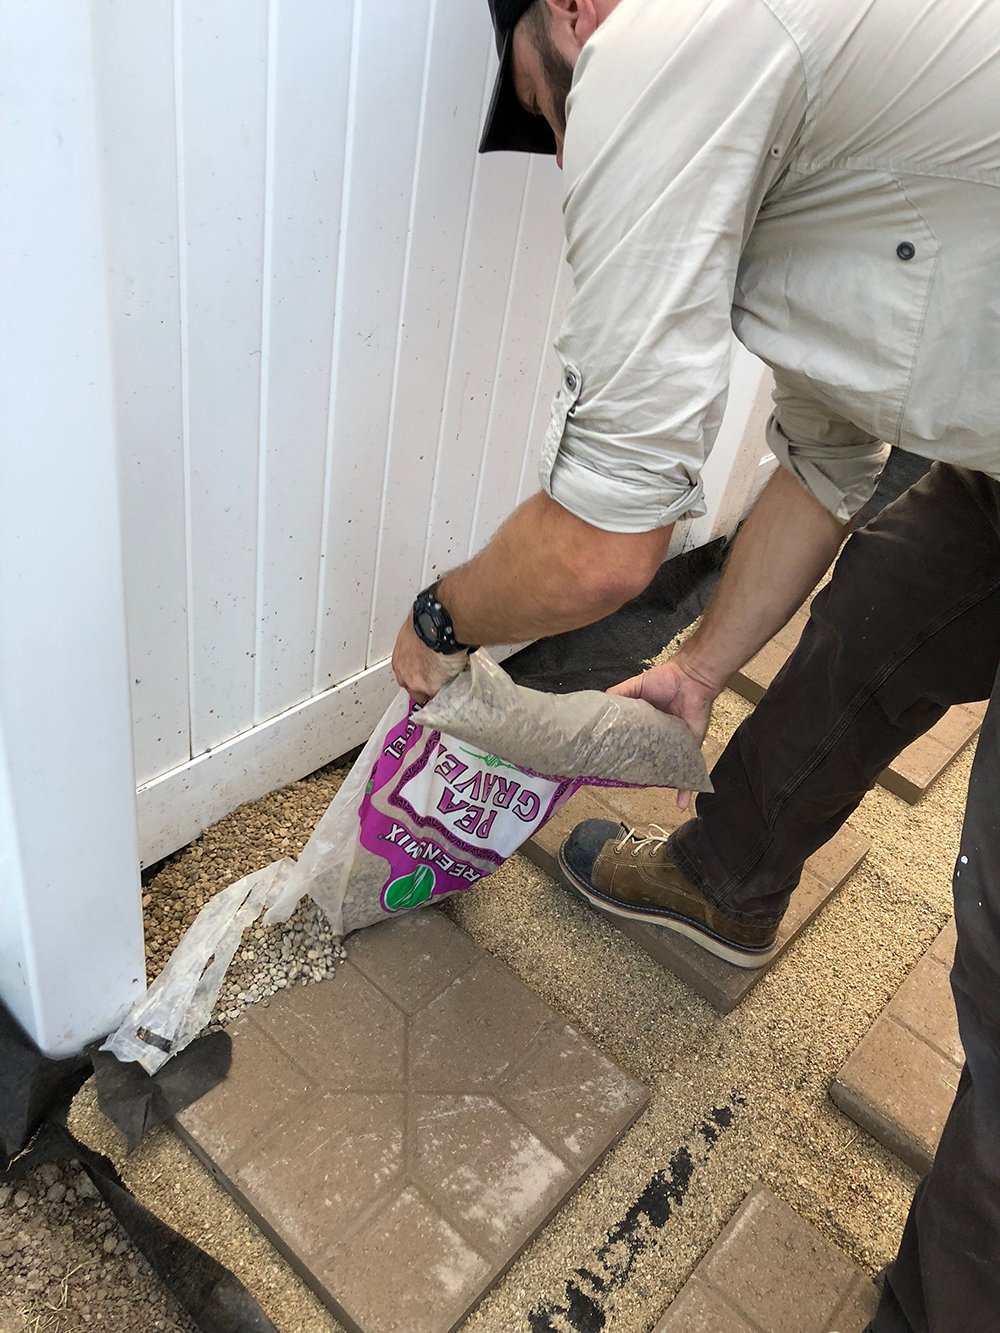 Step 4 // Layer on the pea gravel. Lastly, you’ll want to dump the bags of pea gravel on top of the stones and paver base.
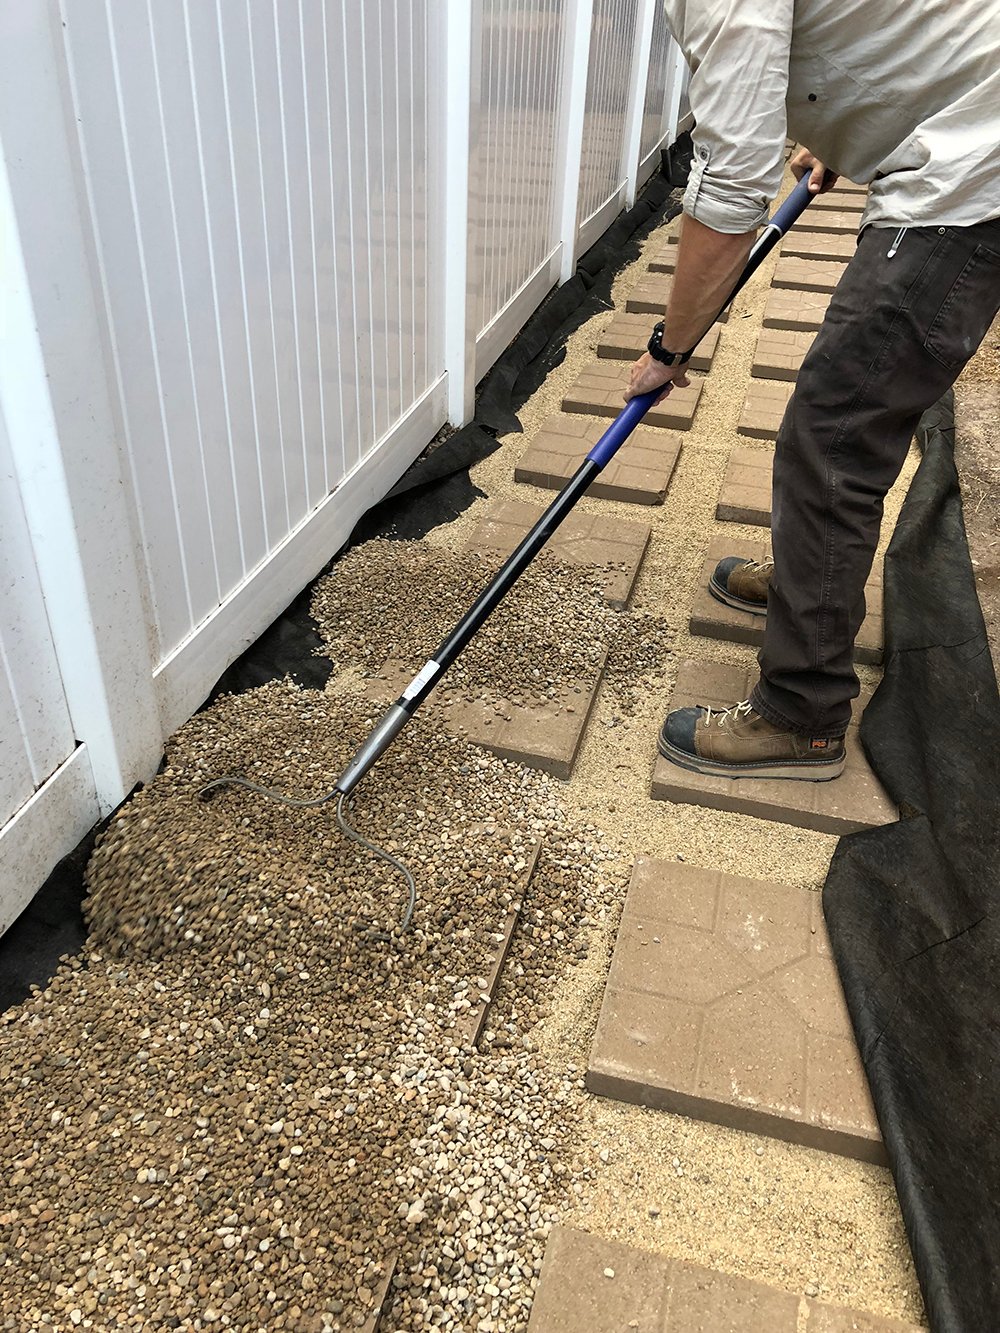
 Step 5 // Spread the gravel around the pavers. Rake the gravel until it is even spread around the pavers. Once you have a thick layer, dust off the stones to reveal the pattern or spray the excess pea gravel off of them with a water hose.
 I’m really into the final aesthetic of this project, but guess what I love even more? The fact that it requires ZERO maintenance. That’s a huge deal! Living in Utah, water conservation is a big concern for us. Lots of people landscape with gravel, stone, and materials that don’t require water. This part of the yard will look the same regardless of the amount of rain we get… and that’s something Emmett and I are both pretty happy about. We won’t have to worry about irrigation or a sprinkler system.
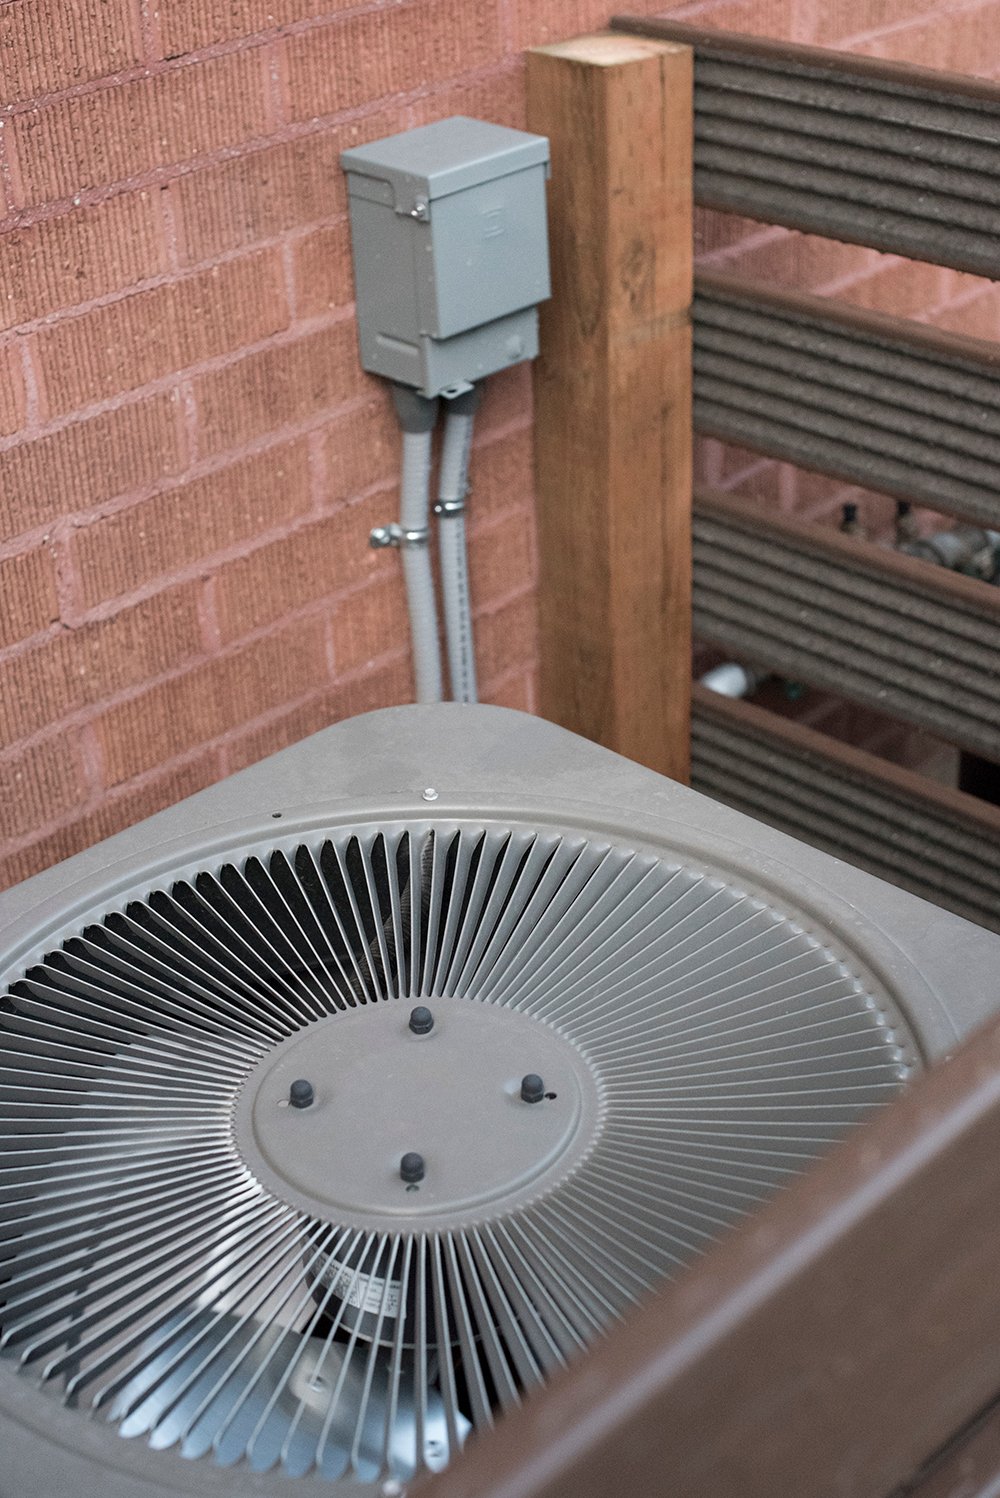
 Lastly, I wanted to quickly touch on one more thing we tried to disguise or clean up… the air conditioner and sprinkler system. Both utilities live in this portion of the yard, so the final item on our checklist was to address both of those eyesores.
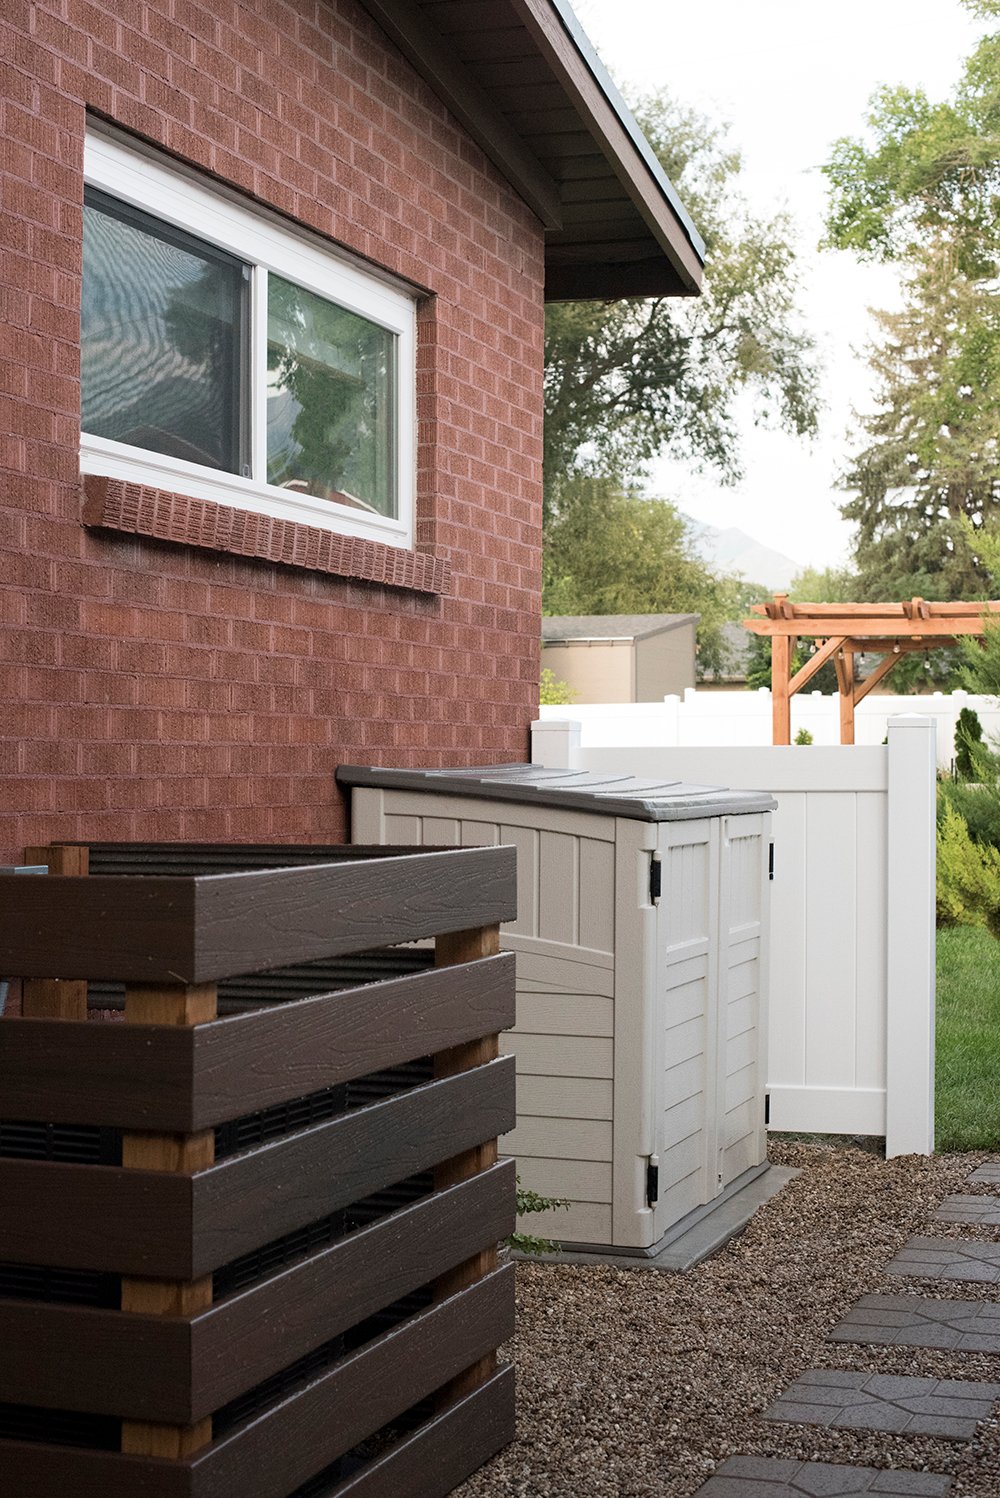
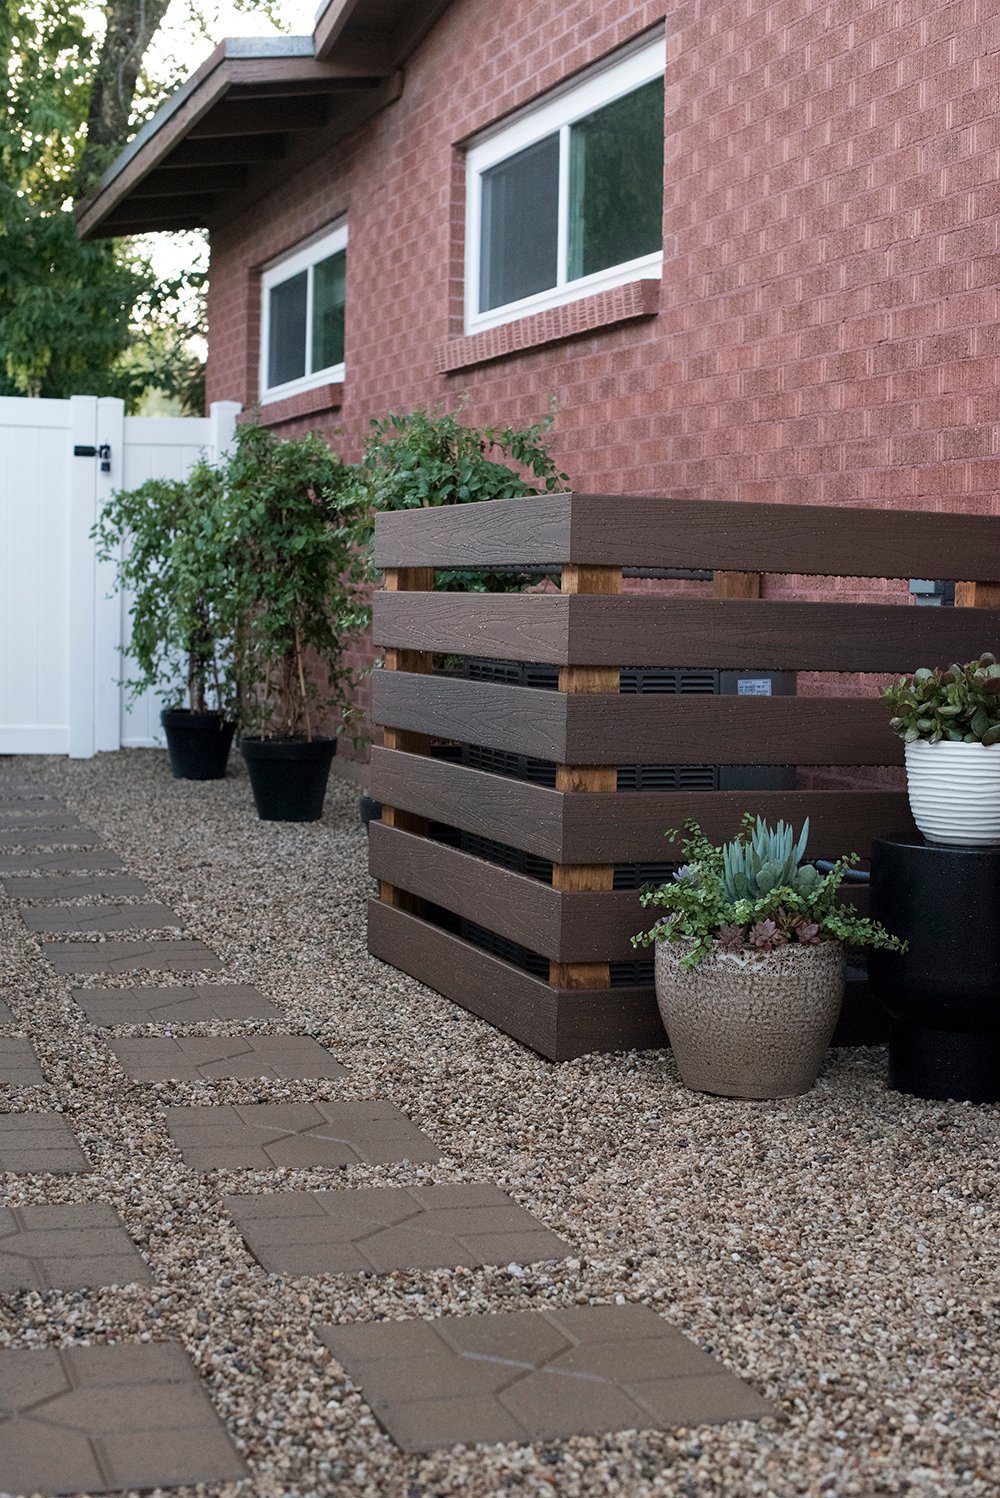 Emmett quickly built a modern cover using deck composite to disguise the AC unit. If you’re not into this easy DIY option, Lowes sells a readymade lattice option that looks really nice! We left plenty of space for the unit to breathe as needed.
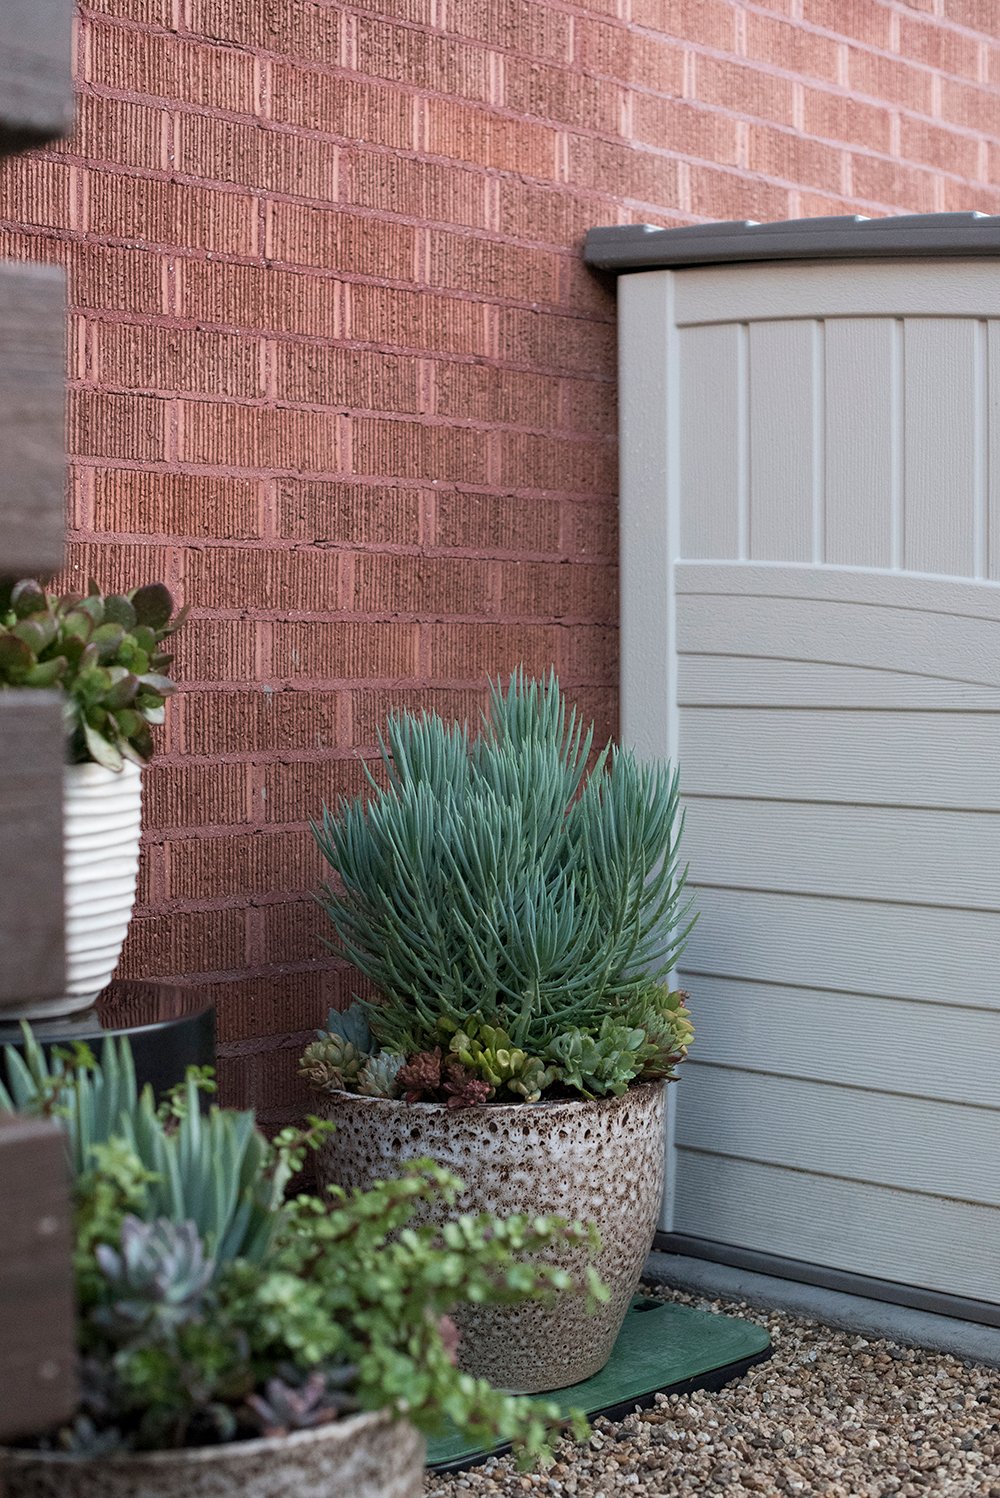
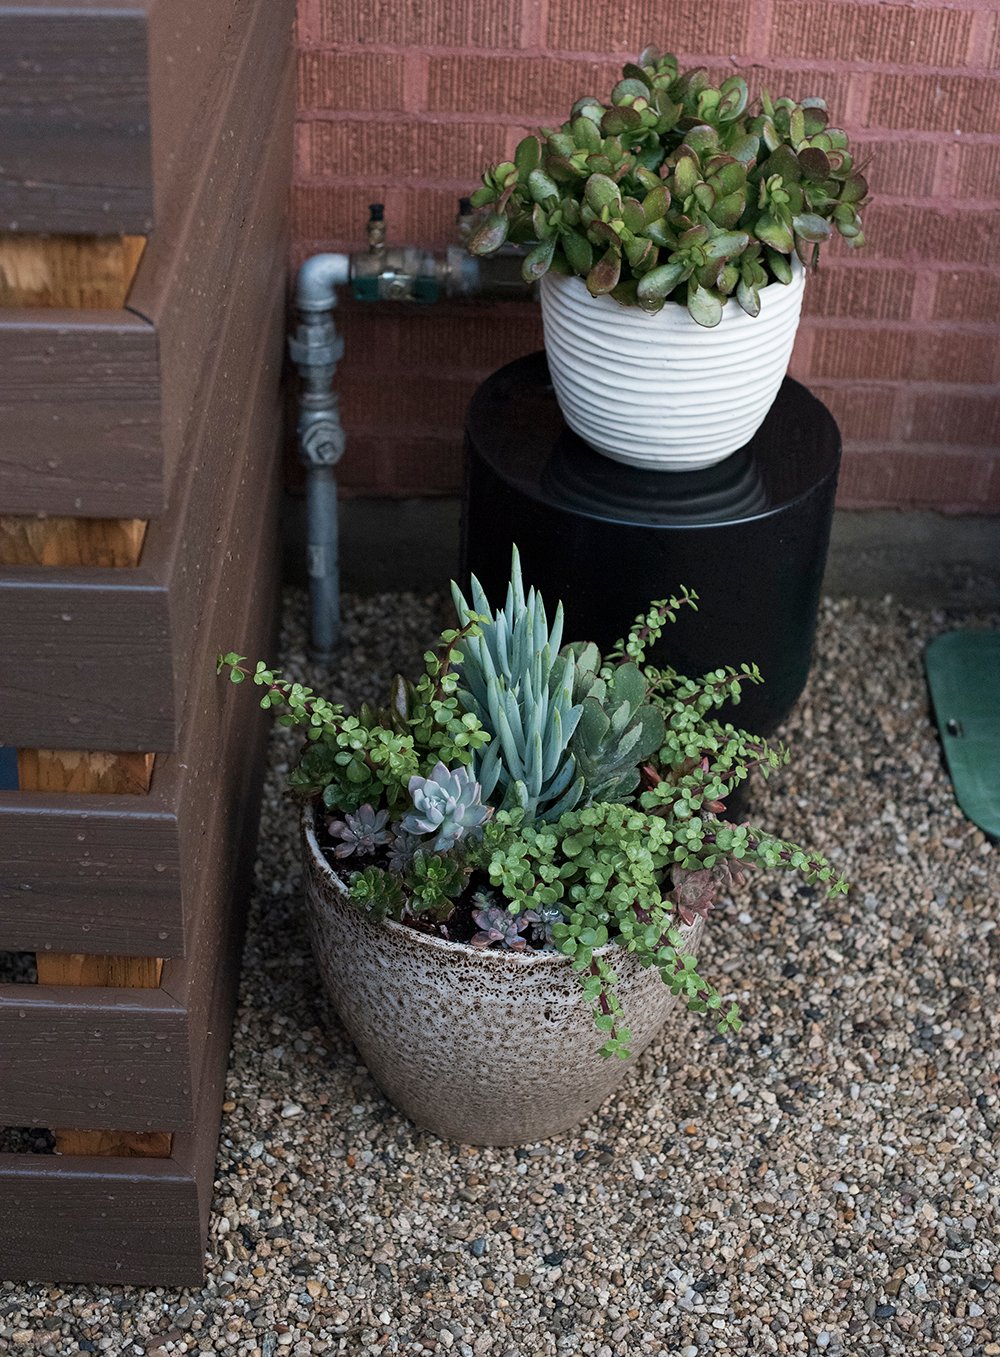
 I moved some of my potted plants into this area to disguise the sprinkler system and plumbing that runs to it. It was an easy fix that will give my full-sun plants a nice place to thrive, while covering some areas that aren’t as pretty to look at.
 What do you guys think? I’d love to hear your thoughts! Do you also have a weird area in your yard that is neglected? I feel like it’s a pretty common occurrence. As always, let me know if you have any questions about the projects… I’m always happy to help explain! Mark your calendars for a 3-day Labor Day project- you’ll be happy you finally crossed it off the to-do list when it’s all said and done. Trust me!