Formal Living Room : One Room Challenge – Room Reveal
 Whewww! WE HAVE ARRIVED. Today is the day. Allow me to finally share our formal living room reveal. Although we started this space for the One Room Challenge that ended back in November, Emmett and I are finally crossing the finish line with this room. Even though we’re a couple months late, I’m still proud as hell. Through sickness, a vacation we already had on the calendar, and the busy holiday season, Emmett and I powered through, working as hard as we could. We bit off more than we could chew for such a short timespan (tough lesson learned), but I’m glad we didn’t compromise and stuck with our original plan and vision. We didn’t cut a single corner and we made it happen together! Speaking of plans- some projects go as planned, unravel easily, and bring happy surprises. This renovation was the complete opposite, and that’s ok. Sometimes that’s how it goes. The extra time, money, and energy we spent getting this room right was a good decision. Ready to see?! Click through for the reveal and of course- all the sources…
If you found me through the ORC site, hi there! I’m Sarah, a designer & blogger located in Salt Lake City, UT. You can see my current home renovation here, as well as my previous home tour here. My husband, Emmett, and I are renovating our third house. In case you missed previous updates, don’t worry! Catch up here: Week 1 (before images, floor plan, and design plan), Week 2 (demo), Week 3 (drywall), Week 4 (fireplace and lighting), Week 5 (sneak peek of furnishings), Week 6 (built-ins and flooring), Week 7 (built-in and furniture placement), Week 8 (millwork), Week 9 (painting built-ins), Week 10 (beams).
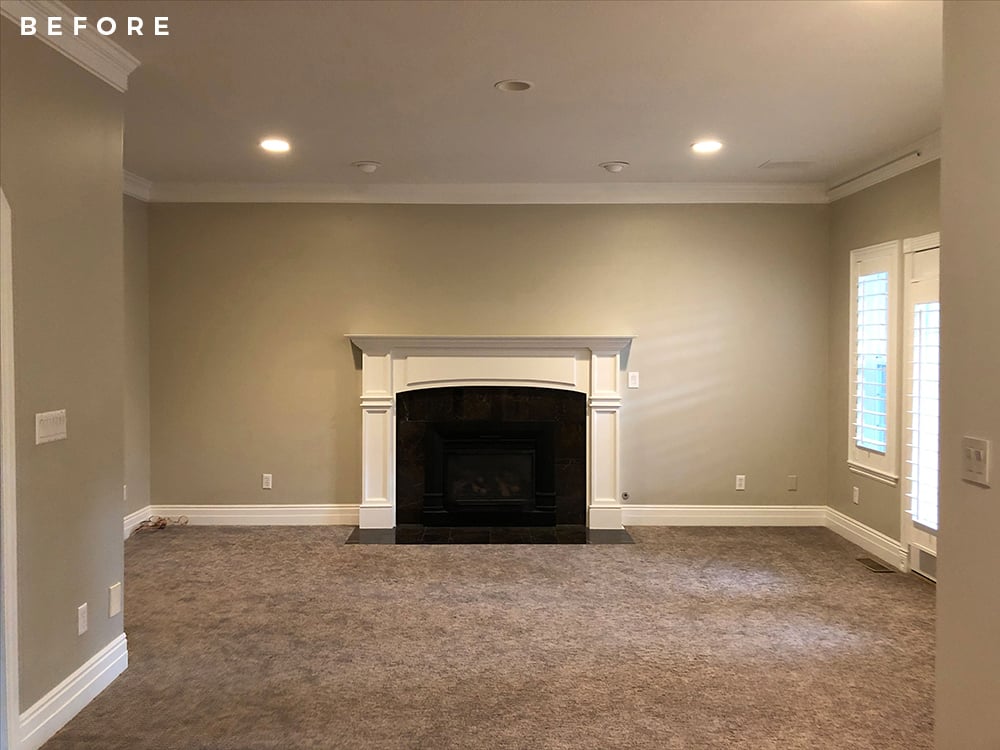
Get ready for a long (but good) post, my friends! Here’s a little refresher to remind you what the space looked like BEFORE we started demo a couple months ago…
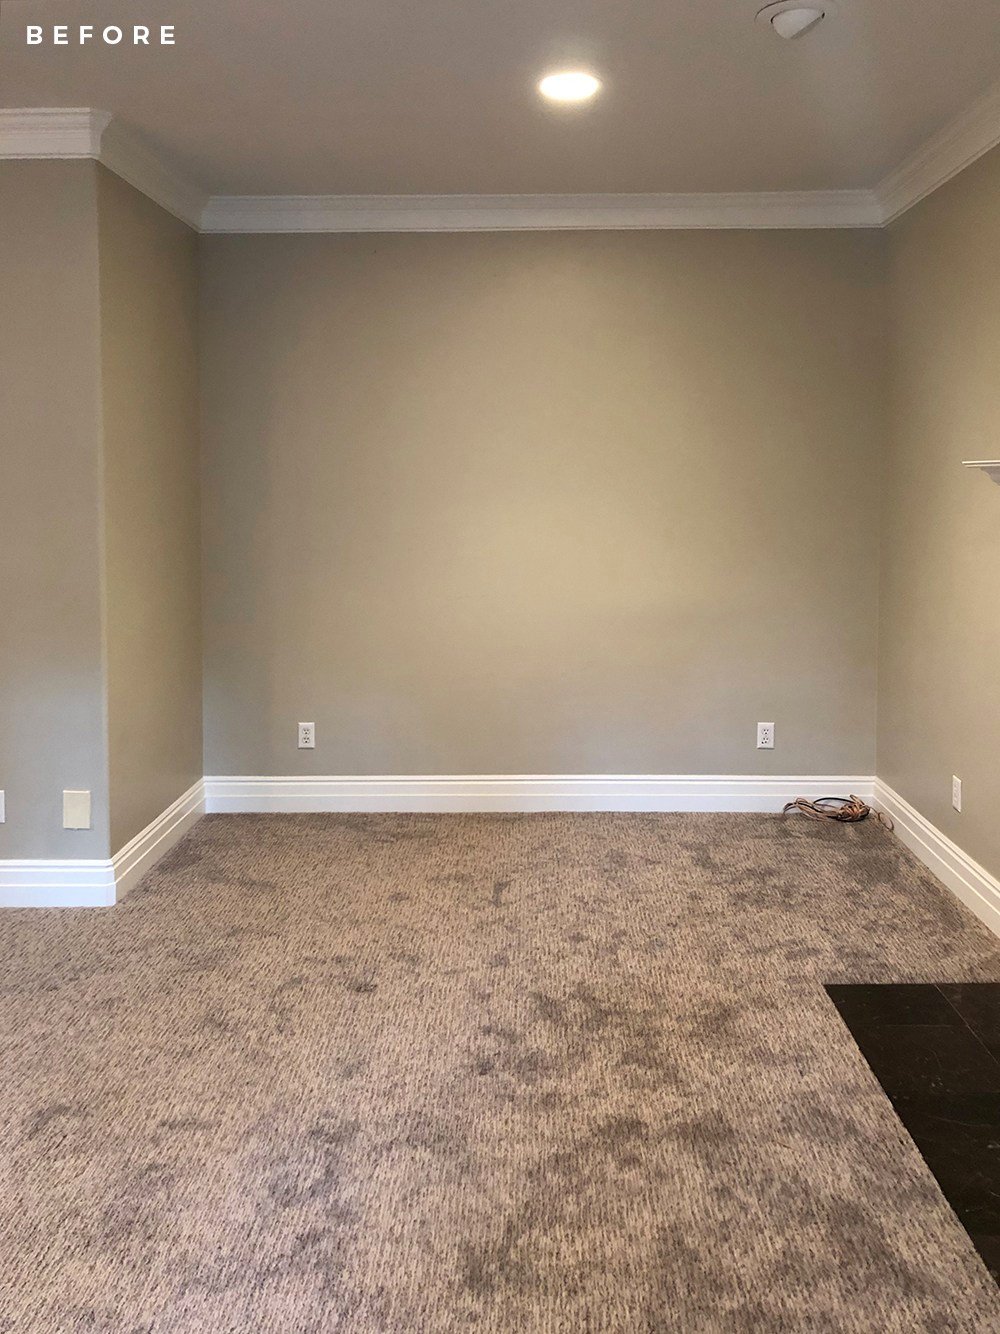 The room was pretty basic, didn’t have great flow or function, and felt pretty bland in our 90’s builder home. My two biggest goals were to add character and function. With that in mind, ready for the after?
 If you’ve been following our progress from the very beginning, you already know- we knocked down walls, removed a closet, traded the carpet for gorgeous herringbone hardwoods, updated the fireplace, added built-ins, installed beams, and about a hundred other things that were kind of a chain reaction (like replacing hot water heaters, new plumbing, the list goes on).
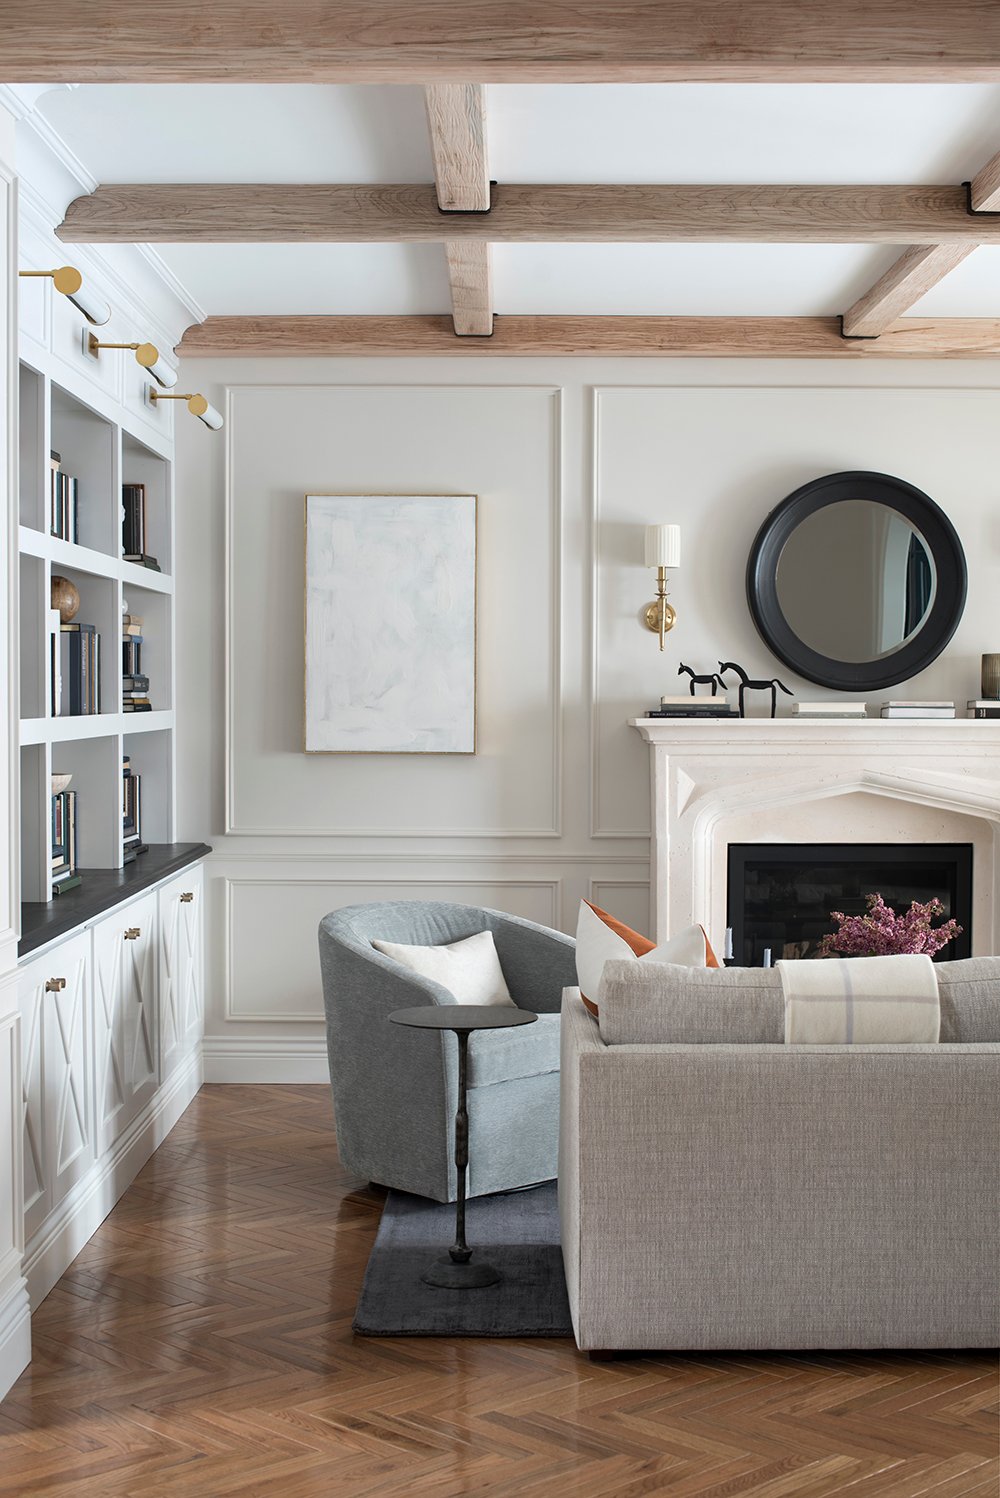
 Our previous boring beige living room is quite the opposite these days. It’s a space I find myself enjoying on a daily basis. This winter, the gas fireplace has been so dreamy! I often find myself working from my laptop in one of the swivel chairs in front of a toasty fire.
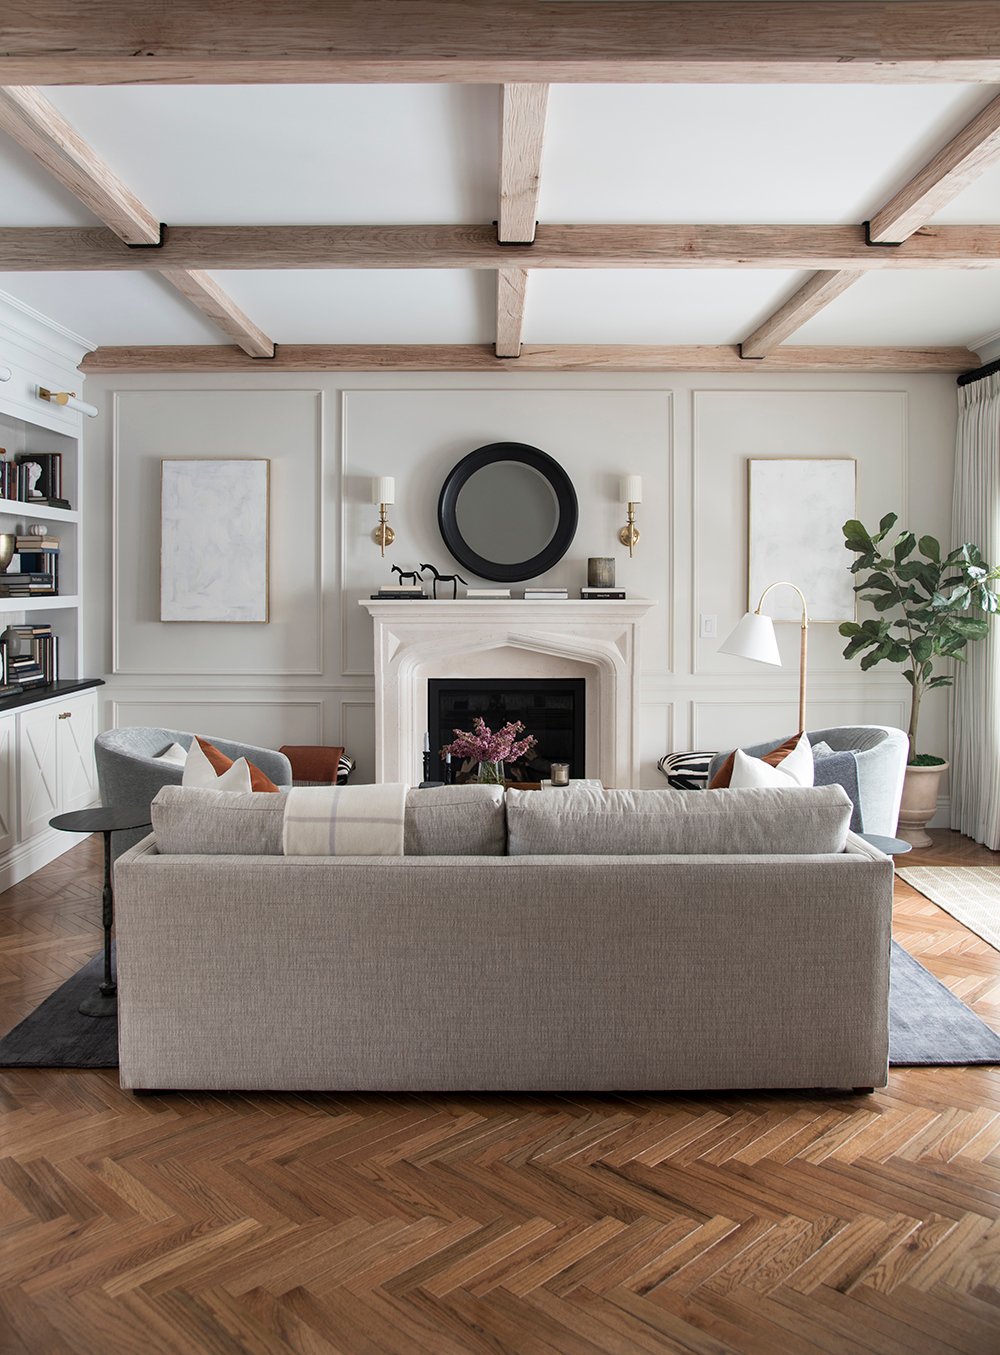 Ready to chat details and design decisions? I think it’s time! First let me give you a lay of the land, so you can get a better feel for where this space is in our home.
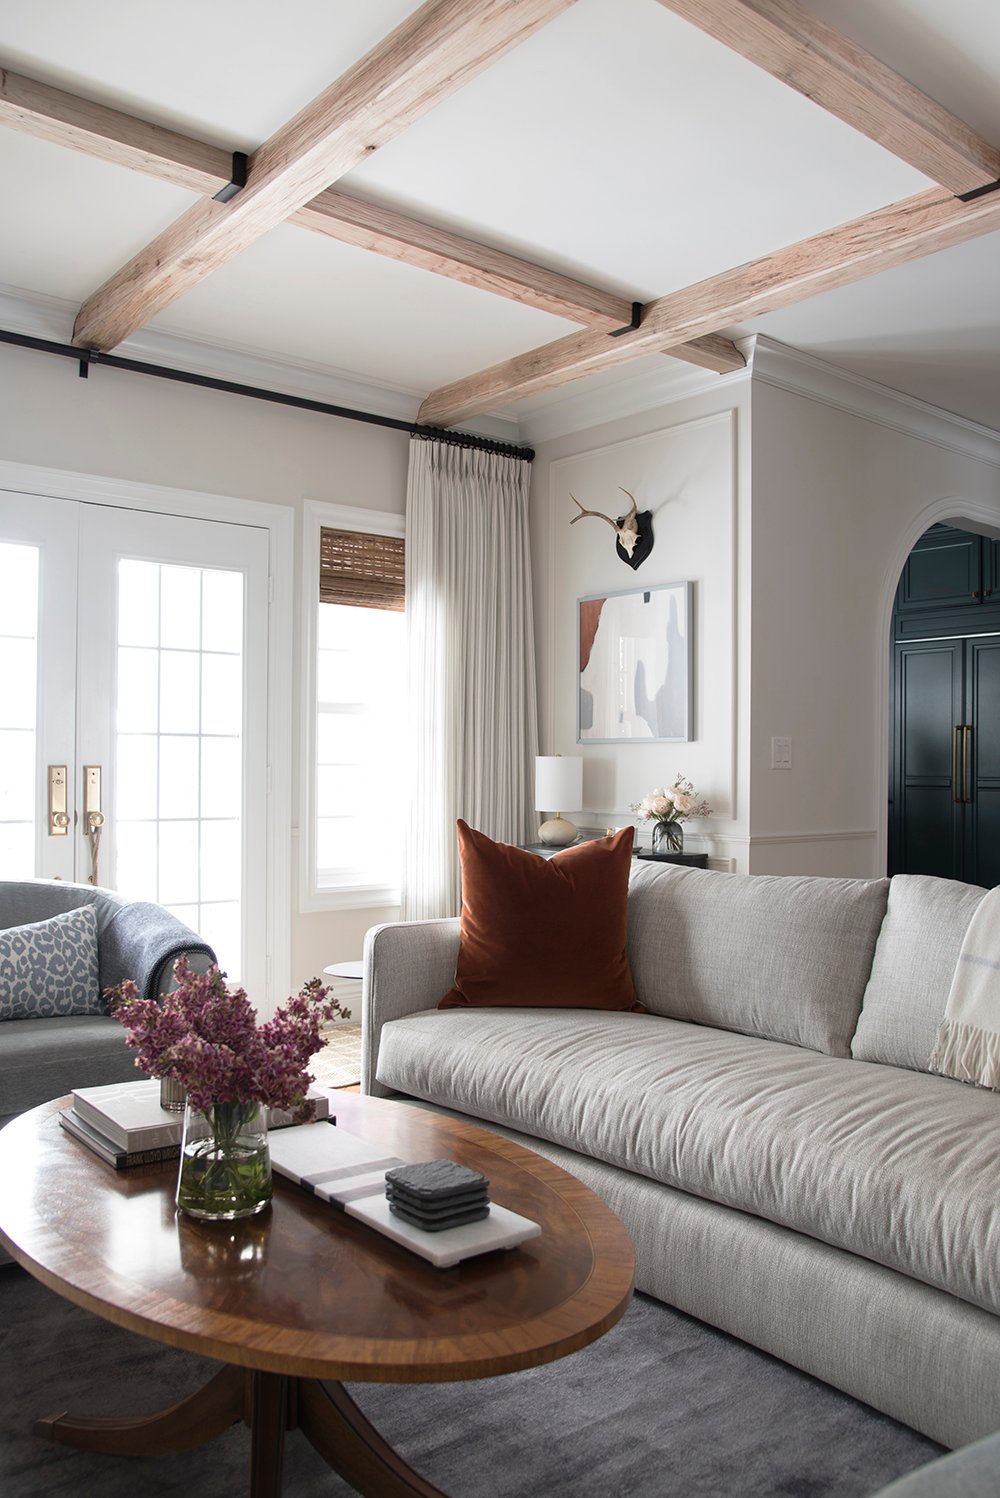 See our kitchen through the arched doorway in the background? This room is sandwiched between the kitchen, dining room (which we have yet to tackle), then out the french doors lives our patio… which is currently covered under a foot of snow.
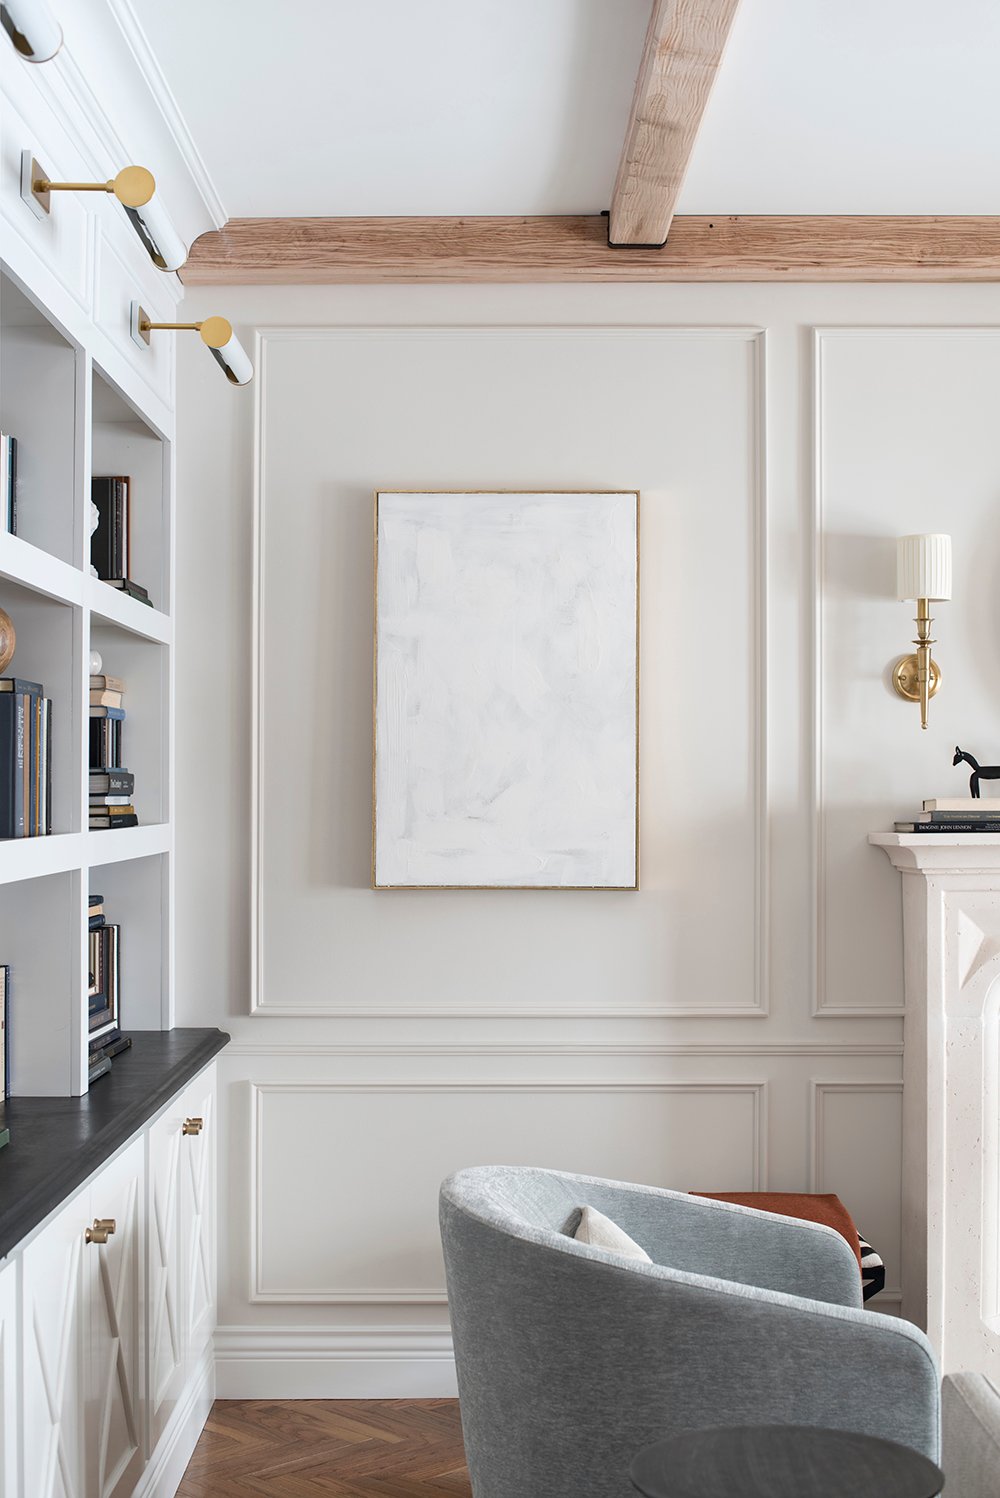
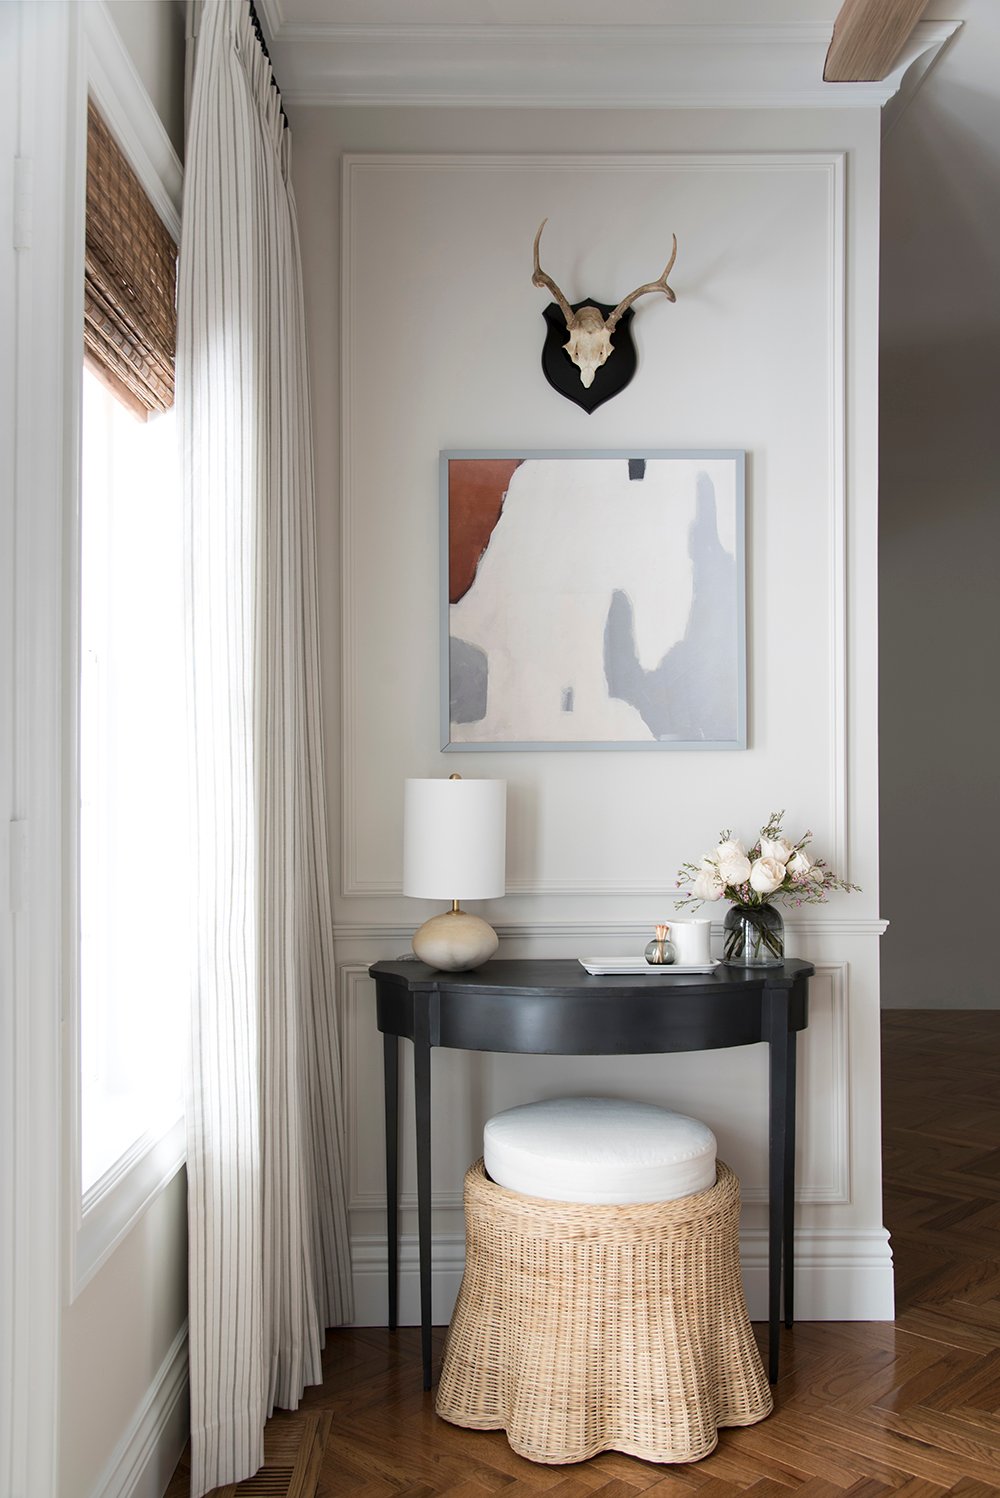 When renovating the kitchen, we extended the room a few feet. The result of that decision is this little corner in the living room. I love that it provided an area for a simple vignette and art. I often find I’m missing precious wall space when designing or working with open concept spaces. Back when I was working on the kitchen floor plan, I knew this corner would come in handy once we jumped to the living room.
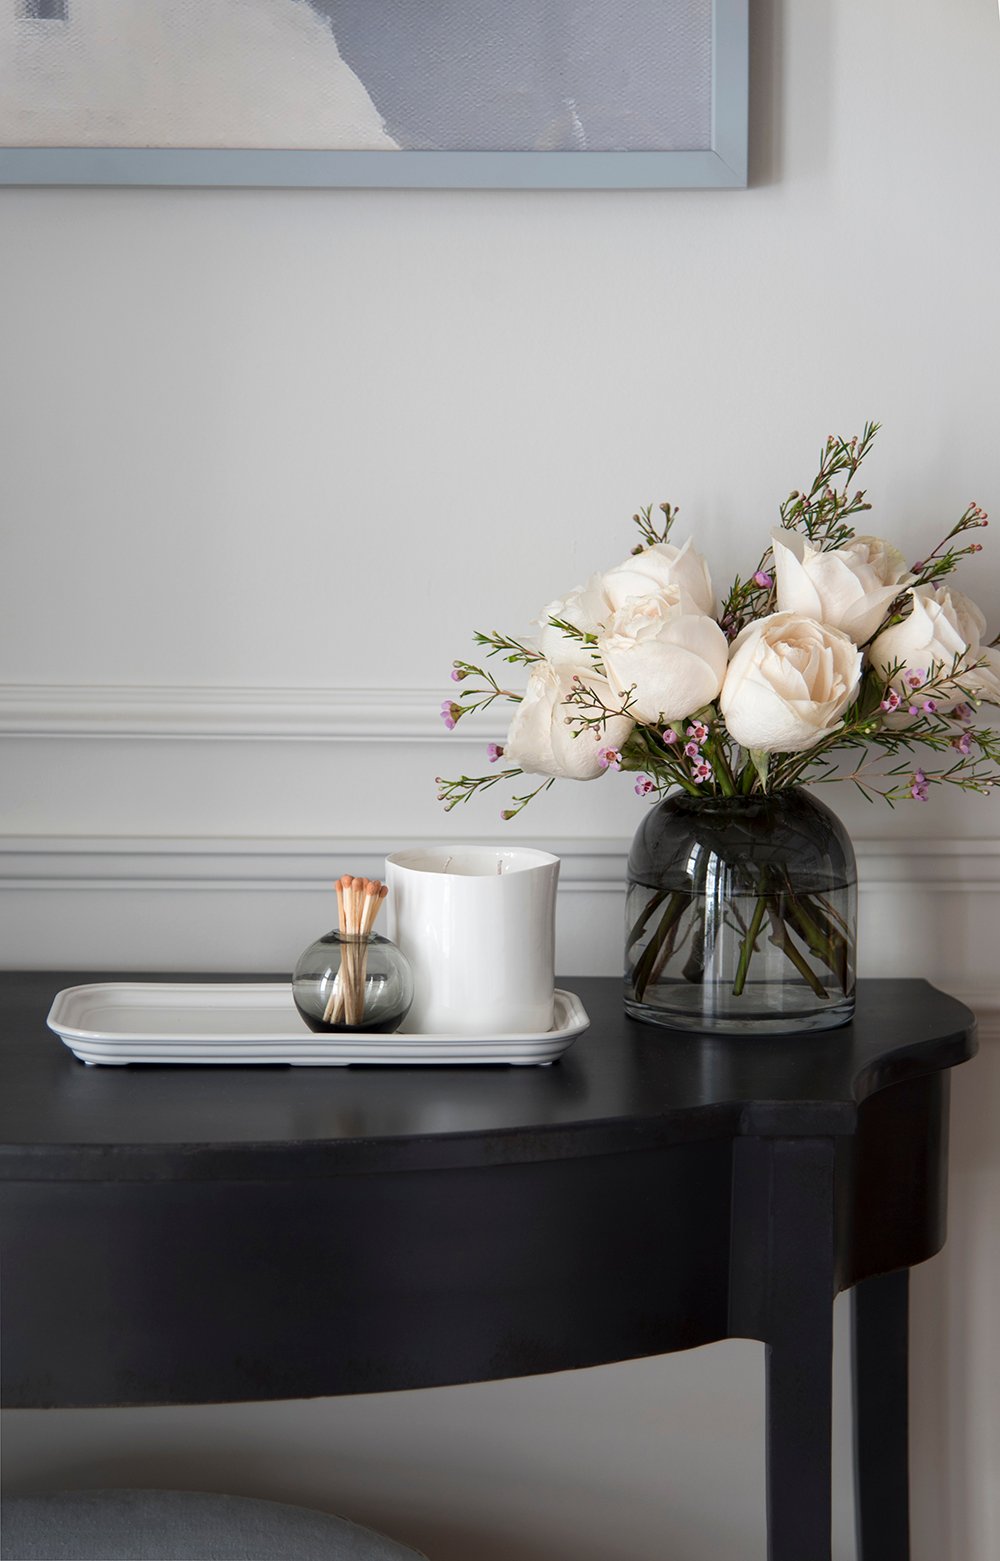 I never pass up an opportunity to set out a floral arrangement, burn a new candle, or add incognito seating to a room that is often used for entertaining. That’s where my favorite ottoman comes in…
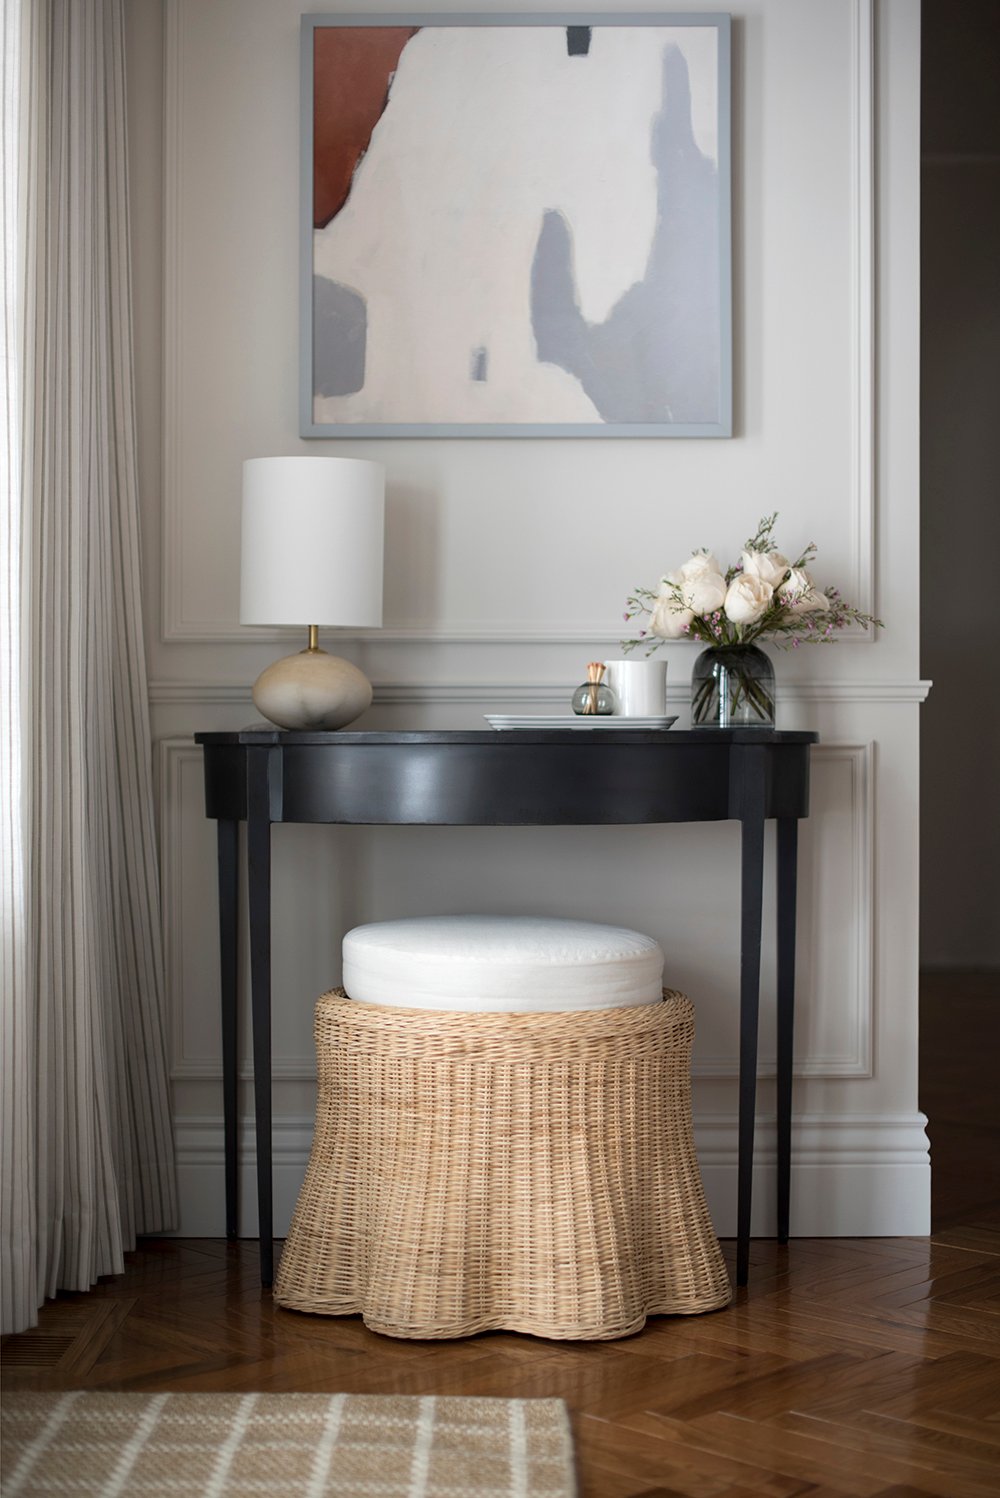 I fell in love with this beauty the moment I stumbled upon the Mainly Baskets site. This ottoman is one of nine in a scalloped furniture collection. Aside from its woven beauty, I wanted to install some ottomans in the living room for functionality purposes. We entertain often and people always end up in the kitchen, living room, or patio… I think because they’re centrally located in our house. Regardless, having the option to pull up an additional, easy seat is really convenient!
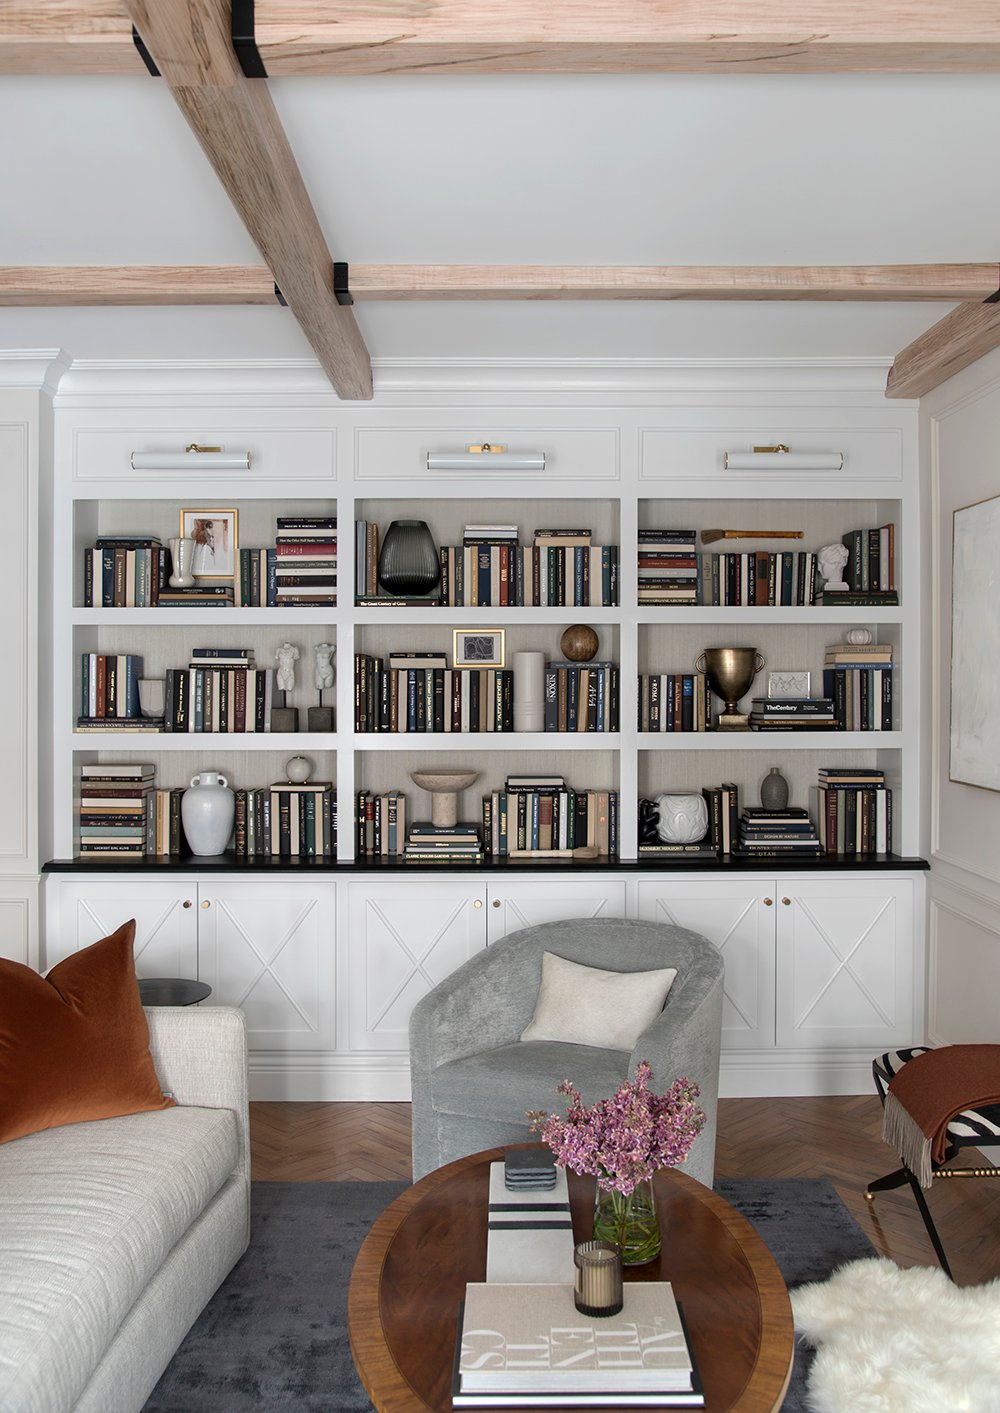
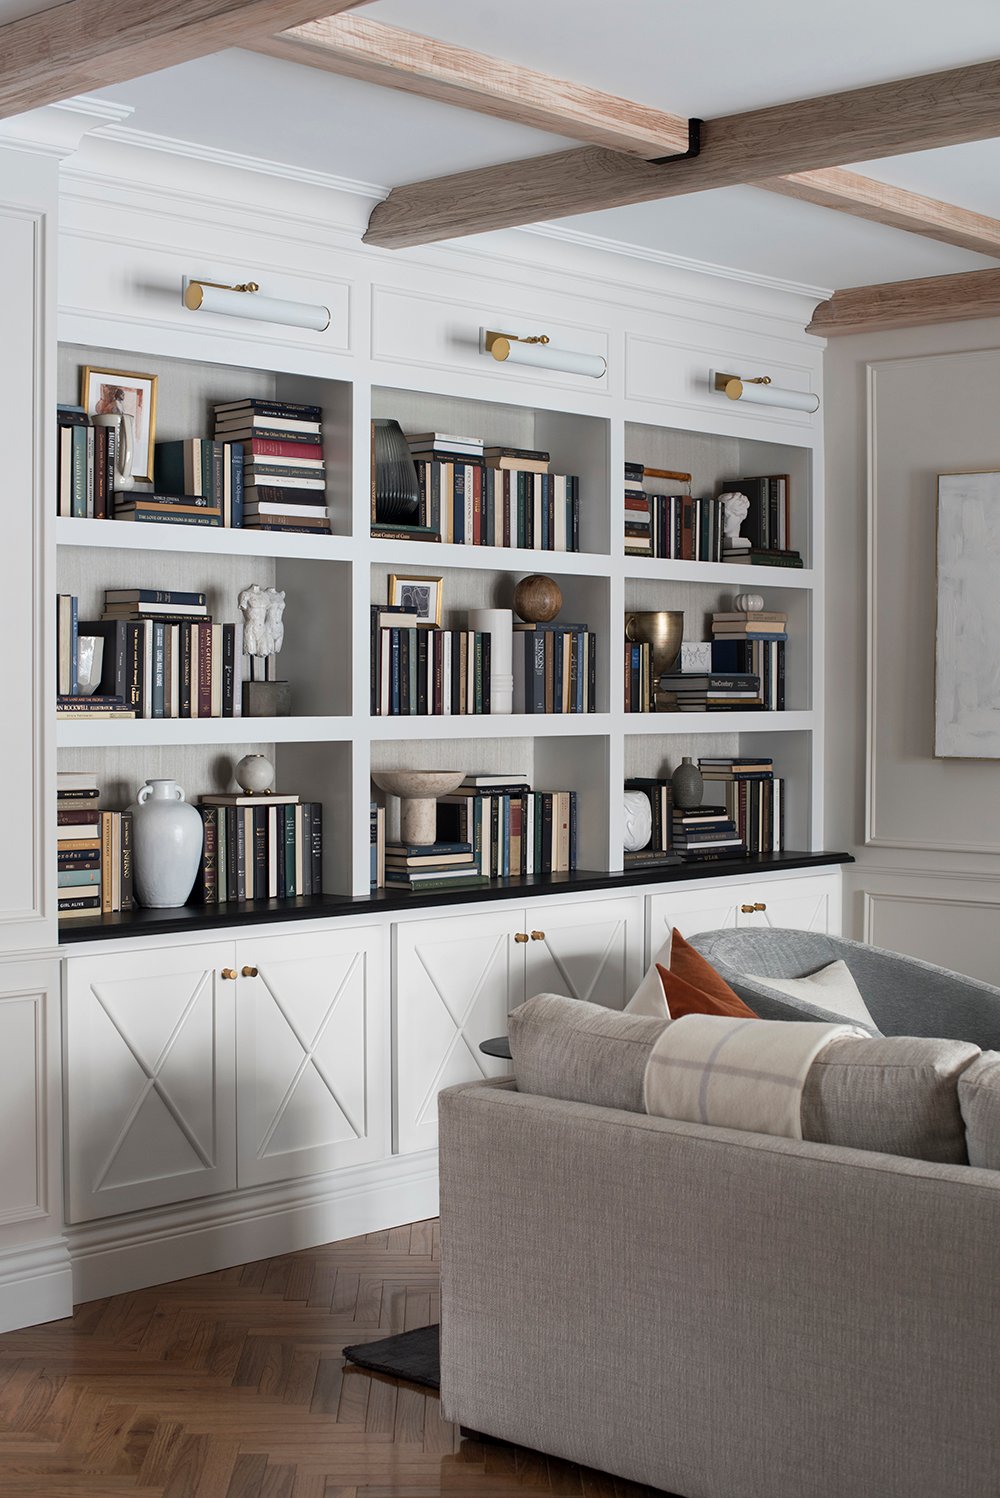 Ready to talk about the built-ins? These things were certainly a labor of love. I sketched them up, Emmett built them (grab the built-in tutorial here), and we finished them together. Did you notice the subtle grasscloth wallpaper on the back of the shelves (get that tutorial here)? We wallpapered together on Christmas Eve. It’s honestly one I won’t forget. I have to take a moment to brag on Emmett’s millwork and carpentry skills- he is SO GOOD these days. I swear his skillset continues to expand and surprise me.
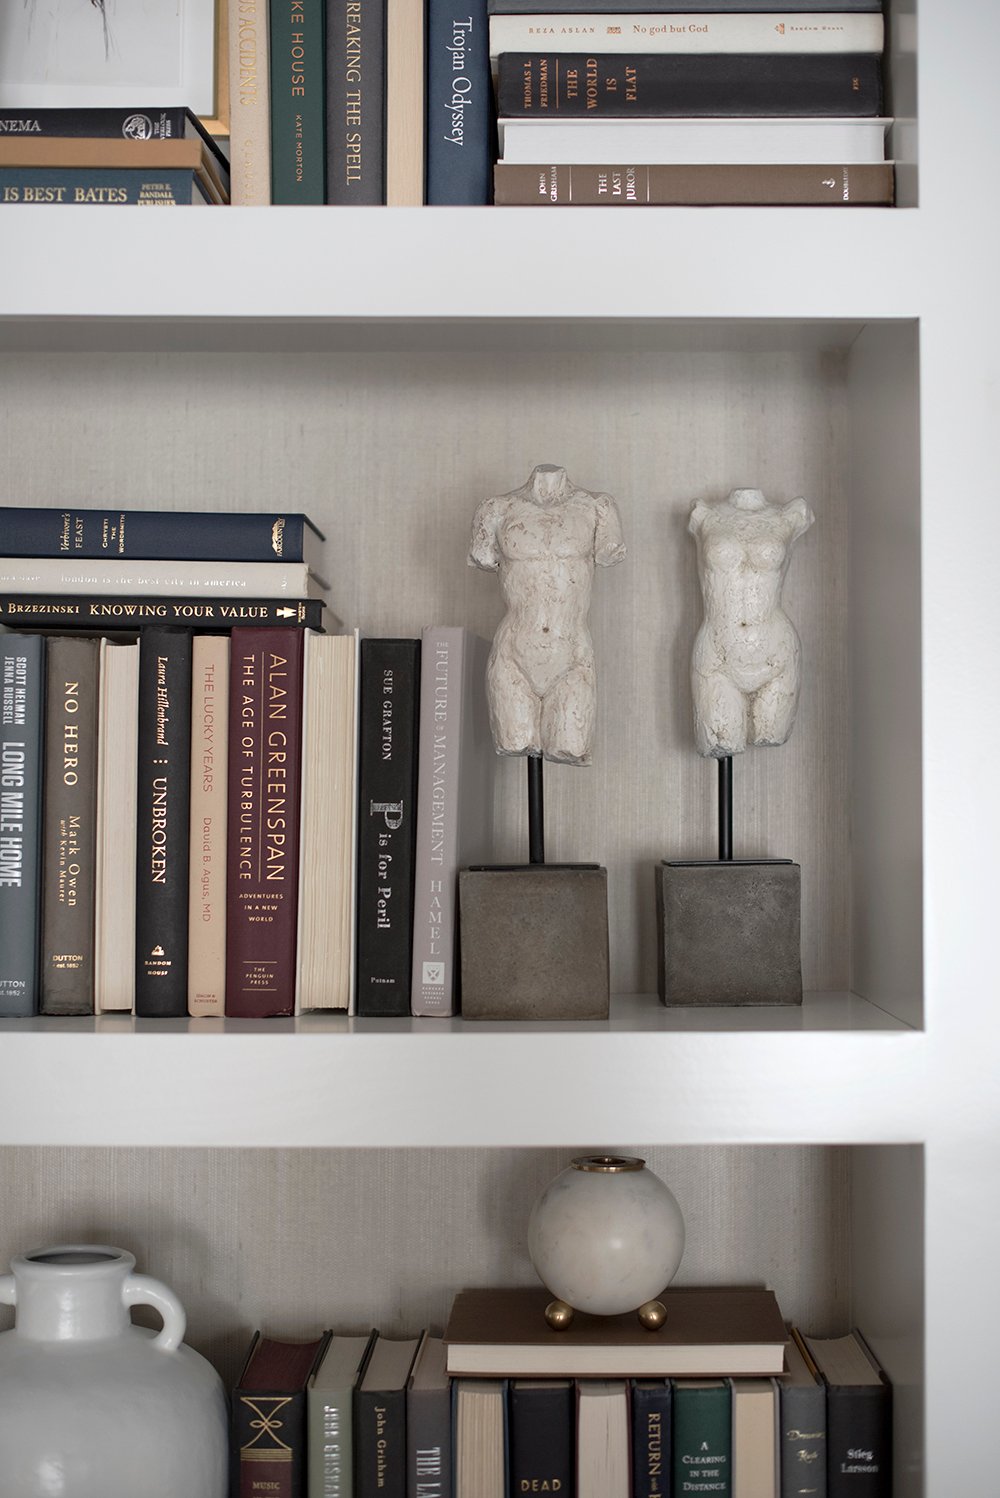 Styling the shelves last week was soooo much work. Maybe it just felt like that because I had / have bronchitis? I’m not sure, but lugging THAT many books up and down the stairs in our house got the best of me… it took me a solid week just to style these babies. Lots of you have been asking about the nude busts, pictured above… they are sold out everywhere. I’m sorry! I’m pretty sure they were discontinued. Mine came from Lamps Plus.
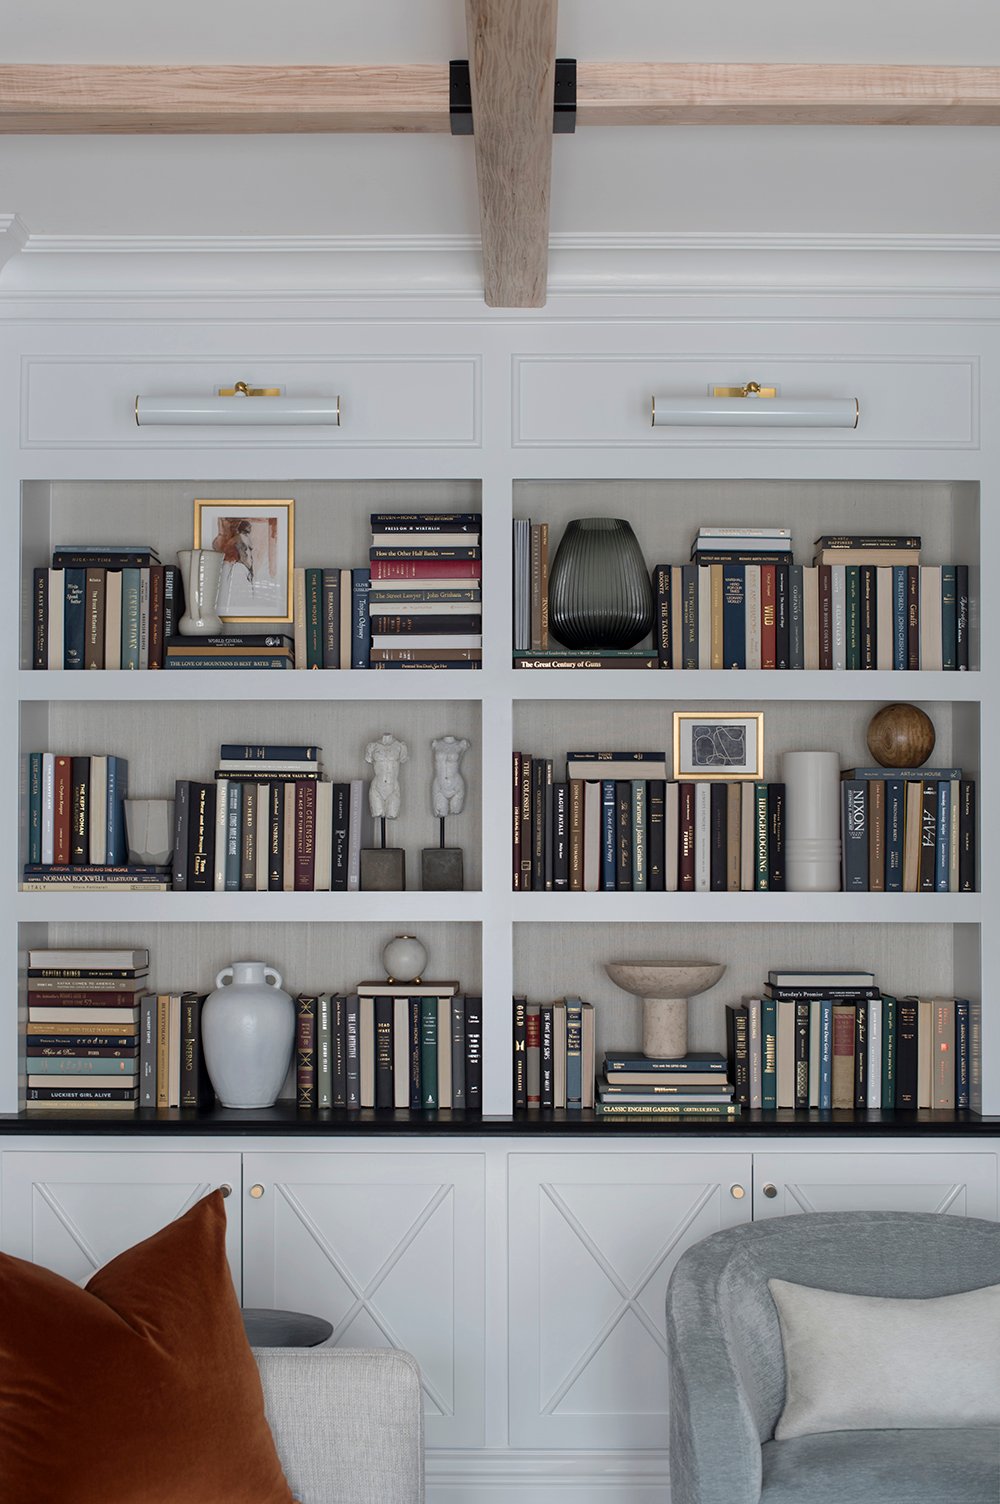 In terms of shelf styling, this time I went heavy on the books. After all- that’s what bookcases are for. You’ll also find vases, vessels, art, and artifacts from our travels tucked throughout. Did you notice the soapstone counter beneath the shelving? We had a partial Polycor slab leftover from our kitchen renovation, so we integrated it into the built-in. I’m a big fan of repeating materials throughout a home for a cohesive, unified look.
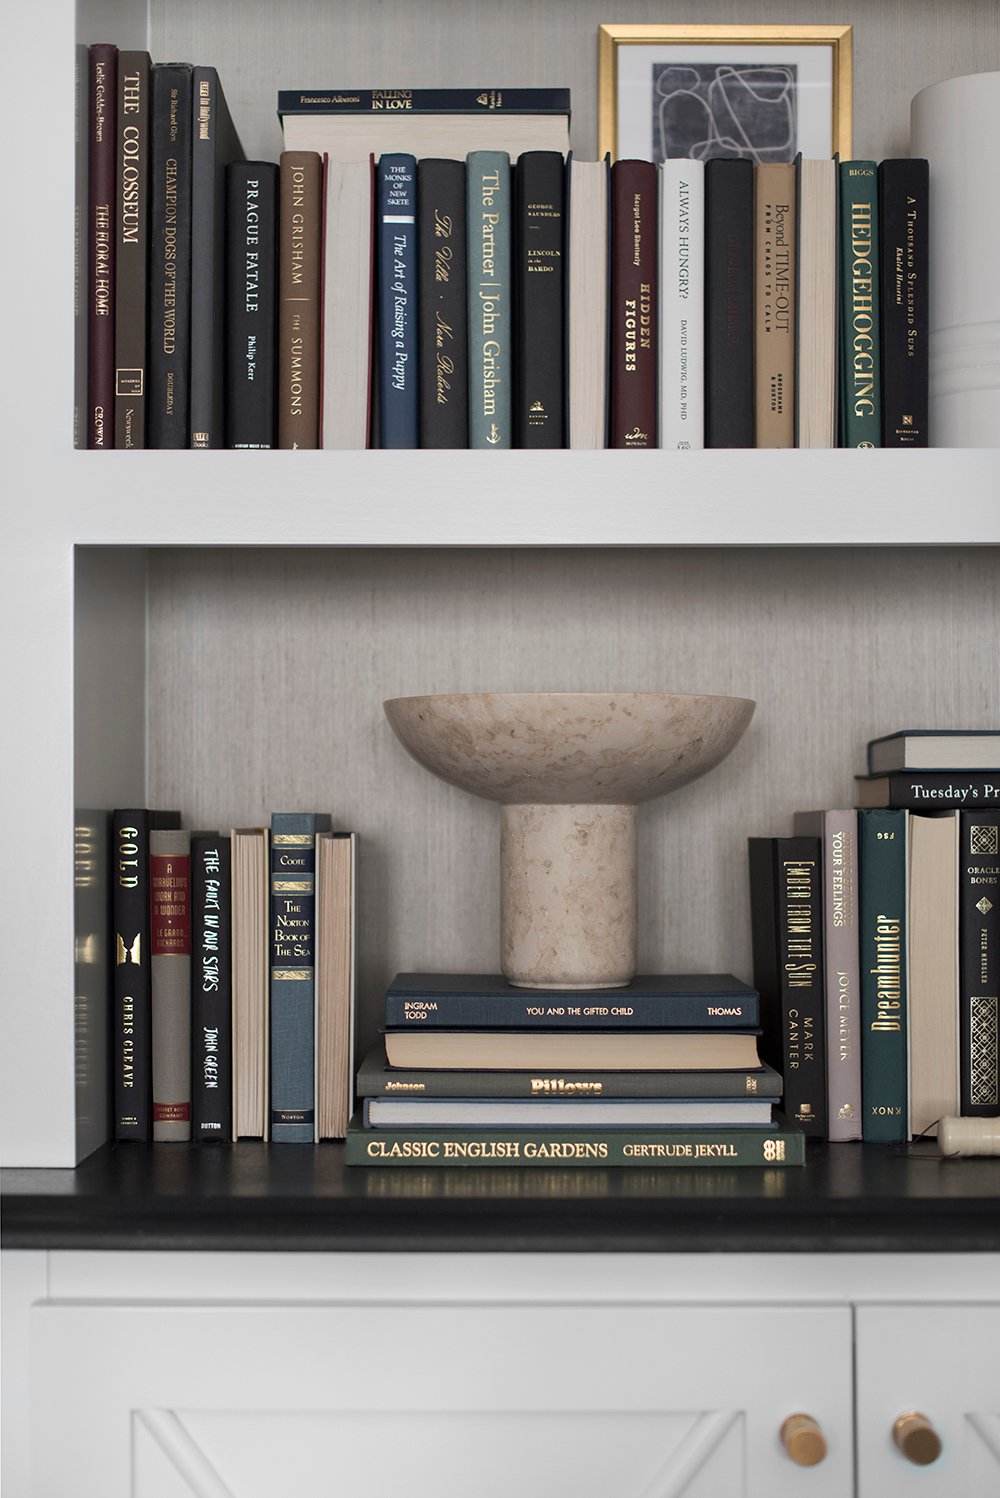 If you’re wondering what we keep in the lower, closed storage portion of the built-ins… we barely have anything down there right now. I’m sure over time, we’ll fill it up and put it to good use, but right now- we keep basic household items in the cabinet: light bulbs, flash lights, shoe bootie covers, etc. Just random odds and ends!
 Moving onto the seating area in the living room… we actually use this space frequently. Emmett and I often hangout in here, and as I previously mentioned- people gravitate toward this room when we entertain. Before we had furniture in this space, our neighbors, Brant & Emily, would sit on the carpeted floor with us. Ha! You know you have good friends when they don’t even care if you have furniture… they still come visit. Well, these days we obviously have furniture and it’s much more comfortable! It’s probably time for a dinner party or something.
 I knew I wanted this room to feel very balanced, in terms of the furniture layout. The space isn’t huge, but I wanted to install comfortable and casual furniture. For seating, I landed on a small curved sofa and two swivel chairs. I liked the idea of swivel chairs so you could turn inward to have a conversation with people seated on the sofa, or turn toward the fireplace for warmth. Swivels are the most versatile lounge chair! These beauties from Overstock fit my color palette and the budget.
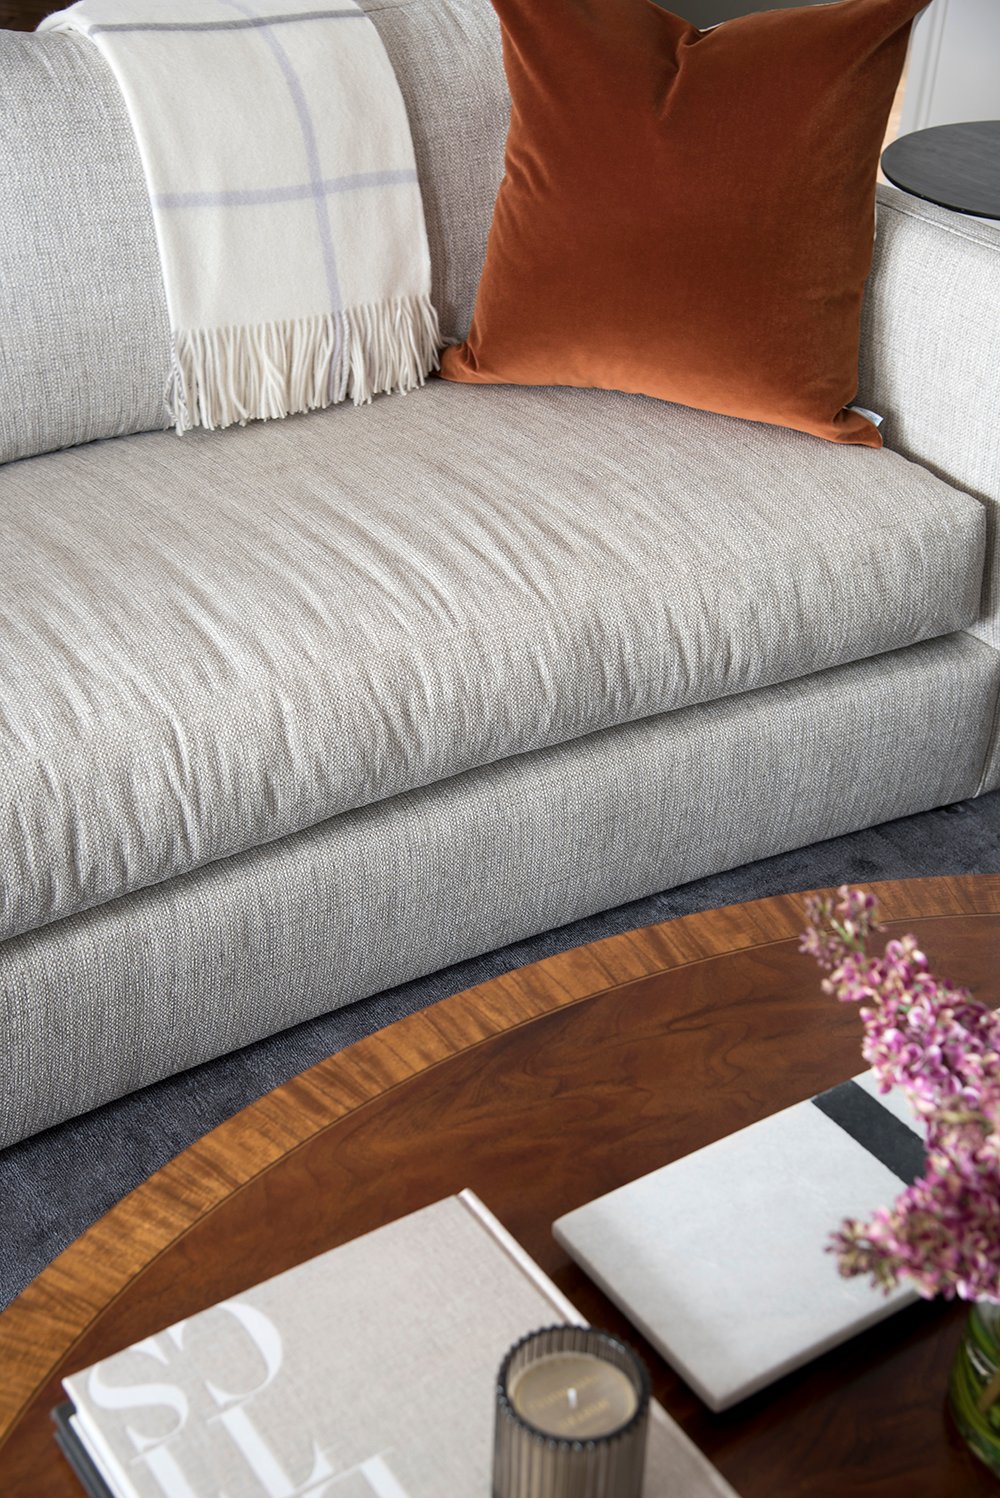
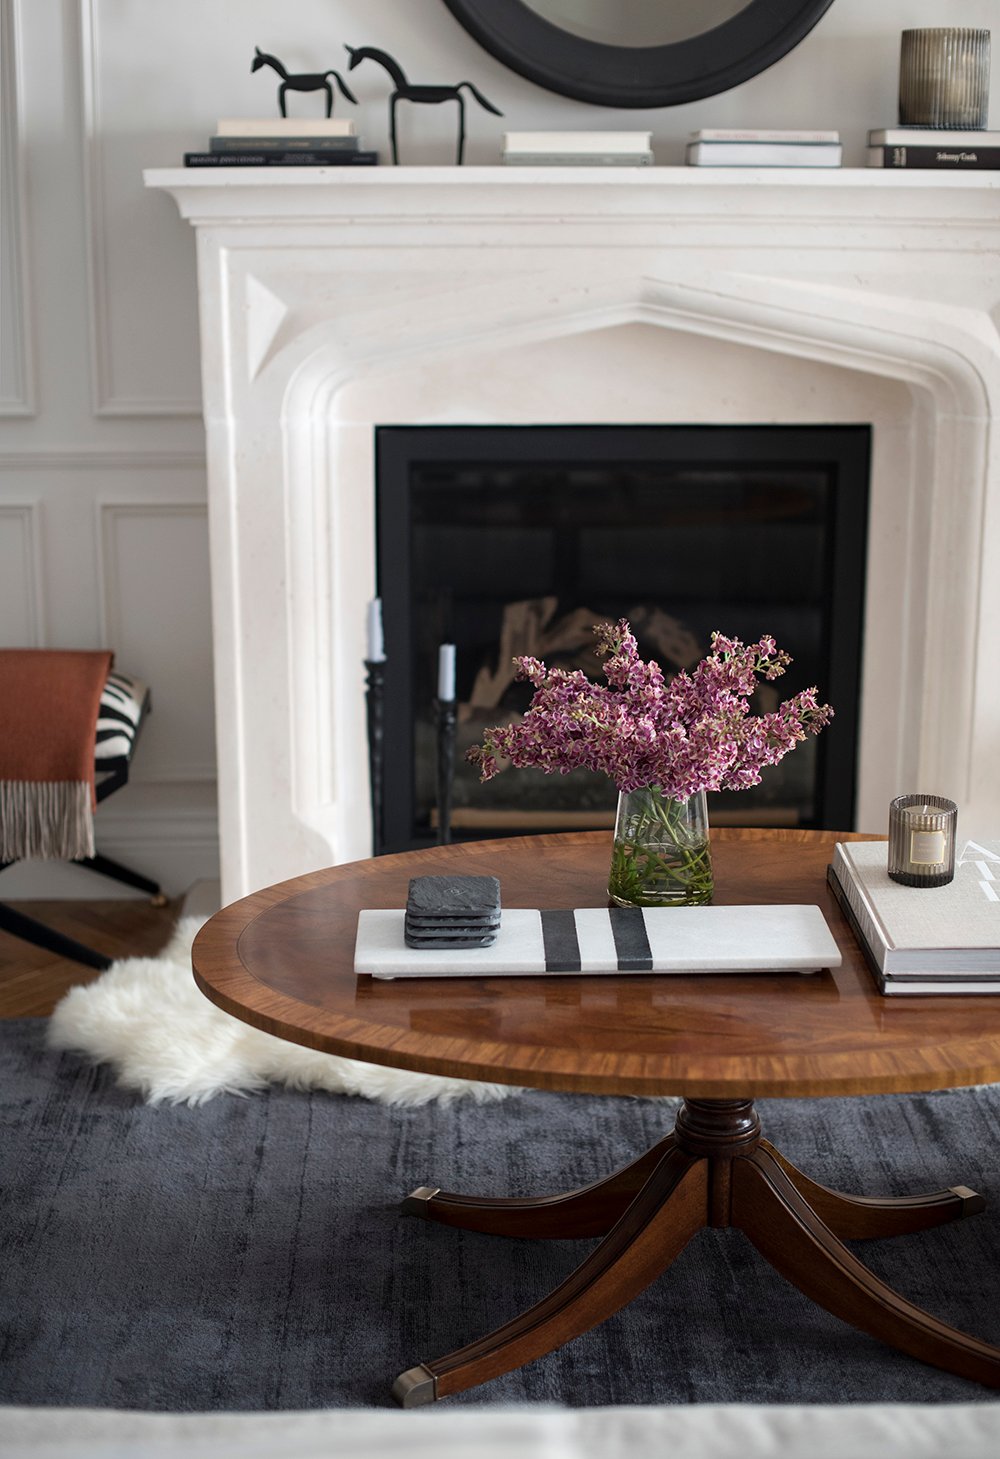
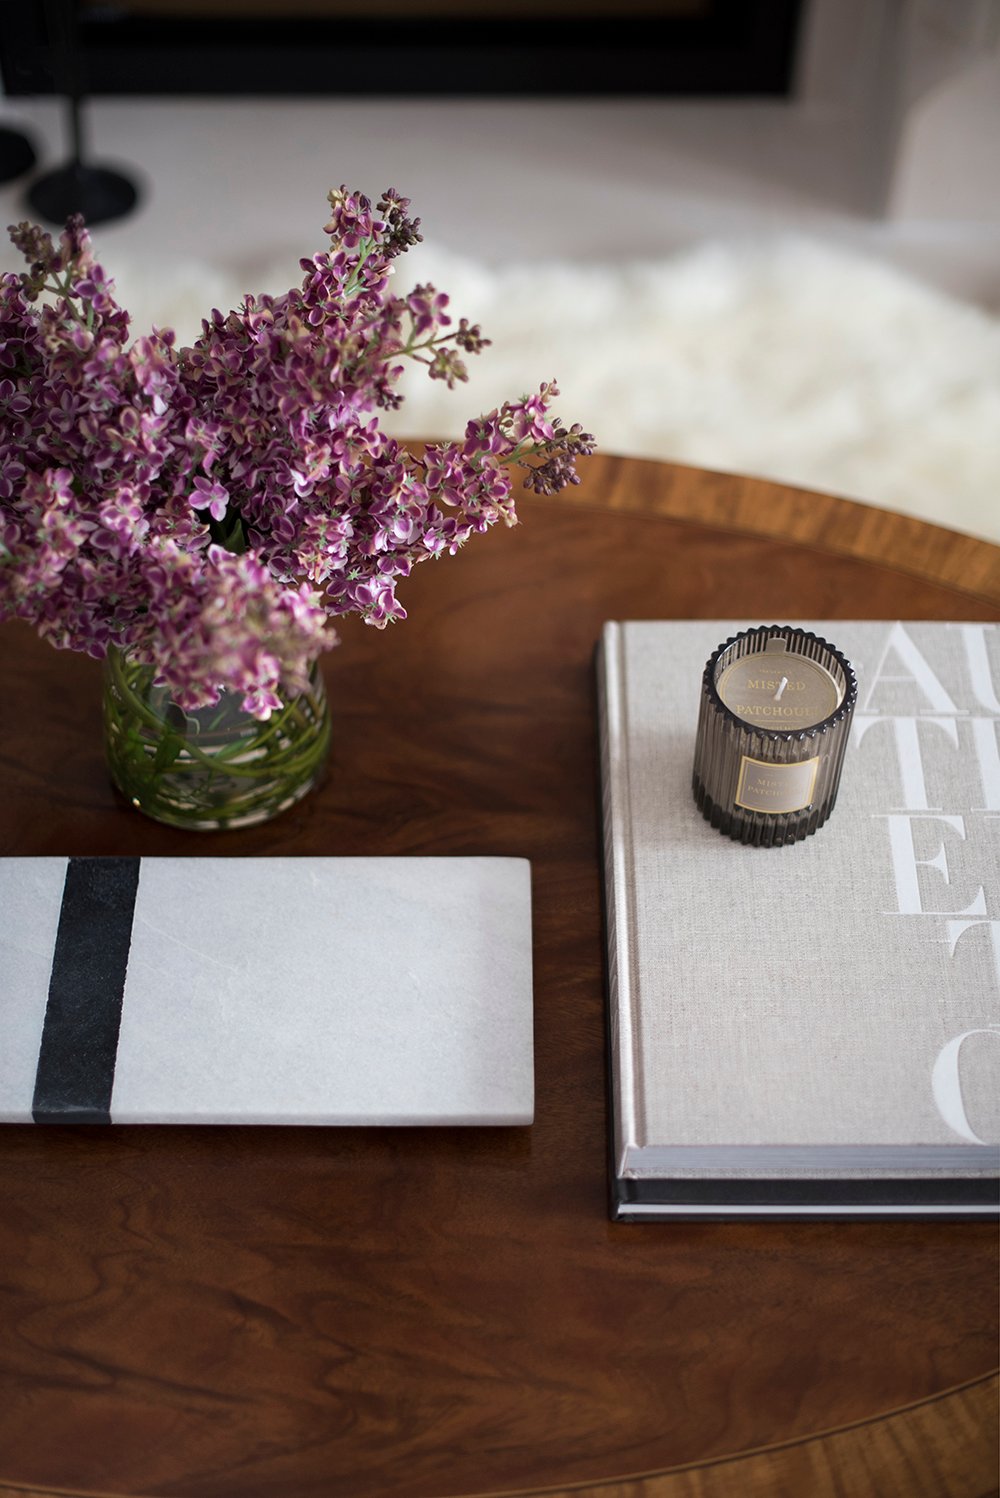
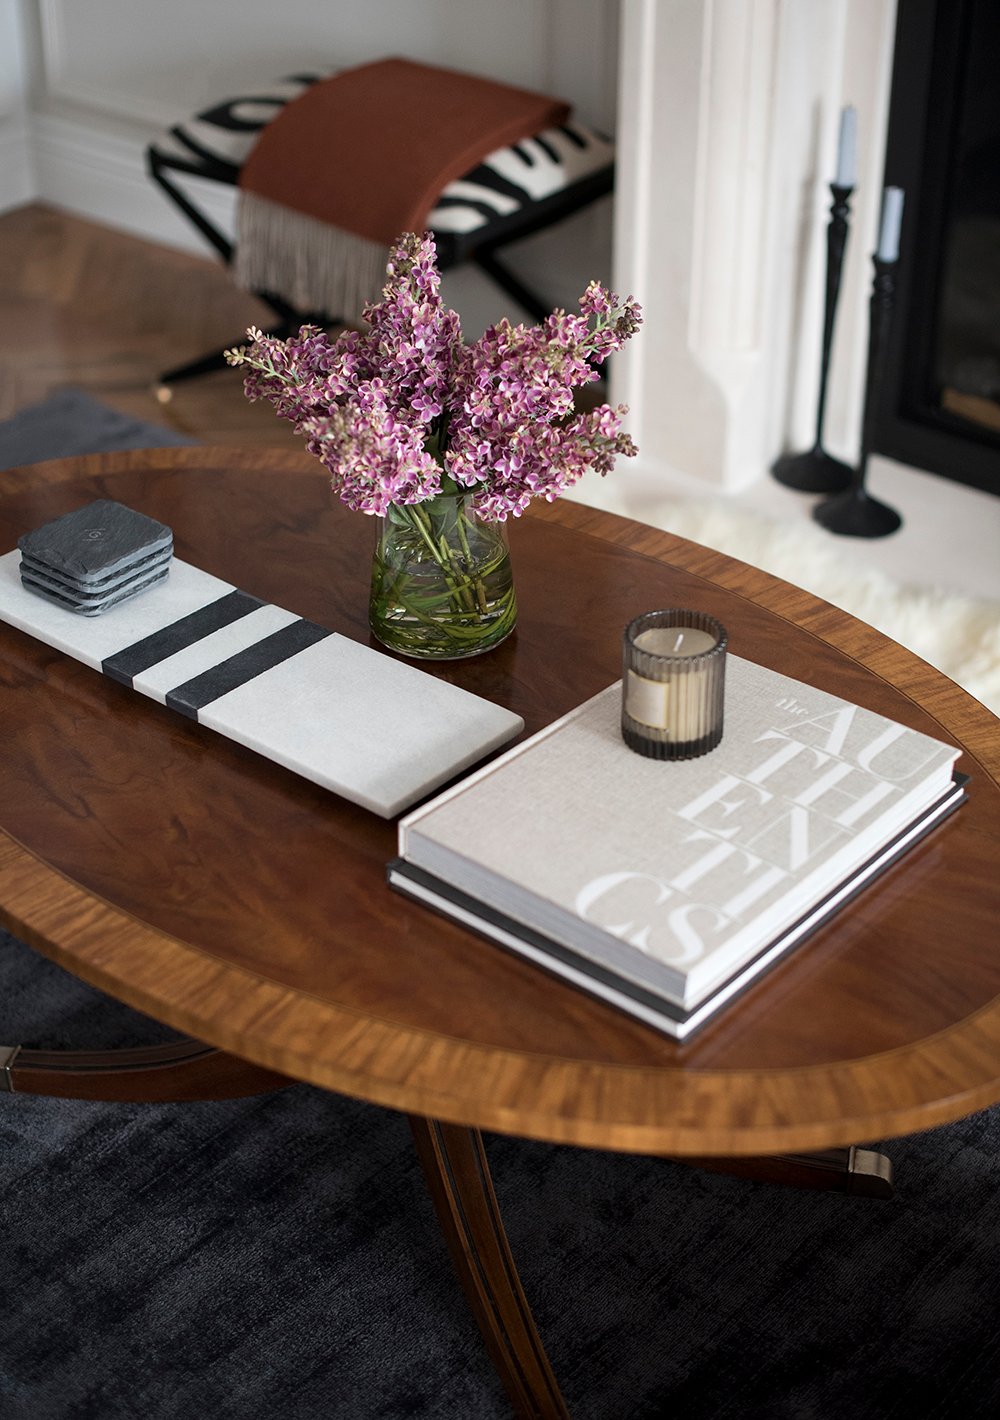 An oval coffee table fit my slightly curved sofa perfectly. It felt like the best shape to maximize the space in our living room. I scored this vintage Ethan Allen table on Facebook Marketplace for under $100. Oval coffee tables are honestly a difficult shape to style. I kept it simple with a couple books, a candle, a marble tray, monogrammed coasters, and a faux floral arrangement. Did you think that was REAL, because I did. It’s probably the most convincing lilac arrangement I’ve ever laid eyes upon. I splurged for those florals because it doesn’t get better (and zero maintenance).
 Above, you’ll see a better view of the sofa profile with the oval coffee table. It’s like these two pieces were made for each other! I love when that happens.
 You’ll also notice a couple other pieces of furniture in the space… the zebra print ottomans (again- these will come in handy for extra seating when entertaining) and some side tables.
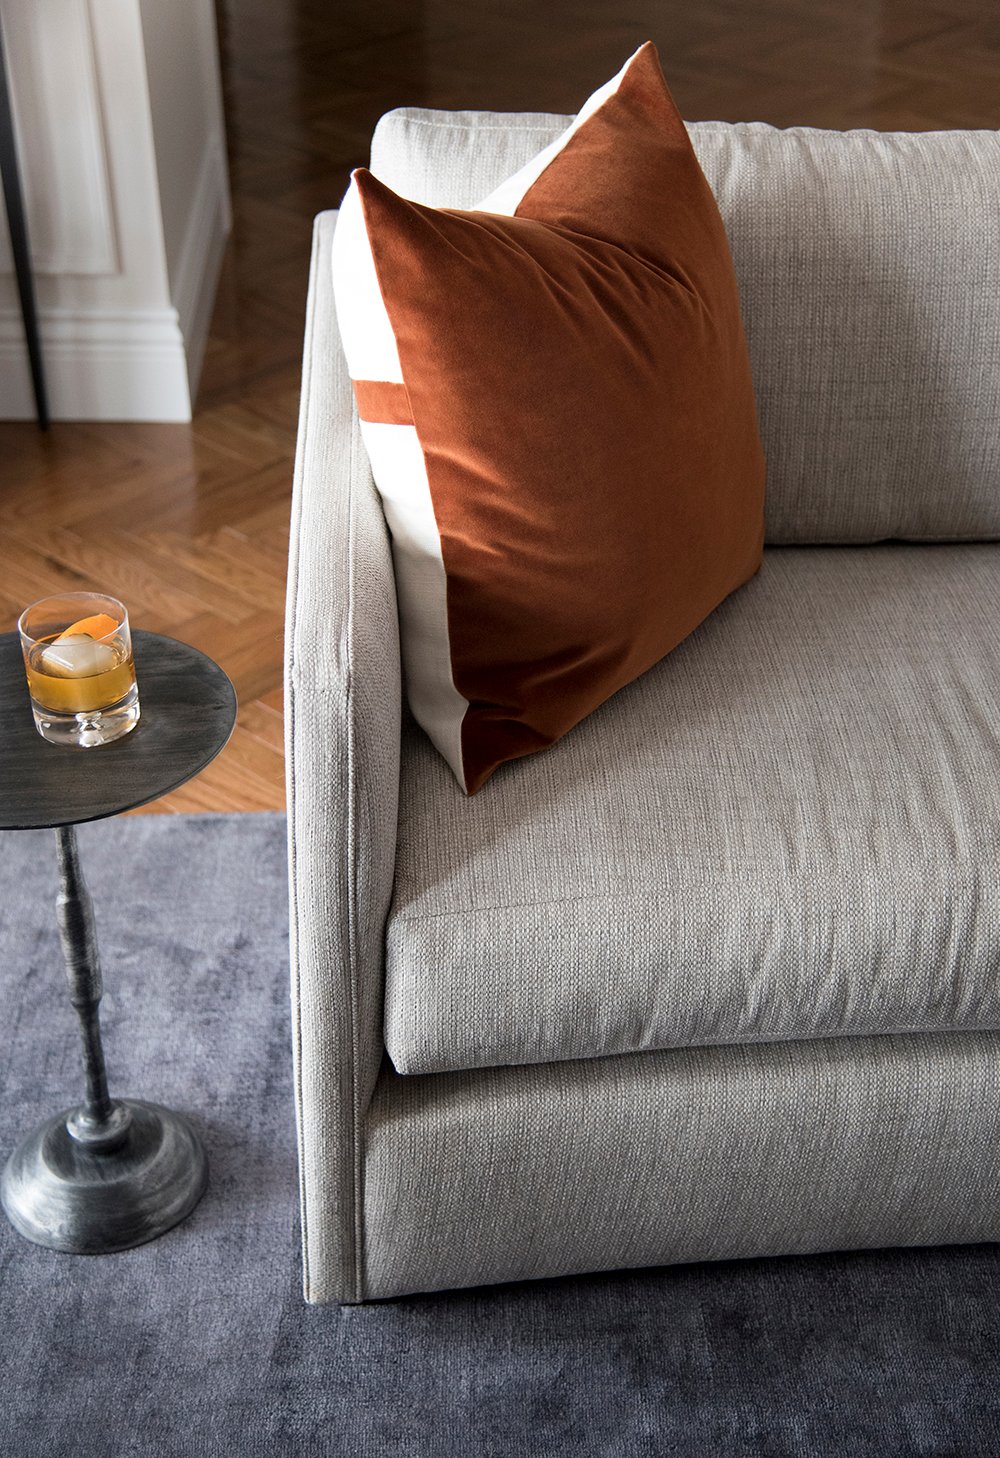 My rule for tables in a living room setting is this… every seat should have a table nearby to rest a drink. If you can’t reach the coffee table, side tables are necessary. They don’t have to be big- just large enough for a drink! Speaking of drinks, after finishing this space yesterday, Emmett poured a celebratory old fashioned (plus a hot toddy for me since I’m sick), we turned on the fireplace, and watched a snowstorm roll in. It felt incredible sitting in this finished room, admiring all of the work we accomplished.
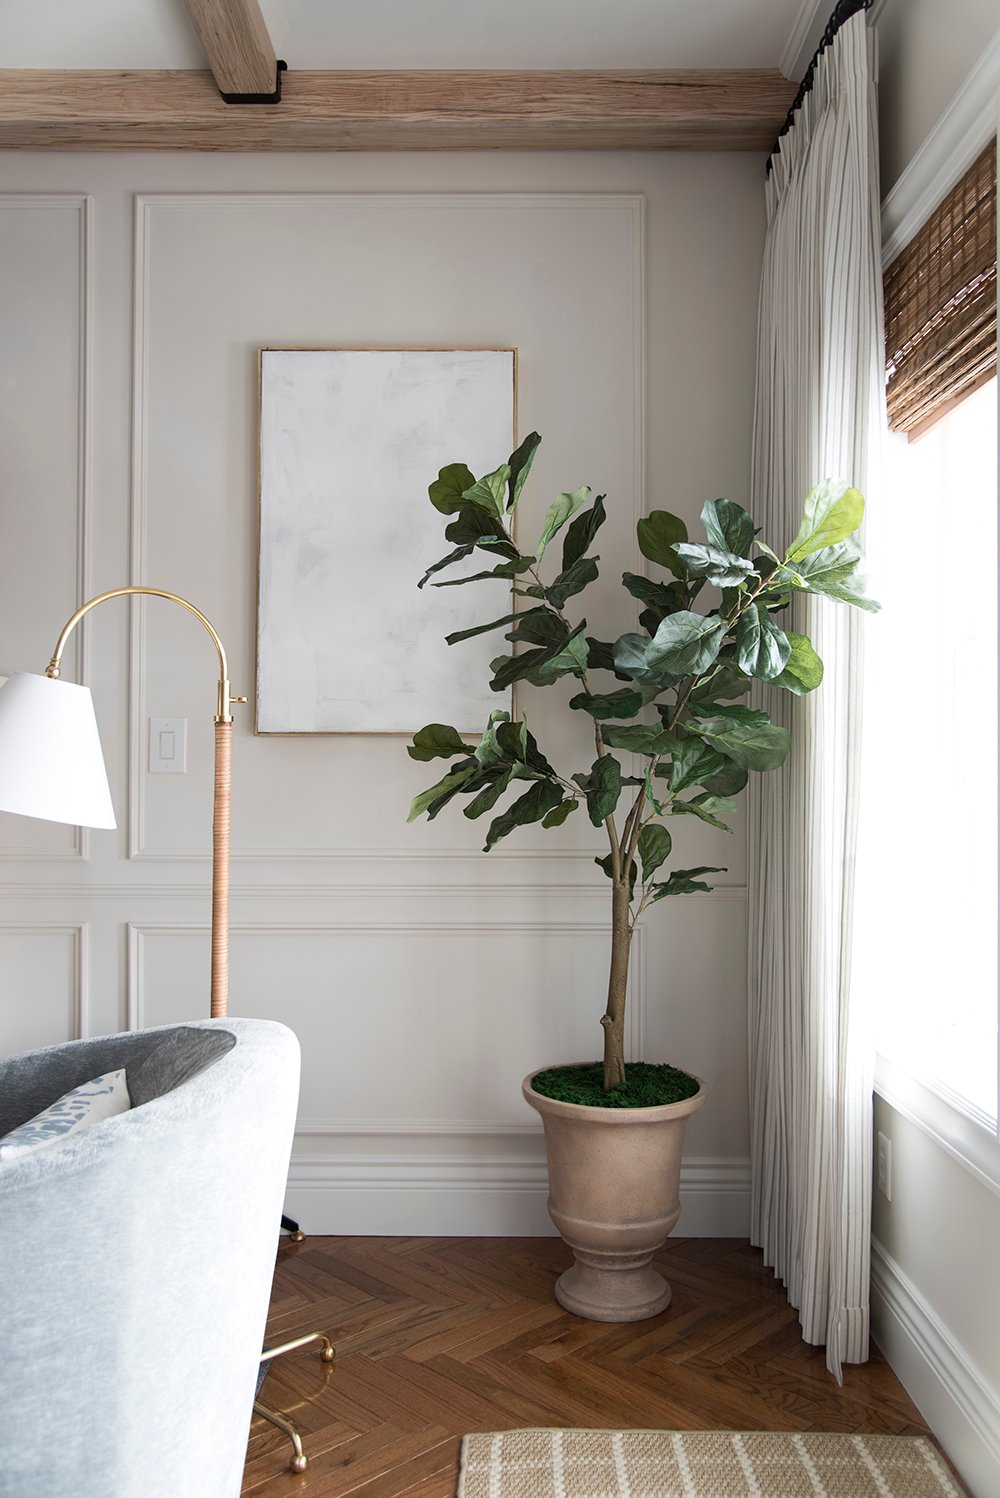
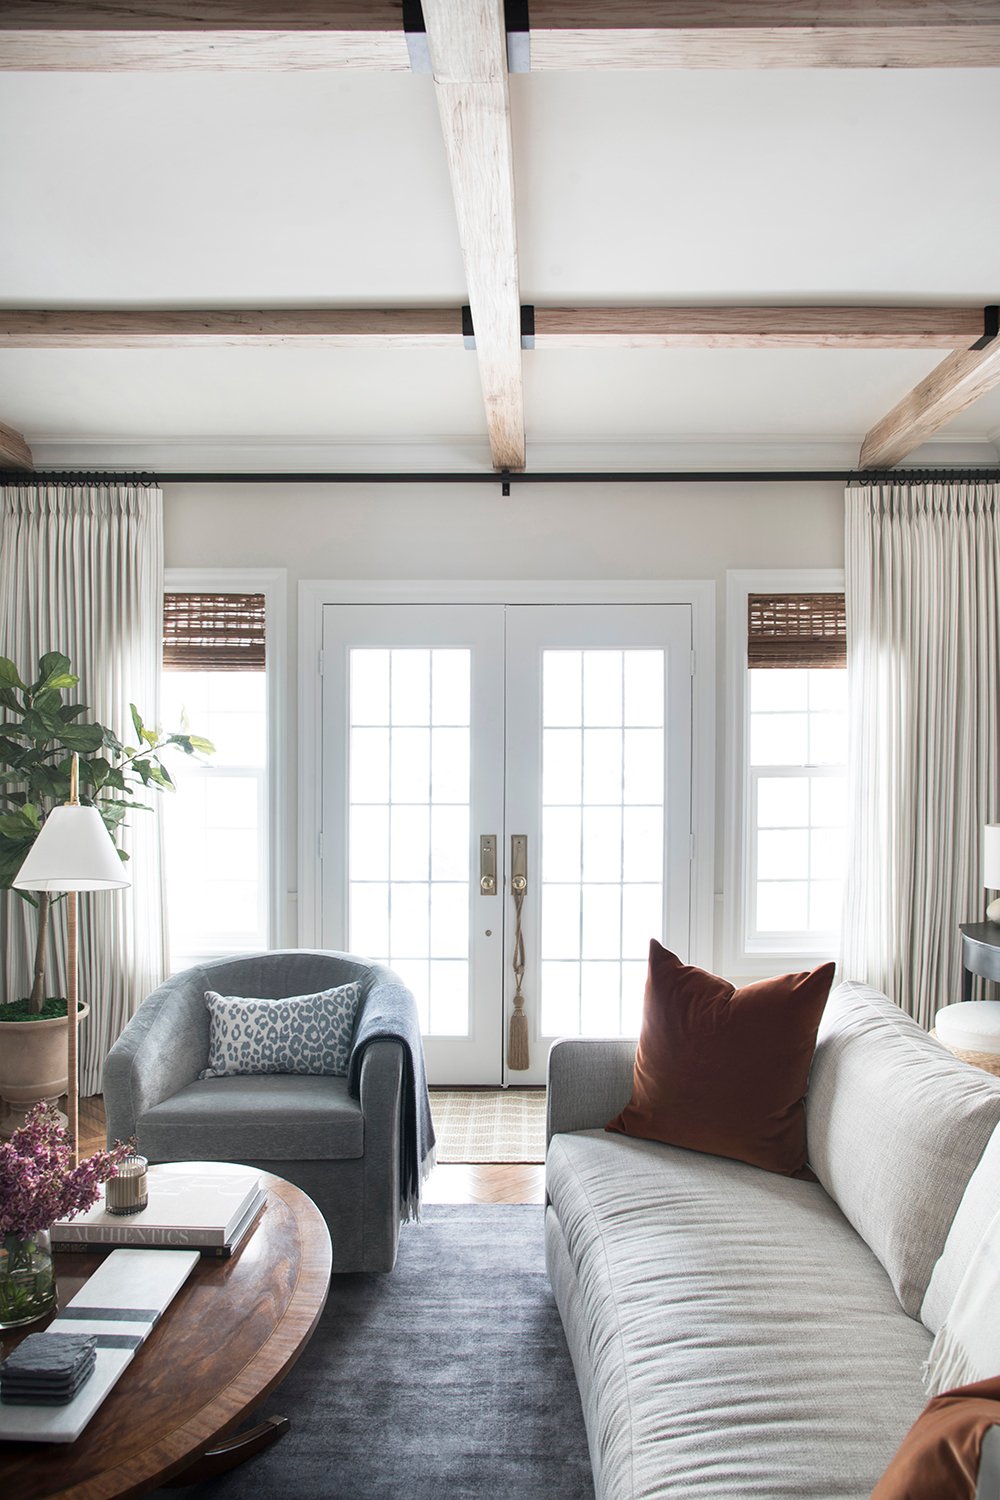 Moving to the other wall, this side of the room also received a lot of attention. After removing the existing bulky plantation shutters, I sanded and painted the doors, everything received updated millwork (that’s all linked in this post), Emmett swapped the door hardware, and we installed custom window treatments. In addition to inexpensive roman shades, I splurged on custom drapery that really softens the space. I went with a triple French pleat drapery panel in this beautiful pinstriped fabric. I had a custom rod made locally, since the span is so large.
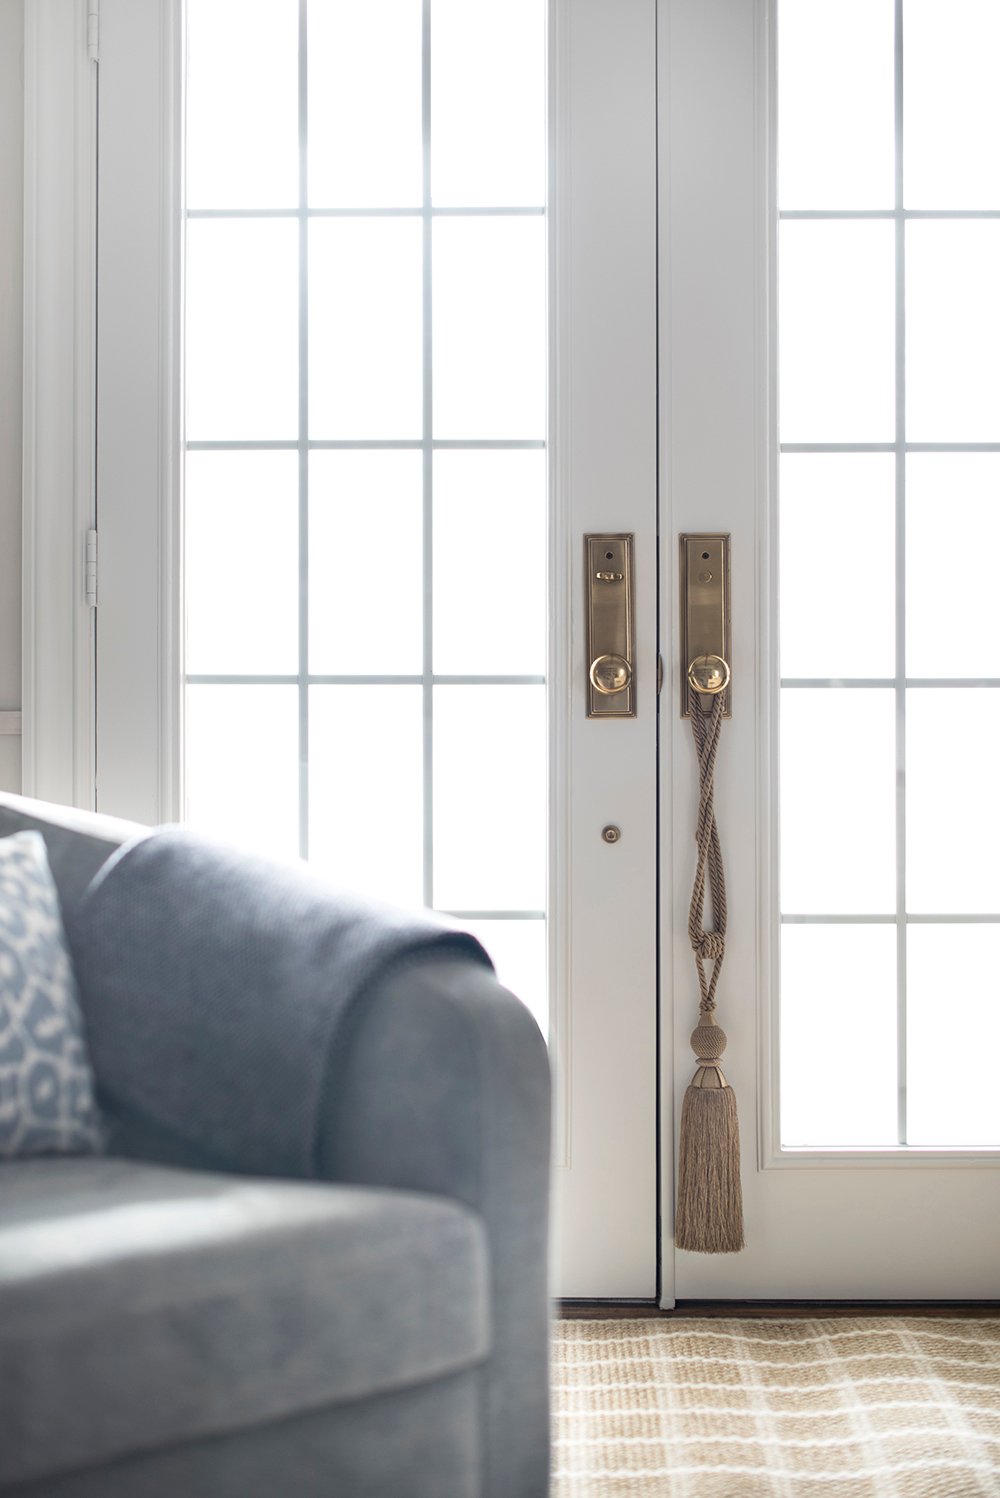 I wasn’t in love with the existing doors and windows, but after dressing them up and giving them the TLC they deserved- they look a thousand times better. I actually like them now!
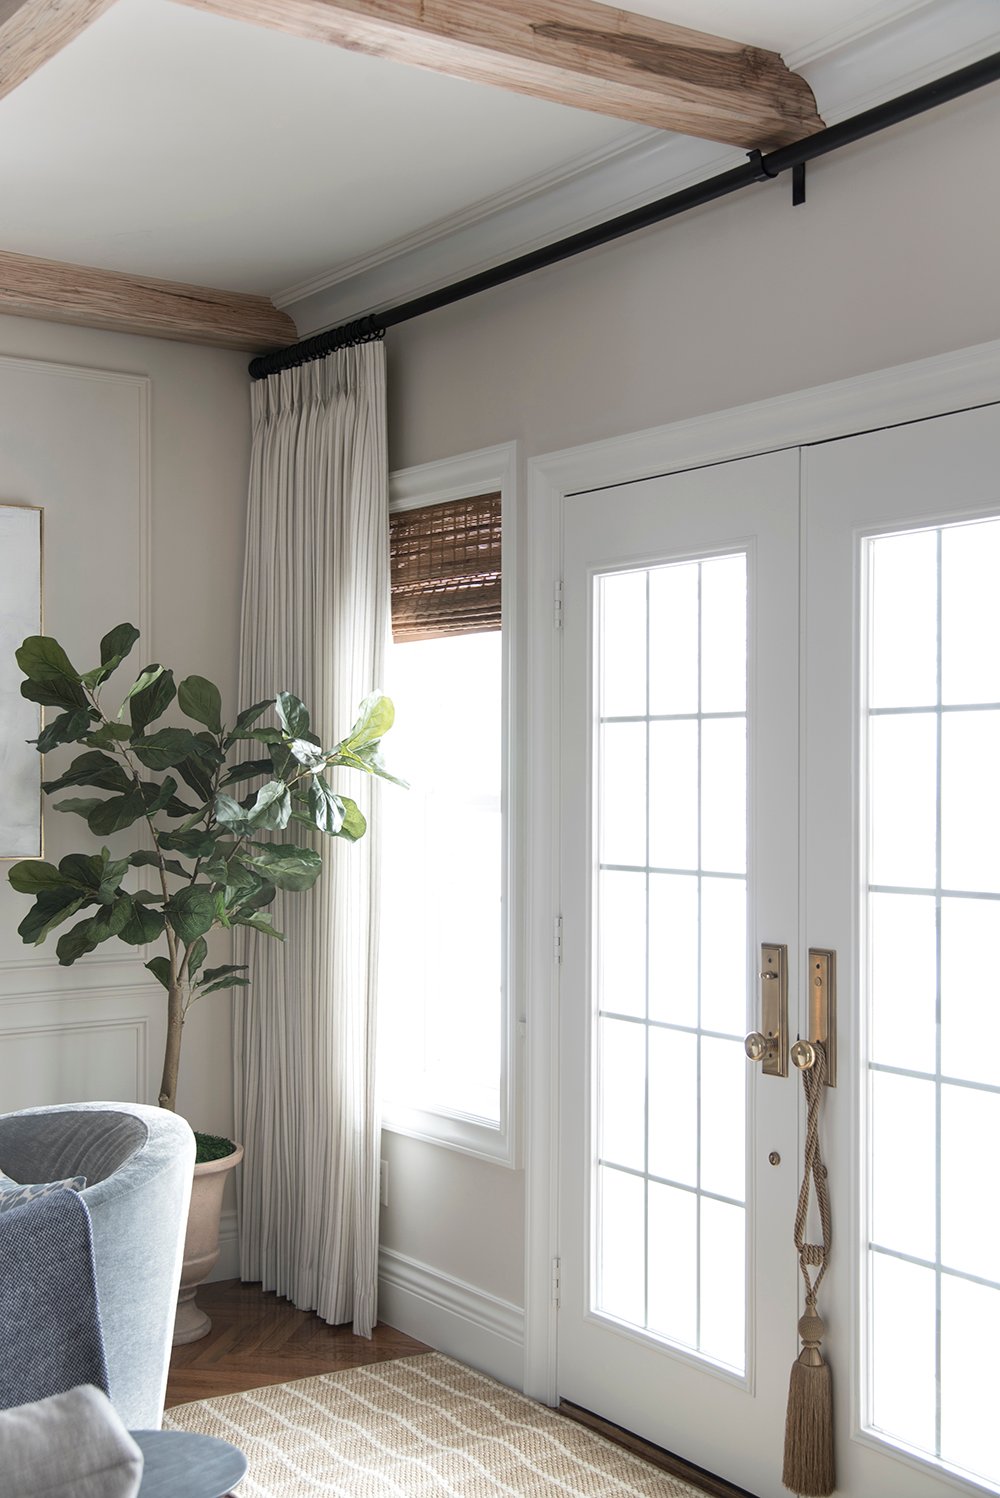 In typical Sarah fashion, I waited until the morning of my photoshoot to add the textiles to the room. I should’ve unrolled the rug by the french doors earlier last week, allowing it time to flatten. Just FYI- if you’re wondering why it’s a little wavy… that’s why. I landed on this woven sisal runner because of its durability. We use these doors multiple times each day to let our dogs into the backyard to play and do their business. They’re constantly running in and out, so this area sees a lot of foot (and paw) traffic. This felt durable against the elements, cleanable, but also more stylistic than a standard door mat. We do have a mat on the opposing side of the door for added foot wiping too.
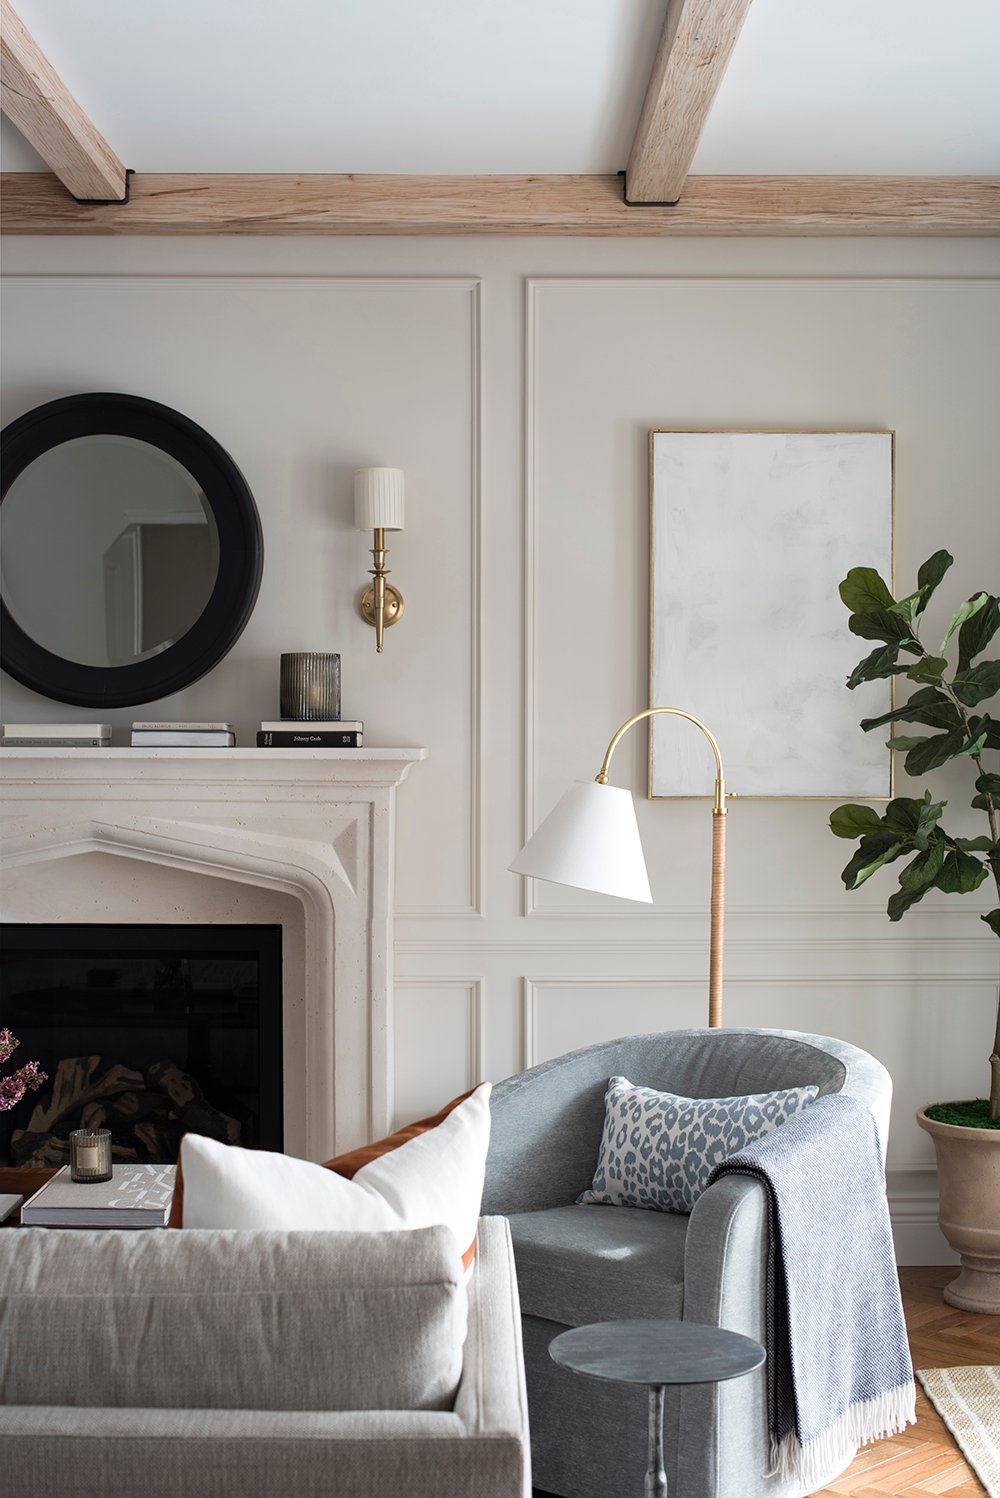
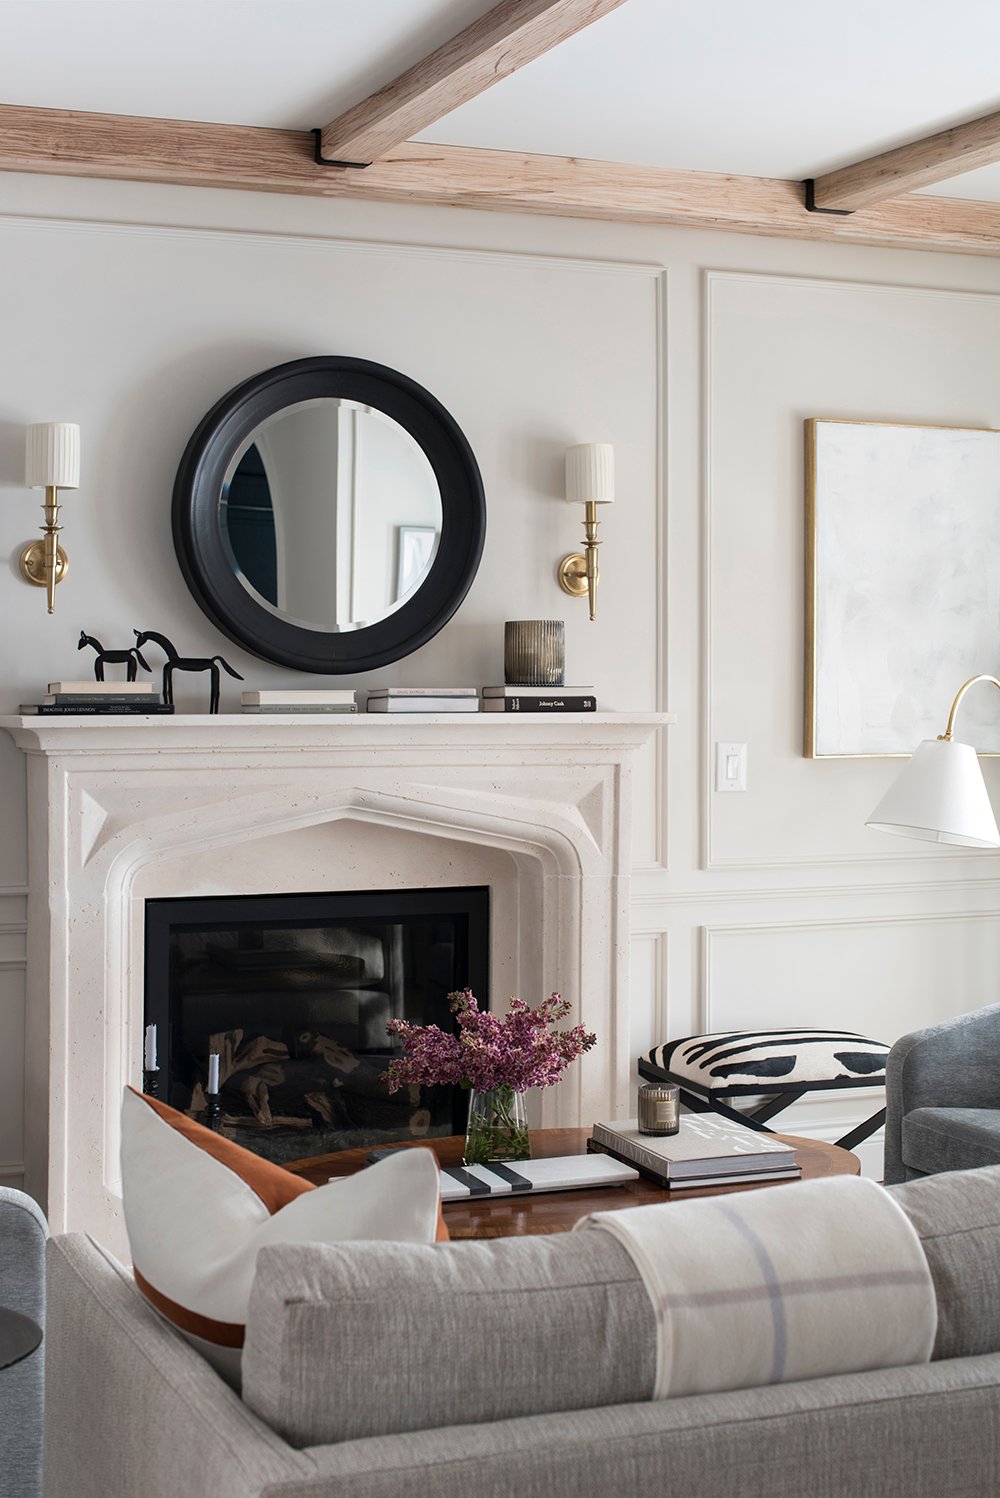
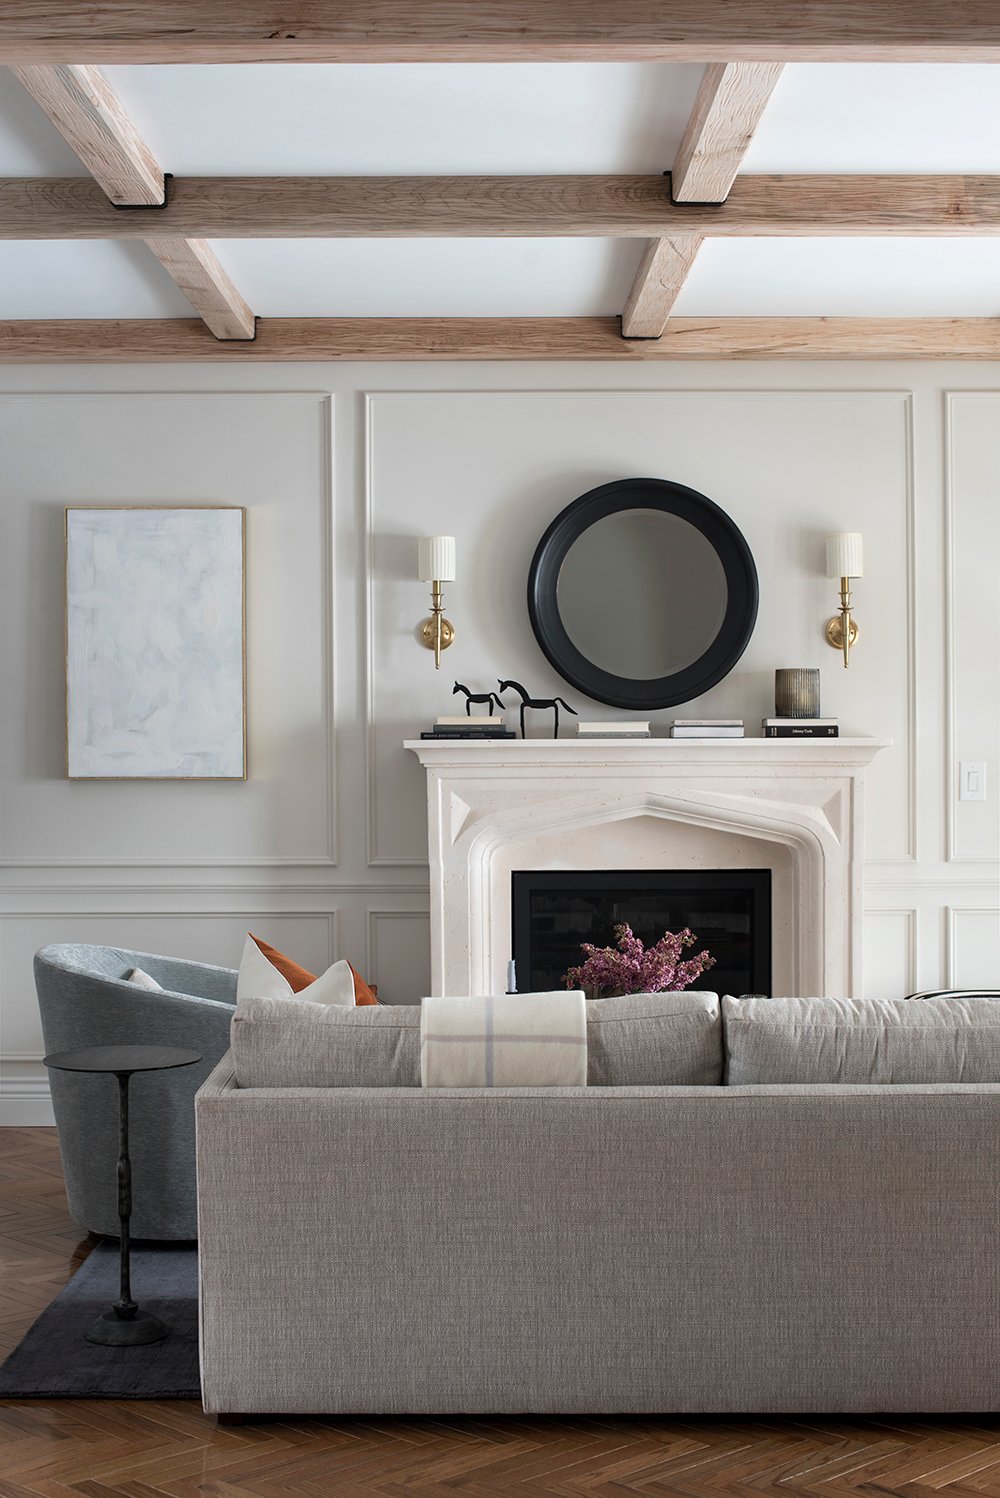 Let’s hop to the fireplace. You can find all sorts of info about the fireplace makeover, the mantel, and the insert in this post. We have actually had the fireplace portion of the renovation finished for quite some time now. If you’re wondering where our pretty herringbone fireplace panels went… they didn’t fit quite right, so I had to send them back and am trying to trade them for the model that actually fits our insert (shopping fail on my part). For now, I’m fine living without those, but ideally- I’d like to add the appropriate panels in the future.
 I also added a couple tapered candles to the hearth for some added drama. I’ve been into colored candles lately and these light blue ones fit my color palette perfectly!
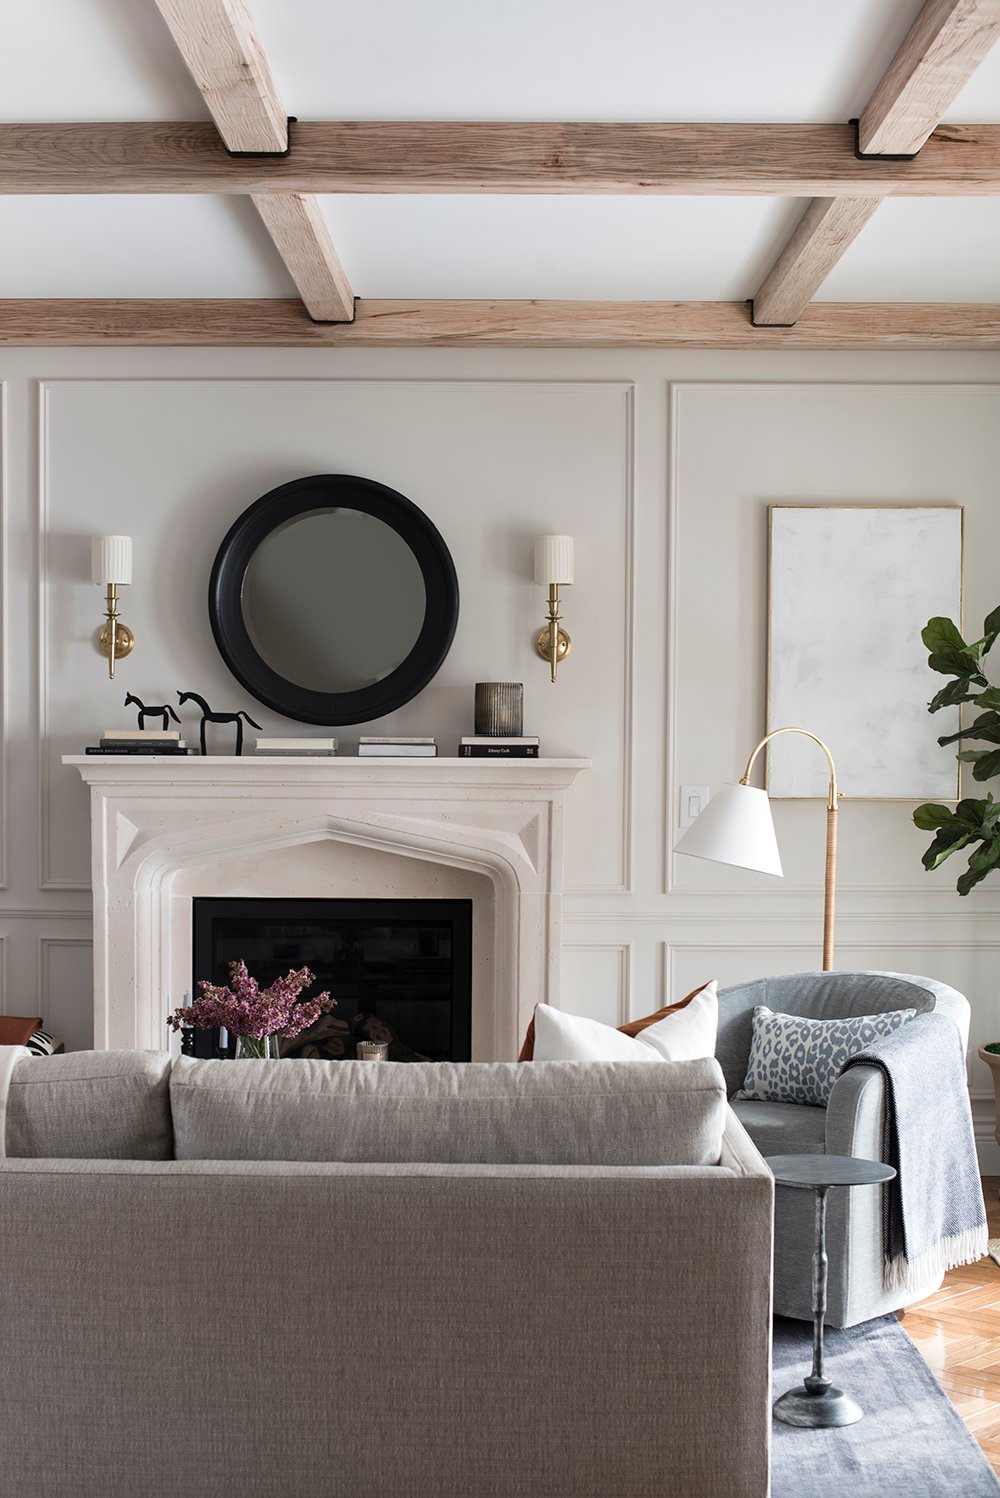
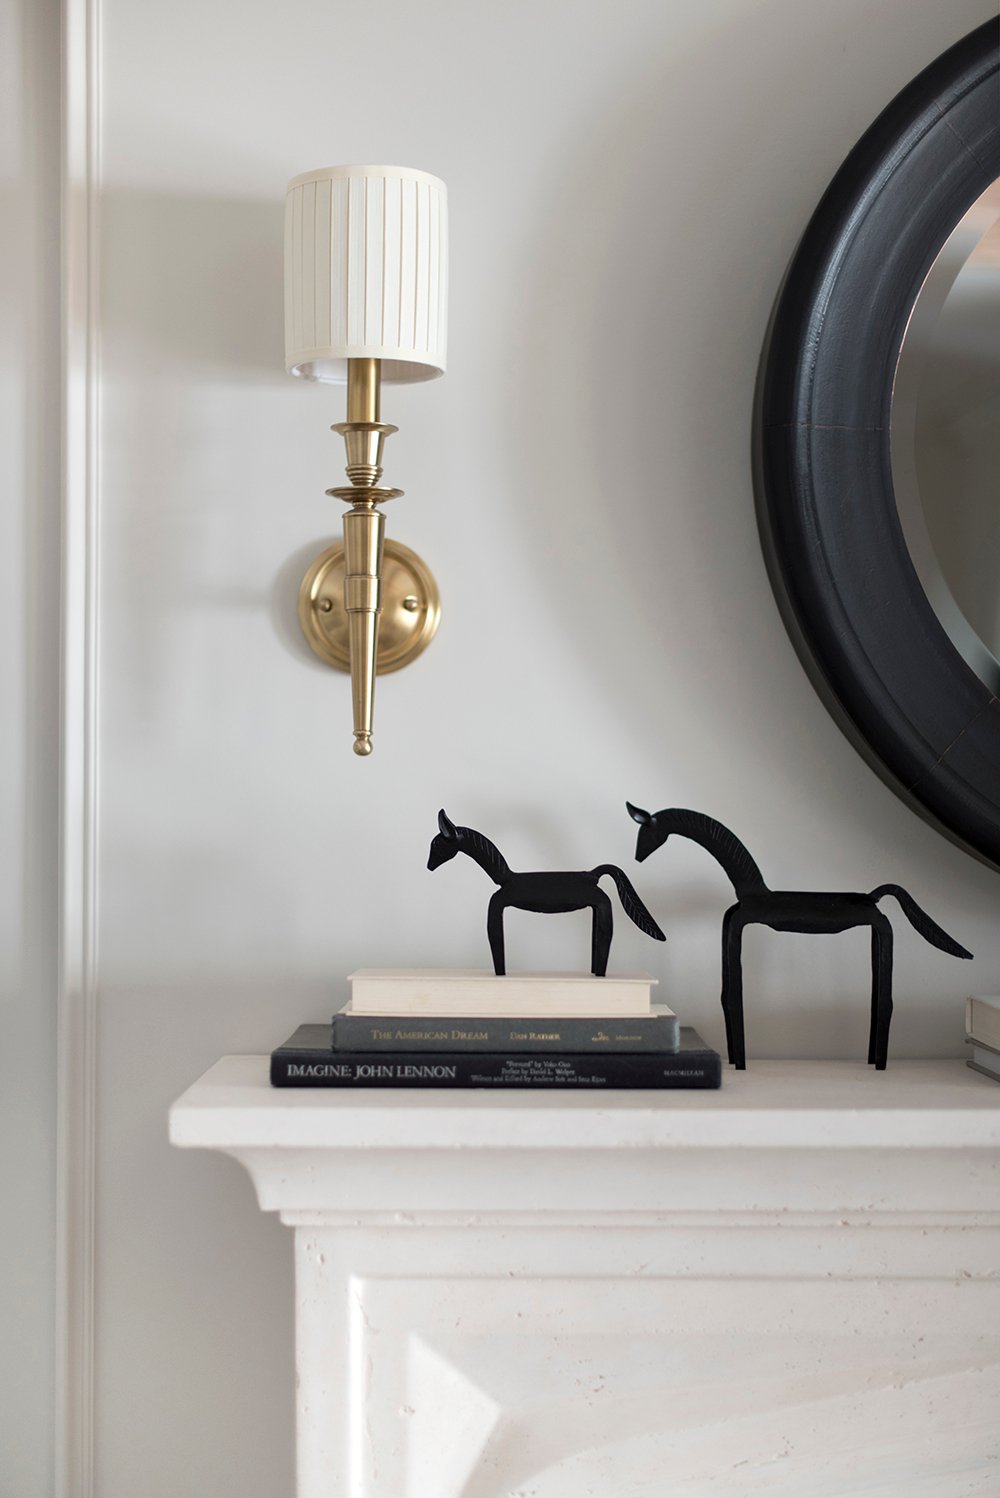 These charming modern metal horses were a birthday gift from Emily. I decided to display them on the mantel because they make me smile. The curve of the tail kind of leads your eye to the center of the mantel and mimics the shape of the mirror, so they’re actually pretty perfect here. Did you guys know I have a picasso tattoo of a horse? It looks pretty similar to these guys, but in a line drawing on my forearm. I digress… how pretty are those sconces? All of my lighting came from Hudson Valley.
 Next, let’s talk textiles… starting with the rugs! I knew I needed a large area rug to ground the furniture… especially since this space is open concept to our dining room. I wanted to make the living room feel segmented and like a separate space. I ended up with this beautiful blue area rug that has the prettiest texture. Another perk? It doesn’t shed. Emmett is about to murder me for our wool rug in the basement right now, because it’s shedding since it’s still new-ish. This checks all of my boxes, and meets his non-shedding requirement. I also layered a sheepskin onto the area rug and hearth to enhance the cozy factor.
 In terms of textile accessories, I added some stunning pillows to the swivel chairs and sofa, thanks to SWD Studio. Those burnt sienna colored cushions on the loveseat are what my design dreams are made of! The backside looks just as beautiful as the front.
 You guys know I’m a fan of snuggling under blankets, so there are lots of those scattered throughout as well. All of my throw blankets came from Garnet Hill. They have the best throws, that feel as luxe as they look.
 I know I’m going to get more questions about sources, so I’m going to link everything I can think of below! Click directly on the items- or use the numbered source links at the bottom of the collage to shop.

01: beams // 02: round mirror // 03: sconce // 04: faux tree // 05: limestone mantel // 06: planter // 07: candle holders // 08: zebra ottoman // 09: squiggle art // 10: sheepskin rug // 11: curved sofa // 12: velvet pillow // 13: area rug // 14: nude art // 15: glass vase // 16: marble tray // 17: leopard pillow // 18: side tables // 19: swivel chairs // 20: floor lamp // 21: cashmere throw // 22: abstract art // 23: asco pot // 24: textured art DIY // 25: bust bookend // 26: alabaster lamp // 27: entry door hardware // 28: drapery fabric // 29: console table // 30: scallop ottoman // 31: faux floral arrangement // 32: woven roman shade // 33: picture light // 34: magnifying glass // 35: woven sisal rug …. PAINT COLORS: trim- Extra White by Sherwin-Williams // walls- Aesthetic White by Sherwin-Williams
If I forgot anything, just ask for the source in the comment section and I’d be happy to share additional info!
 I owe my One Room Challenge sponsors a BIG thank you for making this possible- and for being so understanding in terms of our construction schedule. Every single brand supported me and encouraged me to execute my initial vision, despite the delay. For that, I am so grateful and would love to sing their praises even louder, because the best part of working with brands & products I love is the incredible PEOPLE behind the them. Shouting a giant thank you to the following (they have earned my business and gratitude for years to come):
- Emtek
- Fabricut
- Garnet Hill
- Handy Paint Products
- Hudson Valley Lighting
- Lamps Plus
- Minted
- Mainly Baskets
- Overstock
- SWD Studio
 Even though the One Room Challenge finished months ago, I still want to link the other talented designers who participated. They cheered me on every step of the way and their reveals turned out amazing. If you missed any of these, they’re worth a look…

linked below…
At Charlotte’s House | Design Addict Mom | Erika Ward Interiors | Erin Kestenbaum | Girl & Grey
Gray Malin | Hommeboys | I Spy DIY | Jewel Marlowe | The Learner Observer | Making it Lovely
Nicole White Designs | Old Brand New | Oscar Bravo Home | Place of My Taste | The Rath Project
Room for Tuesday | SG Style | Undecorated Home | Veronica Solomon | Media BH&G | TM by ORC
I’ll be sure to share an IG tour on stories so you can get a feel for the room “in person” either later today or tomorrow. As always, you know I love hearing your thoughts in the comment section below. I owe YOU guys a big thank you for sticking with me and following along, even after the One Room Challenge ended. Emmett and I couldn’t have done it without your encouragement and positivity. Thank you for always showing up and making us smile! We love and appreciate you.
